- REMOVE KICK DOOR CONTROL BRACKET (w/ Hands Free Power Trunk Lid)
- w/o Advanced Drive:
Refer to PROCEDURE - Step 5
- w/ Advanced Drive:
Refer to PROCEDURE - Step 6
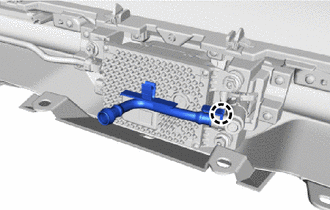
- REMOVE REAR NO. 6 LiDAR CLEANER HOSE (w/ Advanced Drive)
- Detach the claw and remove the rear No. 6 LiDAR cleaner hose.
 Courtesy of © TOYOTA, LICENSE AGREEMENT TMS1002 Courtesy of © TOYOTA, LICENSE AGREEMENT TMS1002
|
- REMOVE REAR LiDAR ADVANCED DRIVE SENSOR ASSEMBLY (w/ Advanced Drive)
- REMOVE REAR LiDAR CLEANER COVER (w/ Advanced Drive)
- REMOVE REAR LiDAR CLEANER NOZZLE (w/ Advanced Drive)
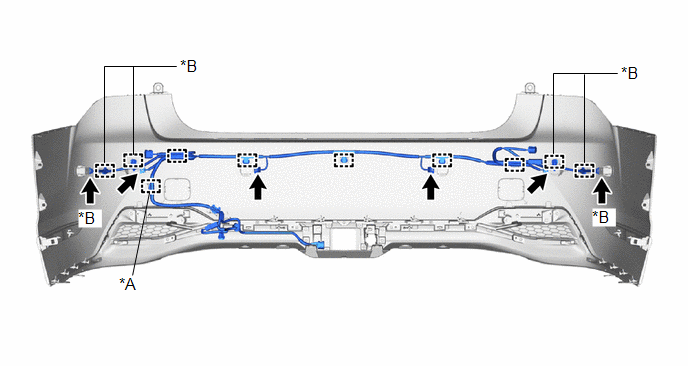
- REMOVE NO. 3 LUGGAGE ROOM WIRE
- Disconnect each connector.
 Courtesy of © TOYOTA, LICENSE AGREEMENT TMS1002 Courtesy of © TOYOTA, LICENSE AGREEMENT TMS1002
|
| *A |
w/ Hands Free Power Trunk Lid |
*B |
w/ Advanced Park |
NOTE:
Do not apply excessive loads to the retainer. Otherwise, it may peel off.
- Detach the clamp and remove the No. 3 luggage room wire.
- REMOVE REAR SIDE ULTRASONIC SENSOR (w/ Advanced Park)
Refer to PROCEDURE - Step 6
- REMOVE REAR SIDE ULTRASONIC SENSOR RETAINER (w/ Advanced Park)
Refer to PROCEDURE - Step 7
- REMOVE ULTRASONIC SENSOR CLIP
Refer to PROCEDURE - Step 8
- REMOVE REAR CORNER ULTRASONIC SENSOR
Refer to PROCEDURE - Step 9
- REMOVE REAR CORNER ULTRASONIC SENSOR RETAINER
Refer to PROCEDURE - Step 10
- REMOVE REAR CENTER ULTRASONIC SENSOR
Refer to PROCEDURE - Step 11
- REMOVE REAR CENTER ULTRASONIC SENSOR RETAINER
Refer to PROCEDURE - Step 12
- REMOVE REAR ULTRASONIC SENSOR CLIP
Refer to PROCEDURE - Step 13
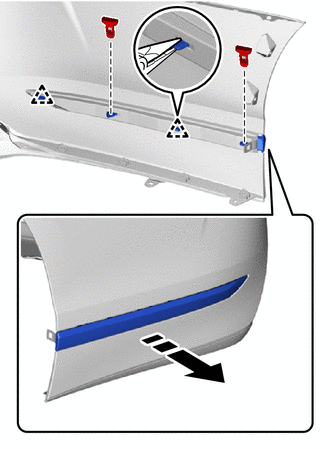
- REMOVE REAR BUMPER SIDE MOULDING LH
- Remove the 2 outside moulding retainers.
 Courtesy of © TOYOTA, LICENSE AGREEMENT TMS1002 Courtesy of © TOYOTA, LICENSE AGREEMENT TMS1002
|
 |
Remove in this Direction |
- Using needle-nose pliers, detach the clip and remove the rear bumper side moulding LH as shown in the illustration.
- REMOVE REAR BUMPER SIDE MOULDING RH
HINT:
Use the same procedure described for the LH side.
- REMOVE REFLEX REFLECTOR ASSEMBLY LH
- Remove the screw.
 Courtesy of © TOYOTA, LICENSE AGREEMENT TMS1002 Courtesy of © TOYOTA, LICENSE AGREEMENT TMS1002
|
|
Remove in this Direction |
- Detach the guide and claw and remove the reflex reflector assembly LH as shown in the illustration.
- REMOVE REFLEX REFLECTOR ASSEMBLY RH
HINT:
Use the same procedure described for the LH side.
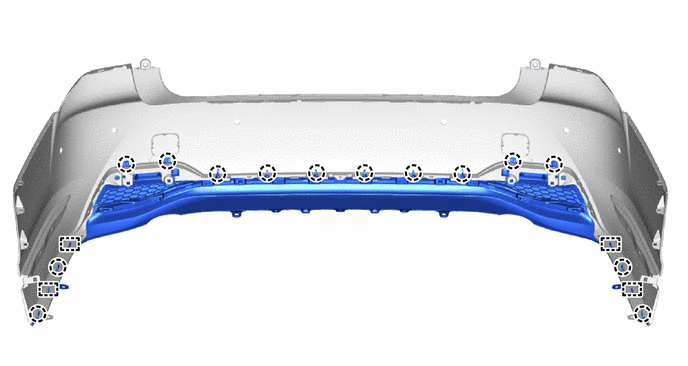
- REMOVE REAR BUMPER LOWER COVER
- Remove the 4 outside moulding retainers.
 Courtesy of © TOYOTA, LICENSE AGREEMENT TMS1002 Courtesy of © TOYOTA, LICENSE AGREEMENT TMS1002
|
HINT:
Use the same procedure for the other side.
- Remove the 2 clips.
 Courtesy of © TOYOTA, LICENSE AGREEMENT TMS1002 Courtesy of © TOYOTA, LICENSE AGREEMENT TMS1002
|
HINT:
Use the same procedure for the other side.
- Remove the 6 outside moulding retainers.
 Courtesy of © TOYOTA, LICENSE AGREEMENT TMS1002 Courtesy of © TOYOTA, LICENSE AGREEMENT TMS1002
|
- Detach the guide and claw and remove the rear bumper lower cover.
 Courtesy of © TOYOTA, LICENSE AGREEMENT TMS1002 Courtesy of © TOYOTA, LICENSE AGREEMENT TMS1002
|
- REMOVE REAR BUMPER CENTER MOULDING (w/o Advanced Drive)
- Remove the 6 screws.
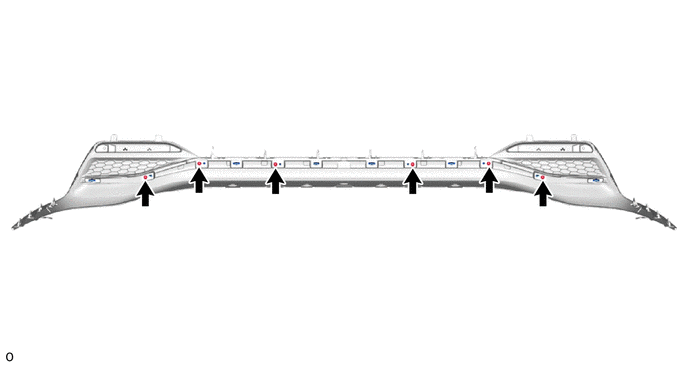 Courtesy of © TOYOTA, LICENSE AGREEMENT TMS1002 Courtesy of © TOYOTA, LICENSE AGREEMENT TMS1002
|
- Using needle-nose pliers, detach the clip.
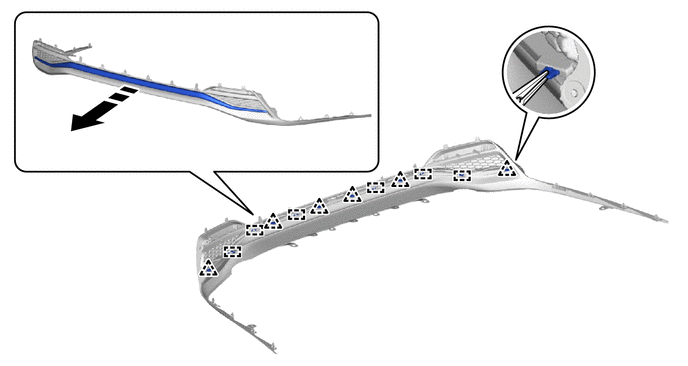 Courtesy of © TOYOTA, LICENSE AGREEMENT TMS1002 Courtesy of © TOYOTA, LICENSE AGREEMENT TMS1002
|
|
Remove in this Direction |
- |
- |
- Detach the guide and remove the rear bumper center moulding as shown in the illustration.
- REMOVE REAR BUMPER EXTENSION MOULDING LH (w/ Advanced Drive)
- Remove the 3 screws.
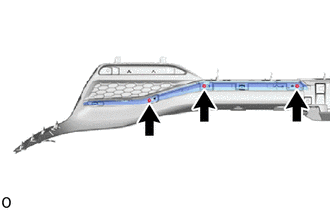 Courtesy of © TOYOTA, LICENSE AGREEMENT TMS1002 Courtesy of © TOYOTA, LICENSE AGREEMENT TMS1002
|
- Using needle-nose pliers, detach the clip.
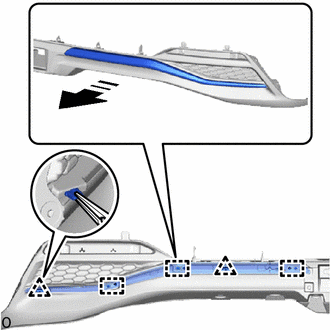 Courtesy of © TOYOTA, LICENSE AGREEMENT TMS1002 Courtesy of © TOYOTA, LICENSE AGREEMENT TMS1002
|
|
Remove in this Direction |
- Detach the guide and remove the rear bumper extension moulding LH as shown in the illustration.
- REMOVE REAR BUMPER EXTENSION MOULDING RH (w/ Advanced Drive)
HINT:
Use the same procedure described for the LH side.
- REMOVE REAR BUMPER PIECE LH
- Detach the claw.
 Courtesy of © TOYOTA, LICENSE AGREEMENT TMS1002 Courtesy of © TOYOTA, LICENSE AGREEMENT TMS1002
|
|
Remove in this Direction |
- Detach the anti-drop hook and remove the rear bumper piece LH as shown in the illustration.
- REMOVE REAR BUMPER PIECE RH
HINT:
Use the same procedure described for the LH side.
- REMOVE NO. 1 MOULDING TAPE
HINT:
- When removing the No. 1 moulding tape, heat the rear bumper cover and No. 1 moulding tape using a heat light.
- Use the same procedure for the other side.
Standard
| Item |
Temperature |
| Rear Bumper Cover |
20 to 30°C (68 to 86°F) |
| No. 1 Moulding Tape |
20 to 30°C (68 to 86°F) |
WARNING:
- Do not touch the heat light and heated parts.
- Touching the heat light may result in burns.
- Touching heated parts for a long time may result in burns.
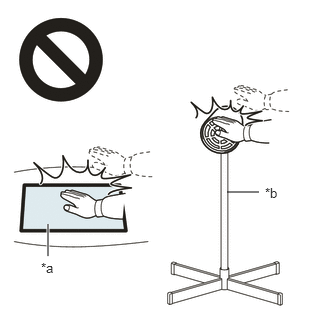 Courtesy of © TOYOTA, LICENSE AGREEMENT TMS1002 Courtesy of © TOYOTA, LICENSE AGREEMENT TMS1002
|
| *a |
Heated Part |
| *b |
Heat Light |
- Using a heat light, heat the rear bumper cover and No. 1 moulding tape.
 Courtesy of © TOYOTA, LICENSE AGREEMENT TMS1002 Courtesy of © TOYOTA, LICENSE AGREEMENT TMS1002
|
Remove the No. 1 moulding tape.
- REMOVE REAR BUMPER ARM
HINT:
- When removing the rear bumper arm, heat the rear bumper cover and rear bumper arm using a heat light.
- Use the same procedure for the other side.
Standard
| Item |
Temperature |
| Rear Bumper Cover |
20 to 30°C (68 to 86°F) |
| Rear Bumper Arm |
20 to 30°C (68 to 86°F) |
WARNING:
- Do not touch the heat light and heated parts.
- Touching the heat light may result in burns.
- Touching heated parts for a long time may result in burns.
Courtesy of © TOYOTA, LICENSE AGREEMENT TMS1002
|
| *a |
Heated Part |
| *b |
Heat Light |
- Using a heat light, heat the rear bumper cover and rear bumper arm.
 Courtesy of © TOYOTA, LICENSE AGREEMENT TMS1002 Courtesy of © TOYOTA, LICENSE AGREEMENT TMS1002
|
Remove the 2 rear bumper arms.
- REMOVE REAR BUMPER ENERGY ABSORBER
- Detach the guide and remove the rear bumper energy absorber.
 Courtesy of © TOYOTA, LICENSE AGREEMENT TMS1002 Courtesy of © TOYOTA, LICENSE AGREEMENT TMS1002
|
|
Remove in this Direction |
- REMOVE REAR BUMPER ARM REINFORCEMENT LH
- Remove the bolt.
 Courtesy of © TOYOTA, LICENSE AGREEMENT TMS1002 Courtesy of © TOYOTA, LICENSE AGREEMENT TMS1002
|
| *a |
Protective Tape |
|
Remove in this Direction |
- Using a screwdriver, detach the claw and remove the rear bumper arm reinforcement LH.
- REMOVE REAR BUMPER ARM REINFORCEMENT RH
HINT:
Use the same procedure described for the LH side.
- REMOVE REAR BUMPER BAR CORNER REINFORCEMENT LH
- Remove the 5 bolts.
 Courtesy of © TOYOTA, LICENSE AGREEMENT TMS1002 Courtesy of © TOYOTA, LICENSE AGREEMENT TMS1002
|
- Detach the guide and remove the rear bumper bar corner reinforcement LH.
- REMOVE REAR BUMPER BAR CORNER REINFORCEMENT RH
HINT:
Use the same procedure described for the LH side.
- REMOVE REAR BUMPER REINFORCEMENT SUB-ASSEMBLY
- Remove the 8 bolts.
 Courtesy of © TOYOTA, LICENSE AGREEMENT TMS1002 Courtesy of © TOYOTA, LICENSE AGREEMENT TMS1002
|
- Detach the guide and remove the rear bumper reinforcement sub-assembly.
 Courtesy of © TOYOTA, LICENSE AGREEMENT TMS1002 Courtesy of © TOYOTA, LICENSE AGREEMENT TMS1002
|
|
Remove in this Direction |
- REMOVE REAR BUMPER LOWER RETAINER LH
- Remove the 4 screws and rear bumper lower retainer LH.
 Courtesy of © TOYOTA, LICENSE AGREEMENT TMS1002 Courtesy of © TOYOTA, LICENSE AGREEMENT TMS1002
|
- REMOVE REAR BUMPER LOWER RETAINER RH
HINT:
Use the same procedure described for the LH side.
- REMOVE REAR BUMPER LOWER SIDE RETAINER LH
- Using a screwdriver, turn the clip 90° and detach the clip as shown in the illustration.
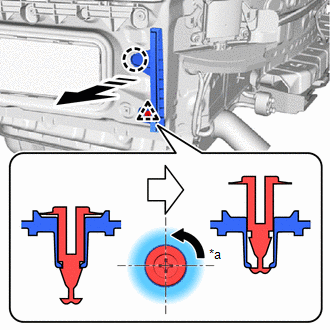 Courtesy of © TOYOTA, LICENSE AGREEMENT TMS1002 Courtesy of © TOYOTA, LICENSE AGREEMENT TMS1002
|
| *a |
90° |
|
Rotation Direction |
 |
Remove in this Direction |
- Detach the claw and remove the rear bumper lower side retainer LH as shown in the illustration.
- REMOVE REAR BUMPER LOWER SIDE RETAINER RH
HINT:
Use the same procedure described for the LH side.
- REMOVE REAR BUMPER SIDE SUPPORT LH
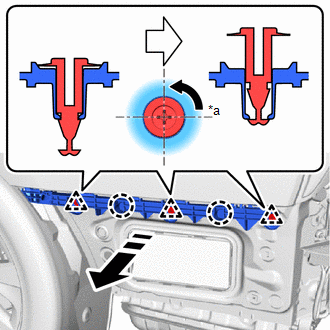 Courtesy of © TOYOTA, LICENSE AGREEMENT TMS1002 Courtesy of © TOYOTA, LICENSE AGREEMENT TMS1002
|
| *a |
90° |
|
Rotation Direction |
|
Remove in this Direction |
Using a screwdriver, turn the clip 90° and detach the clip as shown in the illustration.
- Detach the claw and remove the rear bumper side support LH as shown in the illustration.
- REMOVE REAR BUMPER SIDE SUPPORT RH
HINT:
Use the same procedure described for the LH side.