- INSTALL MULTI-DISPLAY ASSEMBLY
- INSTALL MULTI-DISPLAY CONTROLLER BRACKET A
- for 8 inch:
- Temporarily install the multi-display controller bracket A with the 2 screws.
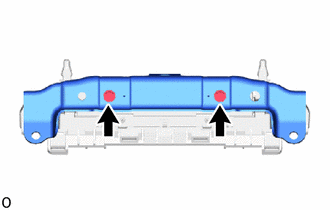 Courtesy of © TOYOTA, LICENSE AGREEMENT TMS1002 Courtesy of © TOYOTA, LICENSE AGREEMENT TMS1002
|
- Install the 2 screws and tighten the 2 screws used to temporarily install the bracket.
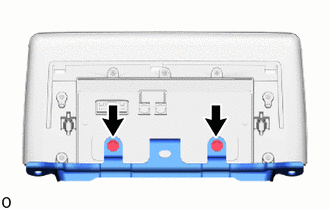 Courtesy of © TOYOTA, LICENSE AGREEMENT TMS1002 Courtesy of © TOYOTA, LICENSE AGREEMENT TMS1002
|
- for 10.3 inch:
- Temporarily install the multi-display controller bracket A with the 2 screws.
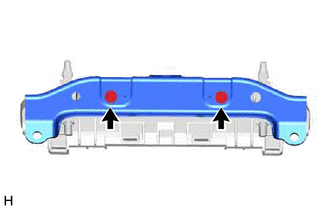 Courtesy of © TOYOTA, LICENSE AGREEMENT TMS1002 Courtesy of © TOYOTA, LICENSE AGREEMENT TMS1002
|
- Install the 2 screws and tighten the 2 screws used to temporarily install the bracket.
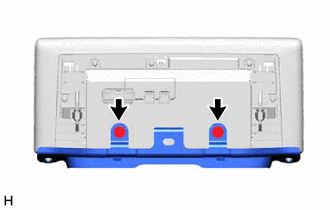 Courtesy of © TOYOTA, LICENSE AGREEMENT TMS1002 Courtesy of © TOYOTA, LICENSE AGREEMENT TMS1002
|
- INSTALL MULTI-DISPLAY ASSEMBLY WITH BRACKET
- for 8 inch:
- Connect the 3 connector and attach the clamp.
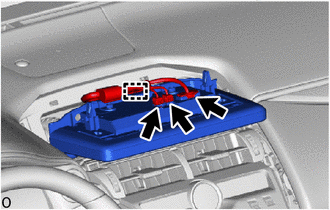 Courtesy of © TOYOTA, LICENSE AGREEMENT TMS1002 Courtesy of © TOYOTA, LICENSE AGREEMENT TMS1002
|
- Set the 3 guides.
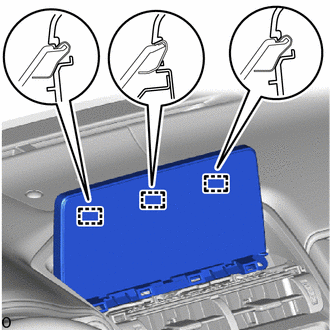 Courtesy of © TOYOTA, LICENSE AGREEMENT TMS1002 Courtesy of © TOYOTA, LICENSE AGREEMENT TMS1002
|
- Move the multi-display assembly with bracket as shown in the illustration to attach the 2 clips.
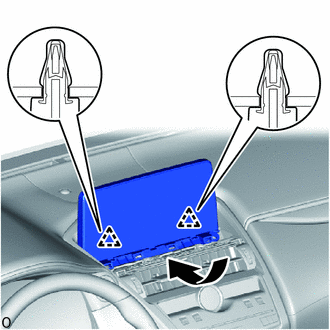 Courtesy of © TOYOTA, LICENSE AGREEMENT TMS1002 Courtesy of © TOYOTA, LICENSE AGREEMENT TMS1002
|
- Install the 2 bolts and multi-display assembly with bracket.
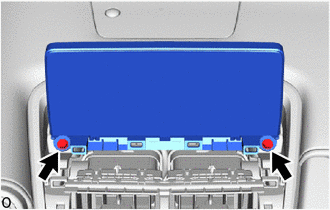 Courtesy of © TOYOTA, LICENSE AGREEMENT TMS1002 Courtesy of © TOYOTA, LICENSE AGREEMENT TMS1002
|
- for 10.3 inch:
- Connect the 3 connector and attach the clamp.
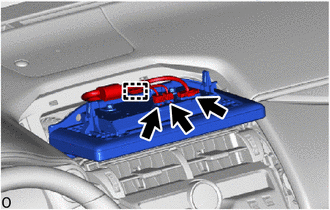 Courtesy of © TOYOTA, LICENSE AGREEMENT TMS1002 Courtesy of © TOYOTA, LICENSE AGREEMENT TMS1002
|
- Set the 3 guides.
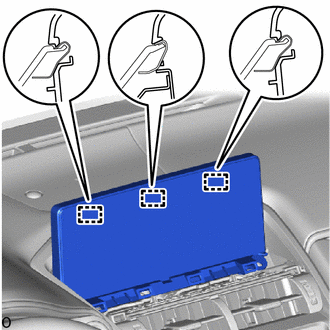 Courtesy of © TOYOTA, LICENSE AGREEMENT TMS1002 Courtesy of © TOYOTA, LICENSE AGREEMENT TMS1002
|
- Move the multi-display assembly with bracket as shown in the illustration to attach the 2 clips.
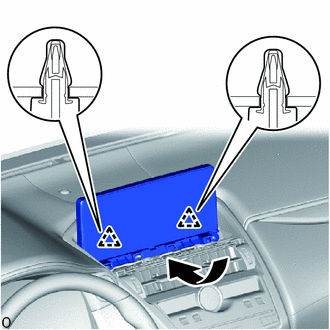 Courtesy of © TOYOTA, LICENSE AGREEMENT TMS1002 Courtesy of © TOYOTA, LICENSE AGREEMENT TMS1002
|
- Install the 2 bolts and multi-display assembly with bracket.
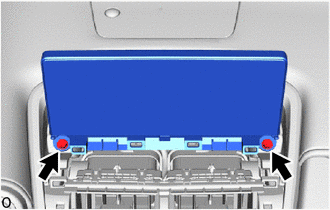 Courtesy of © TOYOTA, LICENSE AGREEMENT TMS1002 Courtesy of © TOYOTA, LICENSE AGREEMENT TMS1002
|
- INSTALL INSTRUMENT PANEL FINISH PLATE
Refer to PROCEDURE - Step 16
- CONNECT CABLE TO NEGATIVE AUXILIARY BATTERY TERMINAL
- INITIALIZATION AFTER RECONNECTING AUXILIARY BATTERY TERMINAL
Refer to WORK PROCEDURE [05/2019 - ]
HINT:
When disconnecting and reconnecting the auxiliary battery, there is an automatic learning function that completes learning when the respective system is used.
Refer to AUTOMATIC LEARNING CHART [05/2019 - ]
- CHECK SRS WARNING LIGHT
Refer to DIAGNOSIS SYSTEM [10/2014 - ]
- INSTALL DECK FLOOR BOX LH
Refer to PROCEDURE - Step 67
- INSTALL REAR DECK FLOOR BOX
Refer to PROCEDURE - Step 68
- INSTALL NO. 3 DECK BOARD SUB-ASSEMBLY
Refer to PROCEDURE - Step 69
- INSTALL DECK BOARD ASSEMBLY
Refer to PROCEDURE - Step 70