Removal [04/2013 - 08/2015]: Procedure
WARNING: This page is about a different car, the 2015 Lexus IS 250 and 2014 Lexus IS 250. However, it is still accessible from the selected car via links, so may be relevant.
- REMOVE COOL AIR INTAKE DUCT SEAL
Refer to PROCEDURE - Step 1
- REMOVE MILLIMETER WAVE RADAR SENSOR ASSEMBLY (w/ Dynamic Radar Cruise Control System)
Refer to REMOVAL [04/2013 - 10/2016]
- REMOVE V-BANK COVER SUB-ASSEMBLY
Refer to PROCEDURE - Step 3
- REMOVE INLET NO. 1 AIR CLEANER
Refer to PROCEDURE - Step 20
- REMOVE ENGINE UNDER COVER
- DRAIN ENGINE COOLANT
See step 4
- REMOVE HOOD LOCK RELEASE LEVER PROTECTOR
Refer to PROCEDURE - Step 6
- DISCONNECT HOOD LOCK CONTROL CABLE ASSEMBLY
- Disengage the 2 clamps and disconnect the hood lock control cable assembly from the upper radiator support sub-assembly.
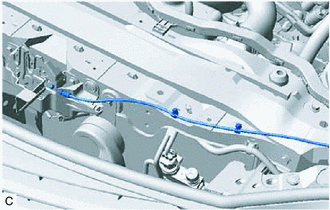 Courtesy of © TOYOTA, LICENSE AGREEMENT TMS1002 Courtesy of © TOYOTA, LICENSE AGREEMENT TMS1002
|
- REMOVE HOOD LOCK ASSEMBLY
Refer to PROCEDURE - Step 7
- REMOVE RADIATOR RESERVE TANK ASSEMBLY
- Slide the clip and disconnect the radiator reserve tank hose from the water inlet.
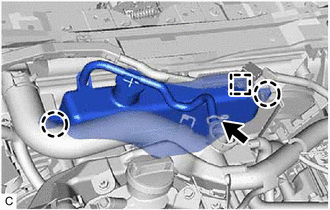 Courtesy of © TOYOTA, LICENSE AGREEMENT TMS1002 Courtesy of © TOYOTA, LICENSE AGREEMENT TMS1002
|
- Disconnect the clamp and wire harness from the radiator reserve tank assembly.
- Disengage the 2 claws and remove the radiator reserve tank assembly from the fan shroud assembly.
- REMOVE NO. 1 RADIATOR HOSE
- Slide the 2 clips and remove the No. 1 radiator hose from the radiator assembly and water inlet.
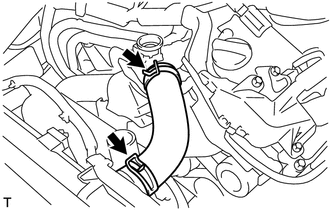 Courtesy of © TOYOTA, LICENSE AGREEMENT TMS1002 Courtesy of © TOYOTA, LICENSE AGREEMENT TMS1002
|
- DISCONNECT NO. 2 RADIATOR HOSE
- Disengage the clamp and disconnect the No. 2 radiator hose from the radiator hose clamp.
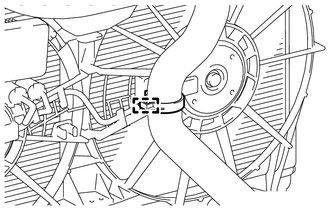 Courtesy of © TOYOTA, LICENSE AGREEMENT TMS1002 Courtesy of © TOYOTA, LICENSE AGREEMENT TMS1002
|
- Remove the radiator hose clamp from the fan shroud assembly.
- Slide the clip and disconnect the No. 2 radiator hose from the radiator assembly.
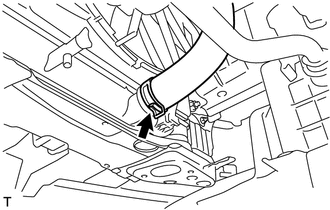 Courtesy of © TOYOTA, LICENSE AGREEMENT TMS1002 Courtesy of © TOYOTA, LICENSE AGREEMENT TMS1002
|
- DISCONNECT ENGINE ROOM MAIN WIRE
- Disconnect the cooling fan ECU connector.
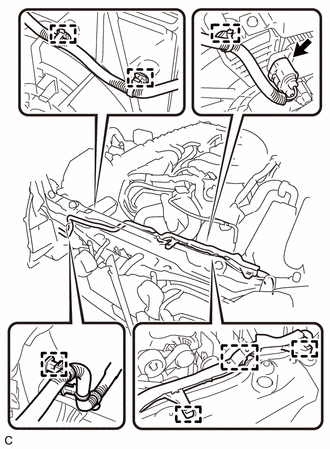 Courtesy of © TOYOTA, LICENSE AGREEMENT TMS1002 Courtesy of © TOYOTA, LICENSE AGREEMENT TMS1002
|
- Disengage the 7 clamps and disconnect the engine room main wire from the upper radiator support sub-assembly.
- REMOVE UPPER RADIATOR SUPPORT SUB-ASSEMBLY
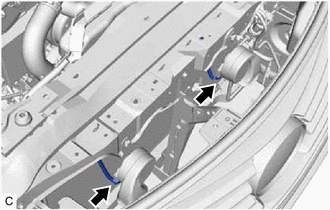 Courtesy of © TOYOTA, LICENSE AGREEMENT TMS1002 Courtesy of © TOYOTA, LICENSE AGREEMENT TMS1002
|
- Disconnect the 2 horn connectors.
- Disengage the 6 clamps and disconnect the wire harness from the upper radiator support sub-assembly.
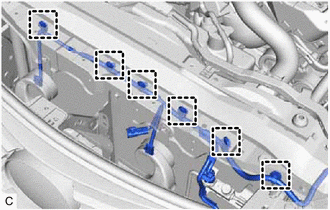 Courtesy of © TOYOTA, LICENSE AGREEMENT TMS1002 Courtesy of © TOYOTA, LICENSE AGREEMENT TMS1002
|
- Remove the 5 bolts and upper radiator support sub-assembly.
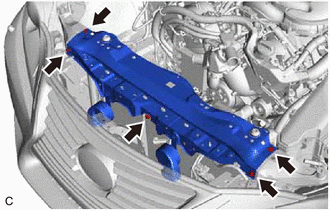 Courtesy of © TOYOTA, LICENSE AGREEMENT TMS1002 Courtesy of © TOYOTA, LICENSE AGREEMENT TMS1002
|
- SEPARATE COOLER CONDENSER ASSEMBLY
- Disengage the 2 claws.
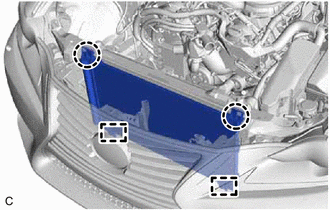 Courtesy of © TOYOTA, LICENSE AGREEMENT TMS1002 Courtesy of © TOYOTA, LICENSE AGREEMENT TMS1002
|
- Disengage the 2 guides and separate the cooler condenser assembly from the radiator assembly.
NOTE:
Do not damage the cooler condenser assembly or radiator assembly when removing the cooler condenser assembly.
- REMOVE ENGINE ROOM ECU OUTLET DUCT
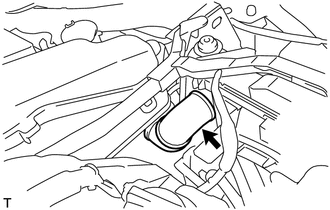 Courtesy of © TOYOTA, LICENSE AGREEMENT TMS1002 Courtesy of © TOYOTA, LICENSE AGREEMENT TMS1002
|
- Remove the engine room ECU outlet duct from the fan shroud assembly.
- REMOVE RADIATOR ASSEMBLY
- Remove the radiator assembly with the fan shroud assembly from the vehicle.
NOTE:
Do not apply excessive force to the condenser assembly or pipe when removing the radiator assembly.
- Disengage the 3 claws.
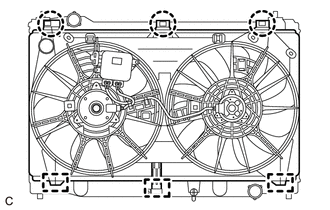 Courtesy of © TOYOTA, LICENSE AGREEMENT TMS1002 Courtesy of © TOYOTA, LICENSE AGREEMENT TMS1002
|
- Disengage the 3 guides and remove the fan shroud assembly from the radiator assembly.
NOTE:
Do not damage the radiator assembly when removing the fan shroud assembly.
- REMOVE RADIATOR SUPPORT CUSHION
- Remove the 2 radiator support cushions from the radiator assembly.
- REMOVE LOWER RADIATOR SUPPORT
- Remove the 2 lower radiator supports from the radiator assembly.