Removal [04/2013 - 08/2015]: Procedure
WARNING: This page is about a different car, the 2015 Lexus IS 250 and 2014 Lexus IS 250. However, it is still accessible from the selected car via links, so may be relevant.
- REMOVE REAR NO. 2 FLOOR BOARD SUB-ASSEMBLY (for Full Cover Type)
Refer to PROCEDURE - Step 2
- REMOVE REAR NO. 1 FLOOR BOARD SUB-ASSEMBLY (for Full Cover Type)
Refer to PROCEDURE - Step 3
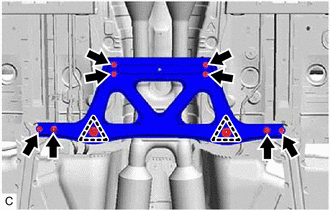
- REMOVE FRONT CENTER FLOOR BRACE
 Courtesy of © TOYOTA, LICENSE AGREEMENT TMS1002 Courtesy of © TOYOTA, LICENSE AGREEMENT TMS1002
|
- Remove the 6 bolts and 2 nuts.
- Disengage the 2 clips to remove the front center floor brace from the body.
- DISCONNECT HEATED OXYGEN SENSOR
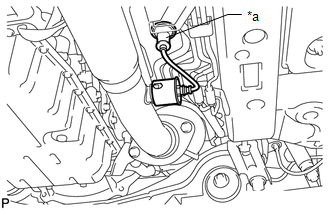
- for Bank 1:
- Disconnect the heated oxygen sensor grommet from the body.
 Courtesy of © TOYOTA, LICENSE AGREEMENT TMS1002 Courtesy of © TOYOTA, LICENSE AGREEMENT TMS1002
|
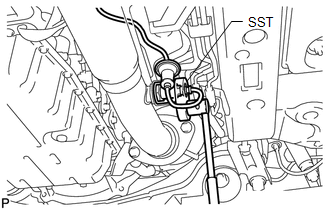
- Using SST, remove the heated oxygen sensor from the front exhaust pipe assembly.
 Courtesy of © TOYOTA, LICENSE AGREEMENT TMS1002 Courtesy of © TOYOTA, LICENSE AGREEMENT TMS1002
|
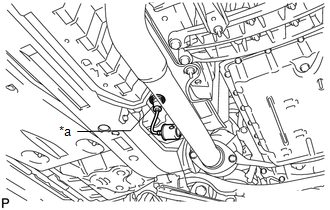
- for Bank 2 (for 2WD):
- Disconnect the heated oxygen sensor grommet from the body.
 Courtesy of © TOYOTA, LICENSE AGREEMENT TMS1002 Courtesy of © TOYOTA, LICENSE AGREEMENT TMS1002
|
- Using SST, remove the heated oxygen sensor from the front exhaust pipe assembly.
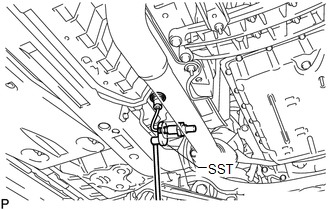 Courtesy of © TOYOTA, LICENSE AGREEMENT TMS1002 Courtesy of © TOYOTA, LICENSE AGREEMENT TMS1002
|
- for Bank 2 (for AWD with Front Floor Cover LH):
- Disconnect the 6 clips and remove the front floor cover LH.
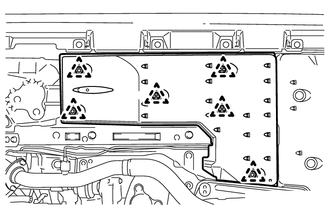 Courtesy of © TOYOTA, LICENSE AGREEMENT TMS1002 Courtesy of © TOYOTA, LICENSE AGREEMENT TMS1002
|
- Disconnect the heated oxygen sensor grommet from the body.
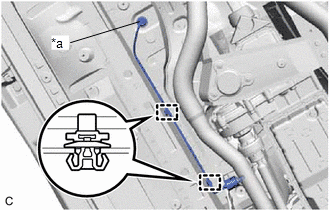 Courtesy of © TOYOTA, LICENSE AGREEMENT TMS1002 Courtesy of © TOYOTA, LICENSE AGREEMENT TMS1002
|
- Disconnect the 2 clamps from the body.
- Using SST, remove the heated oxygen sensor from the front exhaust pipe assembly.
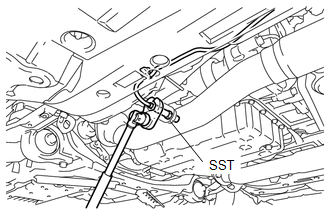 Courtesy of © TOYOTA, LICENSE AGREEMENT TMS1002 Courtesy of © TOYOTA, LICENSE AGREEMENT TMS1002
|
- for Bank 2 (for AWD without Front Floor Cover LH):
- Disconnect the heated oxygen sensor grommet from the body.
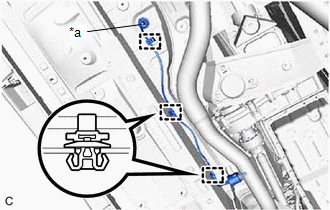 Courtesy of © TOYOTA, LICENSE AGREEMENT TMS1002 Courtesy of © TOYOTA, LICENSE AGREEMENT TMS1002
|
- Disconnect the 3 clamps from the body.
- Using SST, remove the heated oxygen sensor from the front exhaust pipe assembly.
Courtesy of © TOYOTA, LICENSE AGREEMENT TMS1002
|
- REMOVE FRONT EXHAUST PIPE ASSEMBLY (TWC: Rear Catalyst)
- Remove the 4 bolts and 4 nuts to disconnect the front exhaust pipe assembly (TWC: rear catalyst).
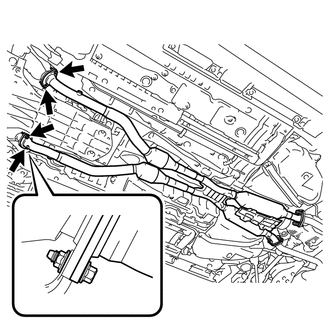 Courtesy of © TOYOTA, LICENSE AGREEMENT TMS1002 Courtesy of © TOYOTA, LICENSE AGREEMENT TMS1002
|
- Remove the 4 bolts, 4 compression springs and front exhaust pipe assembly (TWC: Rear Catalyst).
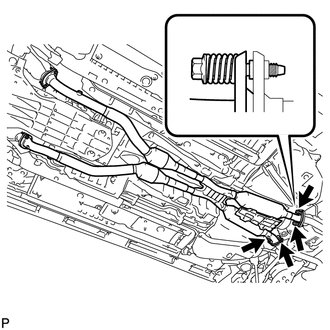 Courtesy of © TOYOTA, LICENSE AGREEMENT TMS1002 Courtesy of © TOYOTA, LICENSE AGREEMENT TMS1002
|
- Remove the 4 gaskets from the front exhaust pipe assembly (TWC: Rear Catalyst).
- DISCONNECT TAIL EXHAUST PIPE ASSEMBLY
- Disconnect the tail exhaust pipe assembly from the 3 exhaust pipe supports.
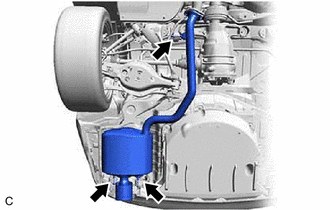 Courtesy of © TOYOTA, LICENSE AGREEMENT TMS1002 Courtesy of © TOYOTA, LICENSE AGREEMENT TMS1002
|
NOTE:
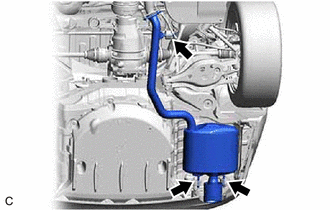
Protect the rear bumper assembly using protection material such as a piece of cloth to avoid damage by the tail exhaust pipe baffle sub-assembly.
- DISCONNECT TAIL EXHAUST PIPE LH
- Disconnect the tail exhaust pipe LH from the 3 exhaust pipe supports.
 Courtesy of © TOYOTA, LICENSE AGREEMENT TMS1002 Courtesy of © TOYOTA, LICENSE AGREEMENT TMS1002
|
NOTE:
Protect the rear bumper assembly using protection material such as a piece of cloth to avoid damage by the tail exhaust pipe baffle sub-assembly.
- REMOVE TAIL EXHAUST PIPE BAFFLE SUB-ASSEMBLY
HINT:
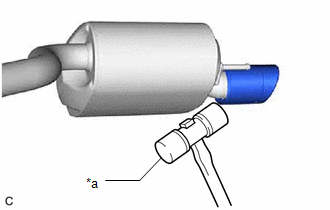
- Perform this procedure only when replacement of the tail exhaust pipe baffle sub-assembly is necessary.
- If the tail exhaust pipe baffle sub-assembly is removed, replace it with a new one.
- Using a plastic hammer, remove the 2 tail exhaust pipe baffle sub-assemblies from the tail exhaust pipe assembly and tail exhaust pipe LH.
 Courtesy of © TOYOTA, LICENSE AGREEMENT TMS1002 Courtesy of © TOYOTA, LICENSE AGREEMENT TMS1002
|