Removal [08/2012 - ]
- PRECAUTION
NOTE:
- After turning the engine switch off, waiting time may be required before disconnecting the cable from the negative (-) battery terminal. Therefore, make sure to read the disconnecting the cable from the negative (-) battery terminal notices before proceeding with work. Refer to PRECAUTION [08/2012 - ]
.
- A Hard Disk Drive (HDD) is built into the multimedia module receiver assembly to store map and other data, and is used for the navigation system. Therefore, care must be taken for the following points when handling the multimedia module receiver assembly.
- When removing the hard disk drive, eliminate static electricity by touching the vehicle body to prevent components from being damaged.
- DISCONNECT CABLE FROM NEGATIVE BATTERY TERMINAL
NOTE:
When disconnecting the cable, some systems need to be initialized after the cable is reconnected. Refer to INITIALIZATION [08/2012 - ]
.
- REMOVE SHIFT LEVER KNOB SUB-ASSEMBLY
. Refer to REMOVAL [08/2012 - ] - Step 4
- REMOVE UPPER NO. 1 CONSOLE PANEL GARNISH
. Refer to REMOVAL [08/2012 - ] - Step 5
- REMOVE UPPER NO. 2 CONSOLE PANEL GARNISH
. Refer to REMOVAL [08/2012 - ] - Step 6
- REMOVE CONSOLE PANEL SUB-ASSEMBLY
. Refer to REMOVAL [08/2012 - ] - Step 7
- REMOVE INSTRUMENT PANEL BOX ASSEMBLY (w/o Ashtray)
. Refer to REMOVAL [08/2012 - ] - Step 8
- REMOVE FRONT ASH RECEPTACLE BOX SUB-ASSEMBLY (w/ Ashtray)
. Refer to REMOVAL [08/2012 - ] - Step 9
- REMOVE NO. 3 INSTRUMENT PANEL REGISTER ASSEMBLY
. Refer to REMOVAL [08/2012 - ] - Step 13
- REMOVE CENTER LOWER INSTRUMENT CLUSTER FINISH PANEL
. Refer to REMOVAL [08/2012 - ] - Step 14
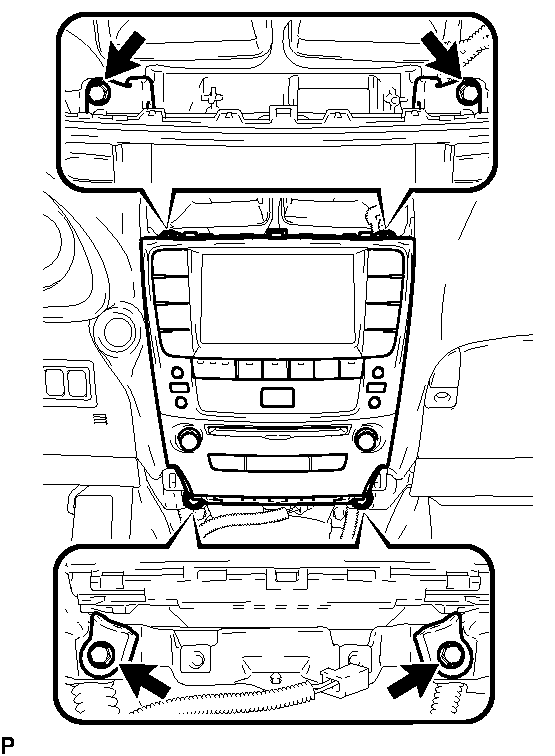
- REMOVE MULTIMEDIA MODULE RECEIVER ASSEMBLY WITH DISPLAY
- Remove the 4 bolts.
 Courtesy of © TOYOTA, LICENSE AGREEMENT TMS1002
- Pull the multimedia module receiver assembly with display toward the rear of the vehicle.
- Disconnect each connector and remove the multimedia module receiver assembly with display.
- REMOVE TIRE PRESSURE WARNING RECEIVER ASSEMBLY (w/ Tire Pressure Warning System)
. Refer to REMOVAL [08/2012 - ] - Step 4
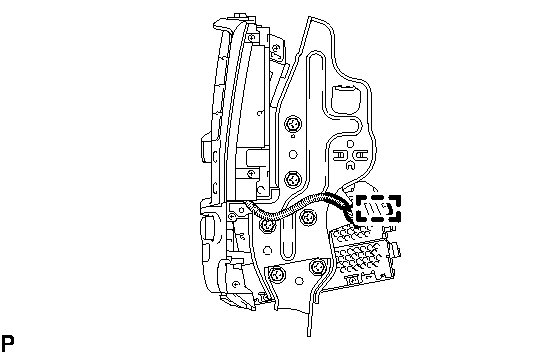
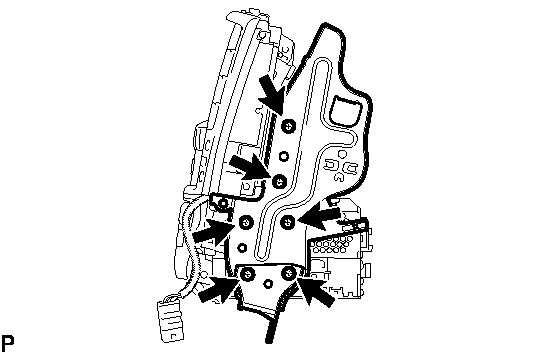
- REMOVE NO. 1 RADIO BRACKET
- Disengage the connector clamp.
 Courtesy of © TOYOTA, LICENSE AGREEMENT TMS1002
- Remove the 6 screws and No. 1 radio bracket.
 Courtesy of © TOYOTA, LICENSE AGREEMENT TMS1002
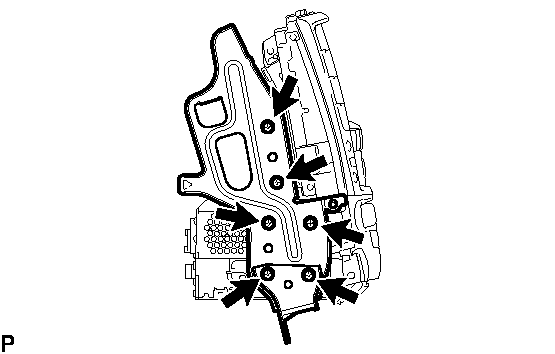
- REMOVE NO. 2 RADIO BRACKET
- Remove the 6 screws and No. 2 radio bracket.
 Courtesy of © TOYOTA, LICENSE AGREEMENT TMS1002
- REMOVE MULTI-DISPLAY ASSEMBLY WITH CLOCK
- REMOVE HARD DISK DRIVE
See step 14
- REMOVE MULTIMEDIA MODULE RECEIVER ASSEMBLY