Installation
SEAT BELT: REAR NO. 1 SEAT OUTER BELT ASSEMBLY: INSTALLATION
HINT
* Use the same procedure for the RH and LH sides.
* The procedure listed below is for the LH side.
1. INSTALL FRONT SHOULDER BELT ANCHOR ADJUSTER ASSEMBLY Installation
2. INSTALL REAR NO. 1 SEAT OUTER BELT ASSEMBLY LH
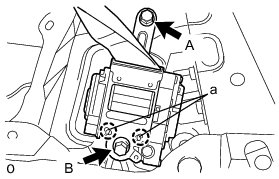
NOTICE:
When installing the retractor, make sure the claws of the vehicle (labeled "a" in the illustration) only contact the installation areas of the retractor.
(a) Align the seat belt positioning holes with the claws and install the retractor of the seat belt with the 2 bolts as shown in the illustration.
HINT
First install bolt A, and then install bolt B.
for bolt A - Torque : 8.5 Nm (87 kgf-cm, 75 in-lbf)
for bolt B - Torque : 42 Nm (428 kgf-cm, 31 ft-lbf)
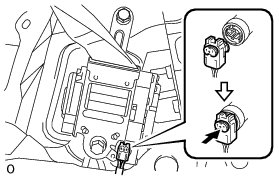
Connect the pretensioner connector as shown in the illustration.
(b) Install the rear No. 1 seat outer belt shoulder anchor with the nut.
Torque : 42 Nm (428 kgf-cm, 31 ft-lbf)
3. INSTALL REAR SIDE NO. 2 AIR DUCT (for RH Side, w/ Rear Air Conditioning System) Installation
4. INSTALL REAR NO. 2 SEATBACK LOCK STRIKER SUB-ASSEMBLY LH (w/o Rear No. 2 Seat) Installation
5. INSTALL FRONT QUARTER TRIM PANEL ASSEMBLY LH Installation
6. INSTALL DECK TRIM SIDE PANEL ASSEMBLY LH
(a) w/o Rear No. 2 Seat:
(1) Attach the 5 clips and 8 claws to install the deck trim side panel.
(2) Install the 4 bolts and 2 screws.
(3) Attach the 6 claws and 2 guides to install the rear seatback lock control lever base to the deck trim side panel.
(4) Install the rear No. 1 seat outer belt floor anchor with the bolt.
Torque : 42 Nm (428 kgf-cm, 31 ft-lbf)
(b) w/ Rear No. 2 Seat:
(1) Connect the connector.
(2) Attach the 3 clips and 8 claws to install the deck trim side panel.
(3) Install the 2 bolts and 2 screws.
(4) Install the rear No. 2 seat outer belt floor anchor with the bolt.
Torque : 42 Nm (428 kgf-cm, 31 ft-lbf)
(5) Install the rear No. 1 seat outer belt floor anchor with the bolt.
Torque : 42 Nm (428 kgf-cm, 31 ft-lbf)
7. INSTALL REAR SEATBACK LOCK CONTROL LEVER BASE LH (w/o Rear No. 2 Seat) Installation
8. INSTALL ASSIST GRIP SUB-ASSEMBLY (w/ Rear No. 2 Seat) Installation
9. INSTALL ASSIST GRIP PLUG (w/ Rear No. 2 Seat) Installation
10. INSTALL FRONT DECK SIDE TRIM COVER (w/ Tonneau Cover) Installation
11. INSTALL NO. 1 TONNEAU COVER HOLDER CAP (w/o Tonneau Cover) Installation
12. INSTALL NO. 1 LUGGAGE COMPARTMENT TRIM HOOK Installation
13. INSTALL REAR NO. 1 SEAT OUTER LAP BELT ANCHOR COVER Installation
14. INSTALL REAR FLOOR CARPET ASSEMBLY (w/o Rear No. 2 Seat) Installation
15. INSTALL REAR FLOOR MAT REAR SUPPORT PLATE (w/o Rear No. 2 Seat) Installation
16. INSTALL NO. 1 DECK BOARD SUB-ASSEMBLY (w/o Rear No. 2 Seat) Installation
17. INSTALL FRONT LUGGAGE COMPARTMENT TRIM COVER (w/o Rear No. 2 Seat) Installation
18. INSTALL REAR DOOR OPENING TRIM WEATHERSTRIP LH Installation
19. INSTALL REAR DOOR SCUFF PLATE LH Installation
20. INSTALL QUARTER SCUFF PLATE LH (w/ Rear No. 2 Seat) Installation
21. INSTALL REAR NO. 1 FLOOR STEP COVER (w/ Rear No. 2 Seat) Installation
22. INSTALL REAR NO. 1 SEATBACK ASSEMBLY LH (for 60/40 Split Double-folding Seat Type LH Side)
(a) Install the rear No. 1 seatback assembly LH Removal.
23. INSTALL REAR NO. 2 SEAT ASSEMBLY LH (w/ Rear No. 2 Seat)
(a) Install the rear No. 2 seat assembly LH Installation.
24. INSTALL TONNEAU COVER ASSEMBLY (w/ Tonneau Cover) Installation