Installation
AUDIO / VIDEO: STEREO COMPONENT AMPLIFIER: INSTALLATION
1. INSTALL NO. 2 AMPLIFIER BRACKET
(a) Set the aligning protrusions of the bracket, labeled A, into the holes of the amplifier.
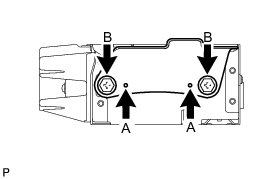
(b) Install the bracket with the 2 screws labeled B.
Torque : 3.0 Nm (31 kgf-cm, 27 in-lbf)
2. INSTALL NO. 1 AMPLIFIER BRACKET
(a) Set the aligning protrusions of the bracket, labeled A, into the holes of the amplifier.
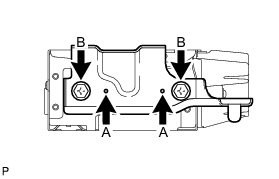
(b) Install the bracket with the 2 screws labeled B.
Torque : 3.0 Nm (31 kgf-cm, 27 in-lbf)
3. INSTALL NO. 2 AMPLIFIER COVER
(a) Install the No. 2 amplifier cover with the bolt and screw.
for bolt - Torque : 8.0 Nm (82 kgf-cm, 71 in-lbf)
4. INSTALL STEREO COMPONENT AMPLIFIER ASSEMBLY WITH BRACKET
(a) Install the stereo component amplifier with the bolt and 2 screws.
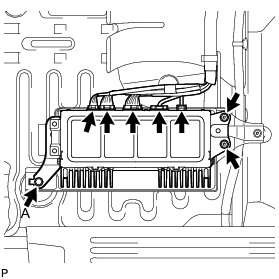
for bolt A - Torque : 8.0 Nm (82 kgf-cm, 71 in-lbf)
(b) Connect the 5 connectors.
5. INSTALL AMPLIFIER COVER
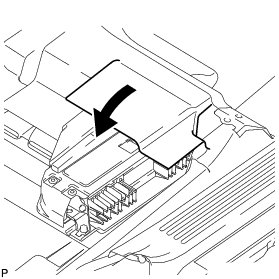
(a) Install the amplifier cover with the 3 clips.
(b) Return the floor carpet to its original position as shown in the illustration.
6. INSTALL FRONT SEAT ASSEMBLY RH
(a) Install the front seat assembly RH Installation.
7. CONNECT CABLE TO NEGATIVE BATTERY TERMINAL
NOTICE:
When disconnecting the cable, some systems need to be initialized after the cable is reconnected Repair Instruction - Initialization.
8. CHECK SRS WARNING LIGHT
(a) Check the SRS warning light Diagnosis System.