INSTALLATION (From 8/2009): Installation
- INSTALL COMBINATION METER ASSEMBLY
- Connect each connector.
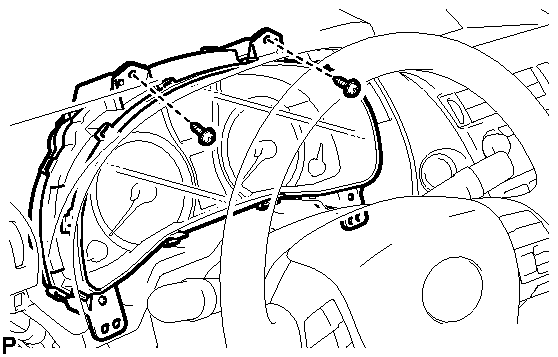
- Install the combination meter assembly with the 2 screws.
 Courtesy of © TOYOTA, LICENSE AGREEMENT TMS1002
- INSTALL NO. 1 INSTRUMENT CLUSTER FINISH PANEL
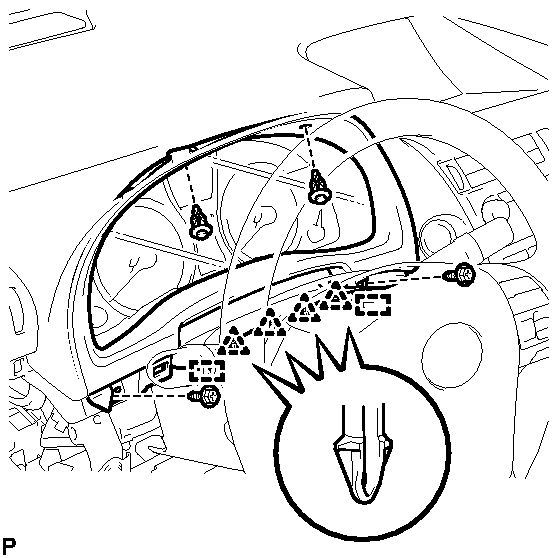
- Engage the 4 clips and 2 guides.
 Courtesy of © TOYOTA, LICENSE AGREEMENT TMS1002
- Install the No. 1 instrument cluster finish panel with the 2 clips and 2 screws.
- INSTALL NO. 2 INSTRUMENT PANEL HOLE COVER
. Refer to INSTALLATION - Step 33
- INSTALL NO. 1 INSTRUMENT PANEL HOLE COVER
. Refer to INSTALLATION - Step 32
- INSTALL LOWER INSTRUMENT PANEL FINISH PANEL SUB-ASSEMBLY
. Refer to INSTALLATION - Step 36
- INSTALL NO. 1 SWITCH HOLE BASE
. Refer to INSTALLATION - Step 37
- INSTALL INSTRUMENT PANEL GARNISH LH
. Refer to INSTALLATION - Step 38
- CONNECT CABLE TO NEGATIVE BATTERY TERMINAL
NOTE:
- Make sure that the cable has been disconnected from the negative (-) battery terminal for at least 2 seconds before reconnecting the cable.
- Reset the auto tilt away function setting to the previous condition by changing the customize parameter. Refer to CUSTOMIZE PARAMETERS
.
- When disconnecting the cable, some systems need to be initialized after the cable is reconnected. Refer to INITIALIZATION
.
- INSPECT SUSPENSION CONTROL SYSTEM (w/ Air Suspension)
- Inspect the suspension control system. Refer to TEST MODE PROCEDURE
.