Installation
REAR SUSPENSION: REAR SHOCK ABSORBER: INSTALLATION
INSTALLATION
HINT:
- Use the same procedure for the RH side and LH side.
- The procedure listed below is for the LH side.
1. INSTALL REAR SHOCK ABSORBER ASSEMBLY
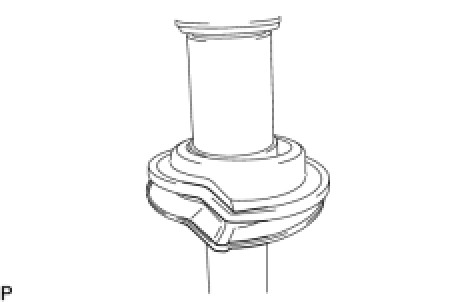
(a) Install the rear lower coil spring insulator to the rear shock absorber so that both recessed parts are aligned.
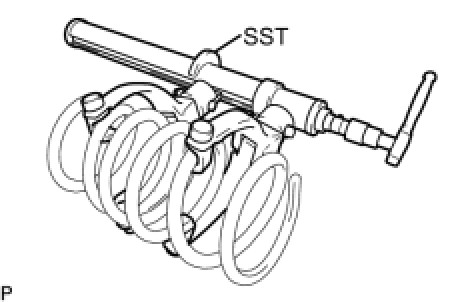
(b) Using SST, compress the rear coil spring.
SST: 09727-30021
09727-00010
09727-00021
09727-00031
NOTE:
Do not use an impact wrench. It will damage SST.
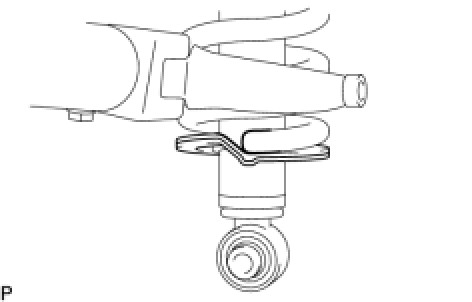
(c) Install the rear coil spring with SST and fit the rear coil spring end into the recessed part of the rear lower shock absorber seat.
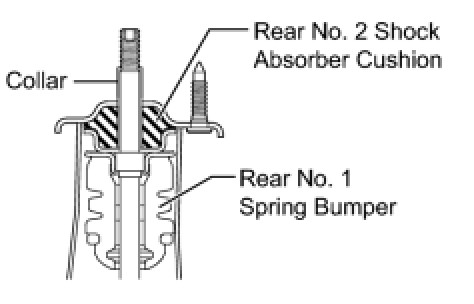
(d) Install the rear No. 1 spring bumper.
NOTE:
Make sure that the rear No. 1 spring bumper is installed in the correct direction.
(e) Install the rear upper coil spring insulator, rear No. 2 shock absorber cushion, rear suspension support assembly, and collar to the rear shock absorber.
NOTE:
Make sure that the rear No. 2 shock absorber cushion is installed in the correct direction.
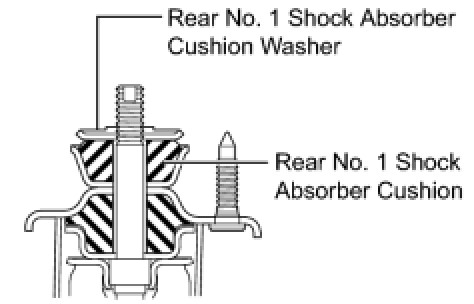
(f) Install the rear No. 1 shock absorber cushion and rear No. 1 shock absorber cushion washer.
NOTE:
Make sure that the rear No. 1 shock absorber cushion and rear No. 1 shock absorber cushion washer are installed in the correct direction.
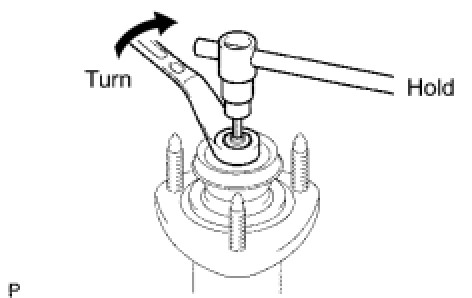
(g) Temporarily install a new lock nut while holding the rod of the rear shock absorber assembly with a socket hexagon wrench (6 mm).
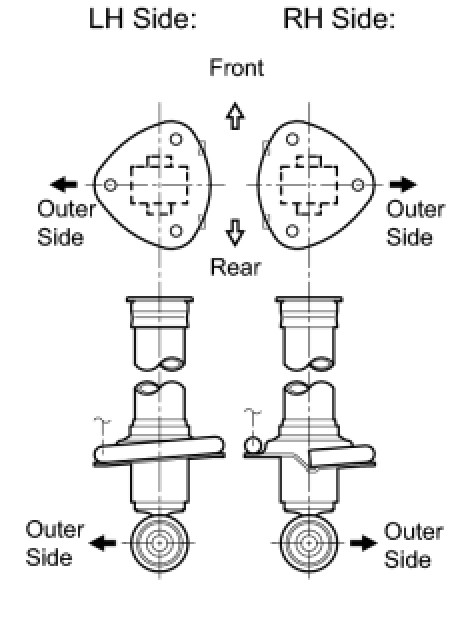
(h) Adjust the rear suspension support assembly to the installation position of the lower part of the rear shock absorber so that the studs are positioned as shown in the illustration.
NOTE:
Make sure that the left coil spring end faces toward the front of the vehicle and the right coil spring end faces toward the rear.
(i) Release SST and remove it from the rear coil spring.
NOTICE:
- Do not use an impact wrench. It will damage SST.
- Remove SST after confirming the position of the rear suspension support assembly.
(j) Fully tighten the lock nut while holding the rod of the rear shock absorber assembly with a socket hexagon wrench (6 mm).
Torque: 18 Nm (184 kgf-cm, 13 ft-lbf)
HINT: Securely insert the socket hexagon wrench to the shock absorber rod to prevent damage to the rear shock absorber.
2. INSTALL REAR SHOCK ABSORBER WITH COIL SPRING
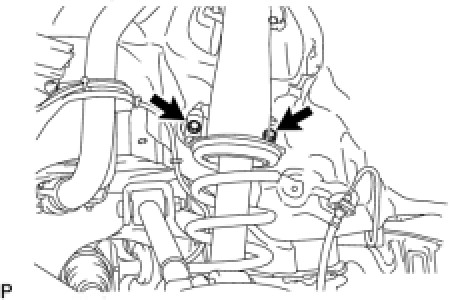
(a) Temporarily install the rear shock absorber with coil spring with the 2 bolts.
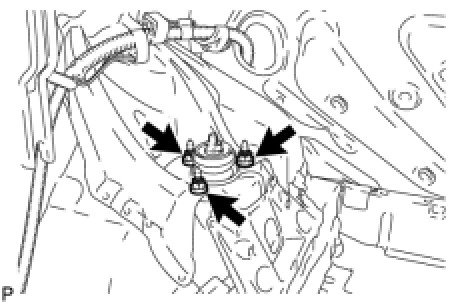
(b) Install the 3 nuts on the upper side of the rear shock absorber with coil spring.
Torque: 74 Nm (755 kgf-cm, 55 ft-lbf)
(c) Tighten the 2 bolts.
Torque: 21 Nm (214 kgf-cm, 15 ft-lbf)
3. TEMPORARILY TIGHTEN REAR NO. 2 SUSPENSION ARM ASSEMBLY
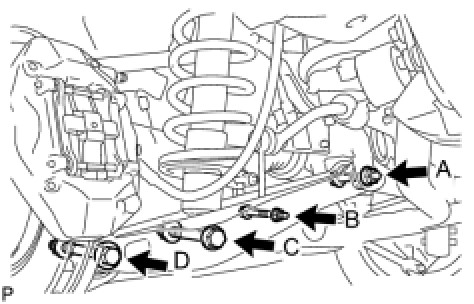
(a) Temporarily install the rear No. 2 suspension arm assembly with the bolt (D) and nut.
NOTE:
Turn the bolt while holding the nut.
(b) Temporarily install the rear stabilizer link assembly and the height control sensor link bracket to the rear No. 2 suspension arm assembly with the bolt and nut (B).
HINT: Fully tighten the nuts and bolts after stabilizing the suspension.
(c) Temporarily install the rear shock absorber with coil spring with the bolt (C) and nut.
NOTE:
Turn the bolt while holding the nut.
(d) Temporarily tighten the nut (A).
4. STABILIZE SUSPENSION
(a) Install the rear wheels.
Torque: 103 Nm (1050 kgf-cm, 76 ft-lbf)
(b) Lower the vehicle to the ground.
(c) Bounce the vehicle up and down at the corners to stabilize the rear suspension.
(d) Remove the rear wheels.
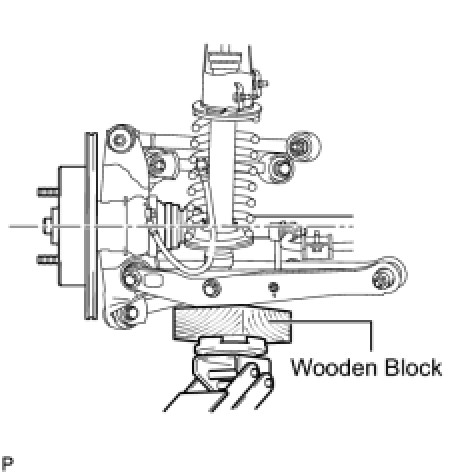
(e) Jack up the axle carrier, with a wooden block placed between the jack and axle carrier, to apply a load to the suspension so that the rear drive shaft assembly becomes level.
5. FULLY TIGHTEN REAR NO. 2 SUSPENSION ARM ASSEMBLY Installation
6. INSTALL REAR SUSPENSION MEMBER BRACE
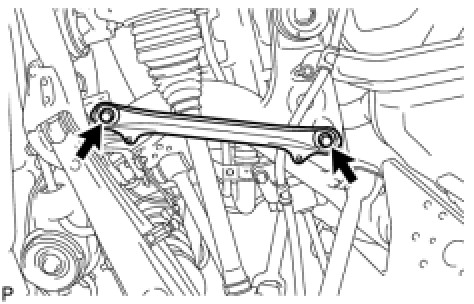
(a) Install the rear suspension member brace with the 2 bolts.
Torque: 50 Nm (510 kgf-cm, 37 ft-lbf)
7. INSTALL NO. 2 DIFFERENTIAL SUPPORT PROTECTOR
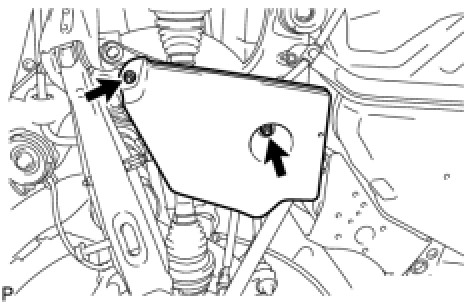
(a) Install the No. 2 differential support protector with the 2 nuts.
8. INSTALL REAR WHEEL HOUSE LINER
9. INSTALL NO. 2 REAR FLOOR HOUSING SHIELD
10. INSTALL REAR WHEEL
Torque: 103 Nm (1050 kgf-cm, 76 ft-lbf)
11. INSTALL SIDE LUGGAGE COMPARTMENT TRIM COVER Installation
12. INSTALL NO. 1 LUGGAGE COMPARTMENT TRIM HOOK Installation
13. INSTALL FRONT LUGGAGE COMPARTMENT TRIM COVER Installation
14. INSTALL NO. 2 LUGGAGE COMPARTMENT TRIM HOOK Installation
15. INSTALL ROPE HOOK Installation
16. INSTALL NO. 2 ROOM LIGHT ASSEMBLY Installation
17. INSTALL REAR LUGGAGE COMPARTMENT TRIM COVER Installation
18. INSTALL ROPE HOOK ASSEMBLY Installation
19. INSTALL DECK SIDE TRIM BOX RH
20. INSTALL DECK SIDE TRIM BOX LH
21. INSTALL NO. 2 LUGGAGE COMPARTMENT TRIM COVER
22. INSPECT AND ADJUST REAR WHEEL ALIGNMENT
Rear Wheel Alignment.
23. INSPECT AND ADJUST HEADLIGHT AIMING
Adjustments.