Installation
SUSPENSION CONTROL: CONTROL VALVE ASSEMBLY: INSTALLATION
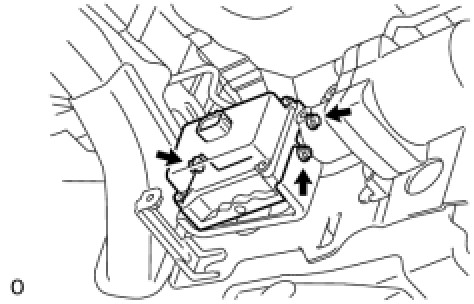
1. INSTALL NO. 1 HEIGHT CONTROL VALVE ASSEMBLY
(a) Install the 3 bolt cushions and 3 bolt holders to the control valve.
(b) Install the control valve with the 3 nuts.
Torque: 5.5 Nm (56 kgf-cm, 49 in-lbf)
2. INSTALL NO. 6 HEIGHT CONTROL TUBE LH
(a) Using a union nut wrench, install the No. 6 height control tube to the control valve and center cylinder.
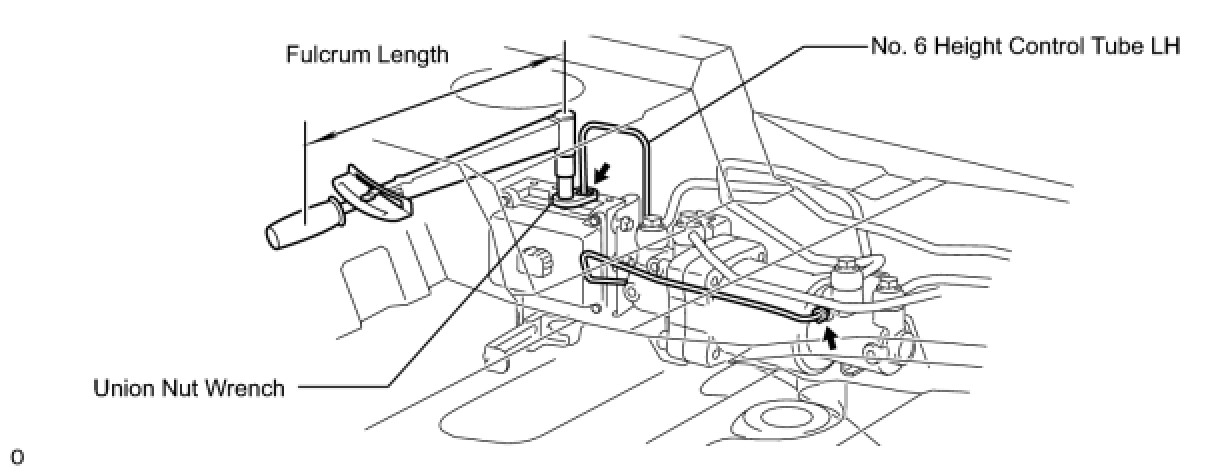
without union nut wrench - Torque: 15 Nm (155 kgf-cm, 11 ft-lbf)
with union nut wrench - Torque: 14 Nm (143 kgf-cm, 10 ft-lbf)
HINT:
- Use a torque wrench with a fulcrum length of 300 mm (11.8 in.).
- The torque value for use with a union nut wrench is effective when the union nut wrench is parallel to the torque wrench.
3. INSTALL NO. 6 HEIGHT CONTROL TUBE
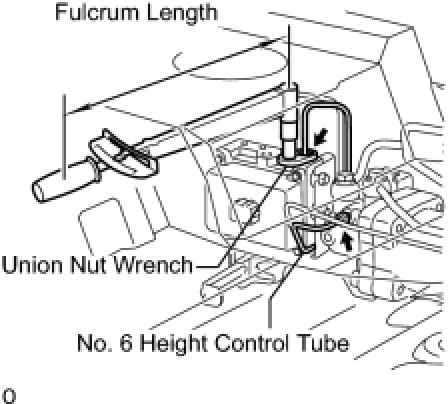
(a) Using a union nut wrench, install the No. 6 height control tube to the control valve and center cylinder.
without union nut wrench - Torque: 15 Nm (155 kgf-cm, 11 ft-lbf)
with union nut wrench - Torque: 14 Nm (143 kgf-cm, 10 ft-lbf)
HINT:
- Use a torque wrench with a fulcrum length of 300 mm (11.8 in.).
- The torque value for use with a union nut wrench is effective when the union nut wrench is parallel to the torque wrench.
4. INSTALL NO. 5 HEIGHT CONTROL TUBE LH
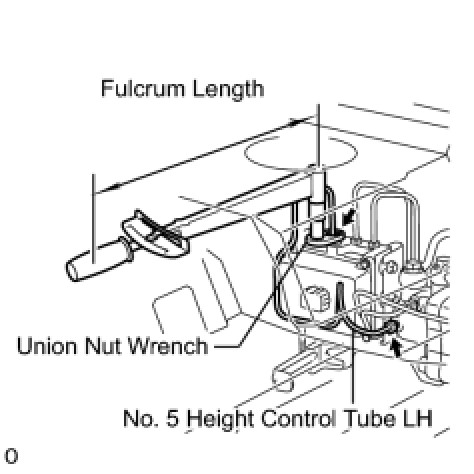
(a) Using a union nut wrench, install the No. 5 height control tube to the control valve and center cylinder.
without union nut wrench - Torque: 15 Nm (155 kgf-cm, 11 ft-lbf)
with union nut wrench - Torque: 14 Nm (143 kgf-cm, 10 ft-lbf)
HINT:
- Use a torque wrench with a fulcrum length of 300 mm (11.8 in.).
- The torque value for use with a union nut wrench is effective when the union nut wrench is parallel to the torque wrench.
5. INSTALL NO. 5 HEIGHT CONTROL TUBE
(a) Using a union nut wrench, install the No. 5 height control tube to the control valve and center cylinder.
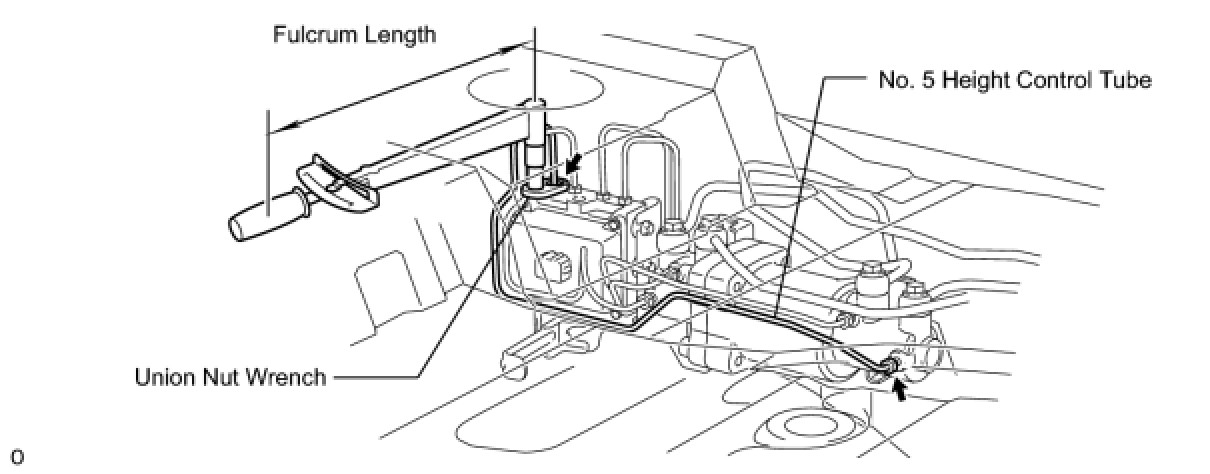
without union nut wrench - Torque: 15 Nm (155 kgf-cm, 11 ft-lbf)
with union nut wrench - Torque: 14 Nm (143 kgf-cm, 10 ft-lbf)
HINT:
- Use a torque wrench with a fulcrum length of 300 mm (11.8 in.).
- The torque value for use with a union nut wrench is effective when the union nut wrench is parallel to the torque wrench.
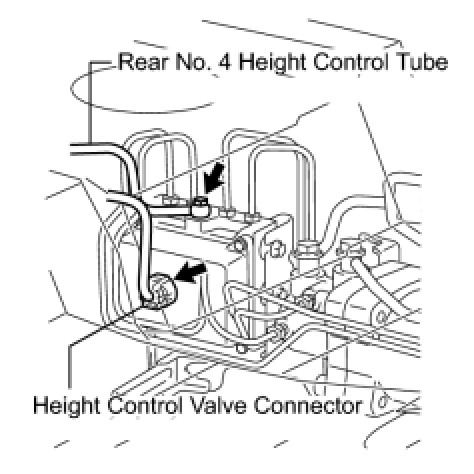
6. CONNECT REAR NO. 4 HEIGHT CONTROL TUBE
(a) Install a new gasket to the control tube, and connect the control tube with the union bolt.
Torque: 25 Nm (255 kgf-cm, 18 ft-lbf)
(b) Connect the height control valve connector.
7. INSTALL NO. 7 HEIGHT CONTROL TUBE Installation
8. INSTALL CLAMP
(a) Install the clamp to the 3 height control tubes.
9. INSTALL CENTER EXHAUST PIPE ASSEMBLY Installation
10. INSTALL TAILPIPE ASSEMBLY Installation
11. BLEED AIR FROM SUSPENSION FLUID Service and Repair
12. CHECK FLUID LEVEL IN RESERVOIR Suspension Control System
13. INSPECT FOR SUSPENSION FLUID LEAK Suspension Control System
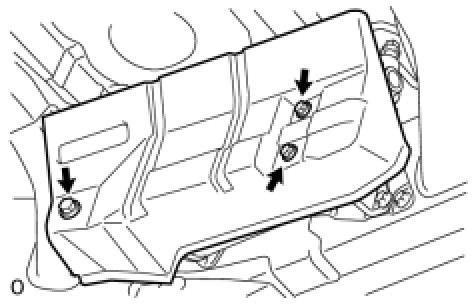
14. INSTALL HEIGHT CONTROL UNIT INSULATOR
(a) Install the insulator to the height control unit with the 3 bolts.
Torque: 31 Nm (316 kgf-cm, 23 ft-lbf)
15. INSPECT FOR EXHAUST GAS LEAK
- If gas is leaking, tighten the areas necessary to stop the leak. Replace damaged parts as necessary.