Installation
SUSPENSION CONTROL: FRONT ACCELERATION SENSOR: INSTALLATION
1. INSTALL ACCELERATION SENSOR (for Driver Side)
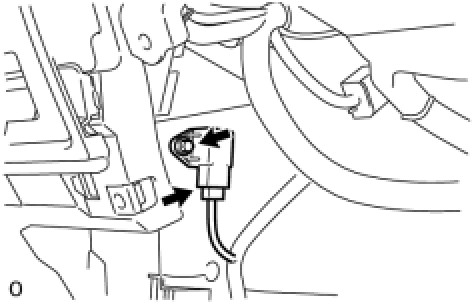
(a) Install the sensor with the bolt.
Torque: 8.0 Nm (82 kgf-cm, 71 in-lbf)
(b) Connect the connector.
2. INSTALL ACCELERATION SENSOR (for Front Passenger Side)
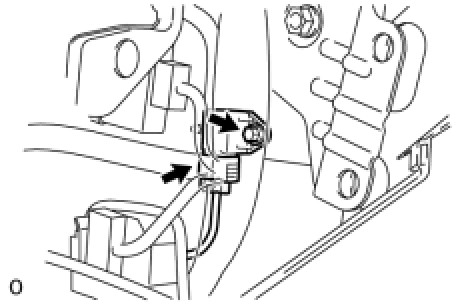
(a) Install the sensor with the bolt.
Torque: 8.0 Nm (82 kgf-cm, 71 in-lbf)
(b) Connect the connector.
3. INSTALL STEERING CONTROL ECU WITH JUNCTION BLOCK
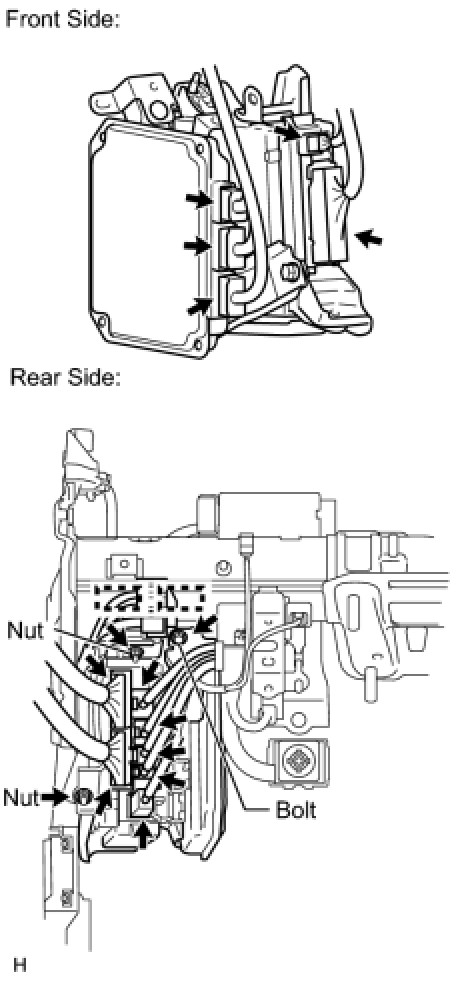
(a) Front Side:
(1) Connect the 5 connectors.
(b) Rear Side:
(1) Install the steering control ECU with junction block to the vehicle with the bolt and 2 nuts.
Torque: 8.0 Nm (82 kgf-cm, 71 in-lbf)
(2) Attach the 2 clamps.
(3) Connect the 7 connectors.
4. INSTALL LOWER NO. 2 INSTRUMENT PANEL FINISH PANEL Installation
5. INSTALL INSTRUMENT PANEL BOX DOOR KNOB Installation
6. INSTALL FRONT PASSENGER SIDE KNEE AIRBAG ASSEMBLY Installation
7. INSTALL COWL SIDE TRIM BOARD RH Installation
8. INSTALL NO. 2 INSTRUMENT PANEL UNDER COVER SUB-ASSEMBLY Installation
9. INSTALL FRONT DOOR SCUFF PLATE RH Installation
10. INSTALL NO. 3 INSTRUMENT CLUSTER FINISH PANEL GARNISH Installation
11. INSTALL NO. 4 INSTRUMENT PANEL REGISTER ASSEMBLY Installation
12. INSTALL INSTRUMENT SIDE PANEL RH Installation
13. INSTALL DRIVER SIDE KNEE AIRBAG ASSEMBLY Installation
14. INSTALL INSTRUMENT PANEL BOX ASSEMBLY Installation
15. INSTALL LOWER NO. 1 INSTRUMENT PANEL FINISH PANEL Installation
16. INSTALL COWL SIDE TRIM BOARD LH Installation
17. INSTALL NO. 1 INSTRUMENT PANEL UNDER COVER SUB-ASSEMBLY Installation
18. INSTALL FRONT DOOR SCUFF PLATE LH Installation
19. INSTALL NO. 1 SWITCH HOLE BASE Installation
20. INSTALL INSTRUMENT SIDE PANEL LH Installation
21. INSTALL LOWER CENTER INSTRUMENT CLUSTER FINISH PANEL SUB-ASSEMBLY Installation
22. INSTALL INNER NO. 1 INSTRUMENT PANEL BRACKET COVER RH Installation
23. INSTALL LOWER INSTRUMENT PANEL PAD SUB-ASSEMBLY RH Installation
24. INSTALL INNER NO. 1 INSTRUMENT PANEL BRACKET COVER LH Installation
25. INSTALL LOWER INSTRUMENT PANEL PAD SUB-ASSEMBLY LH Installation
26. CONNECT CABLE TO NEGATIVE BATTERY TERMINAL
NOTICE:
When disconnecting the cable, some systems need to be initialized after the cable is reconnected Repair Instruction - Initialization.
27. CHECK SRS WARNING LIGHT
(a) Check the SRS warning light Diagnosis System.