Drivetrain - Vibration In Steering Wheel/Acc. Pedal
L-SB-0022-09March 3, 2009
1700 - 2100 RPM Steering Wheel and/or Accelerator Pedal Vibration
Service Category
Engine/Hybrid System
Section
Engine Mechanical

Applicability
Introduction
Some vehicles may exhibit transmitted engine vibration through the steering wheel and/or accelerator pedal between 1700 - 2100 rpm. Use the following repair procedure to reduce the level of vibration.
Production Change Information

This TSIB applies to vehicles produced BEFORE the Production Change Effective VIN shown.

Warranty Information
APPLICABLE WARRANTY
^ This repair is covered under the Lexus Powertrain Warranty. This warranty is in effect for 72 months or 70,000 miles, whichever occurs first, from the vehicle's in-service date.
^ Warranty application is limited to correction of a problem based upon a customer's specific complaint.
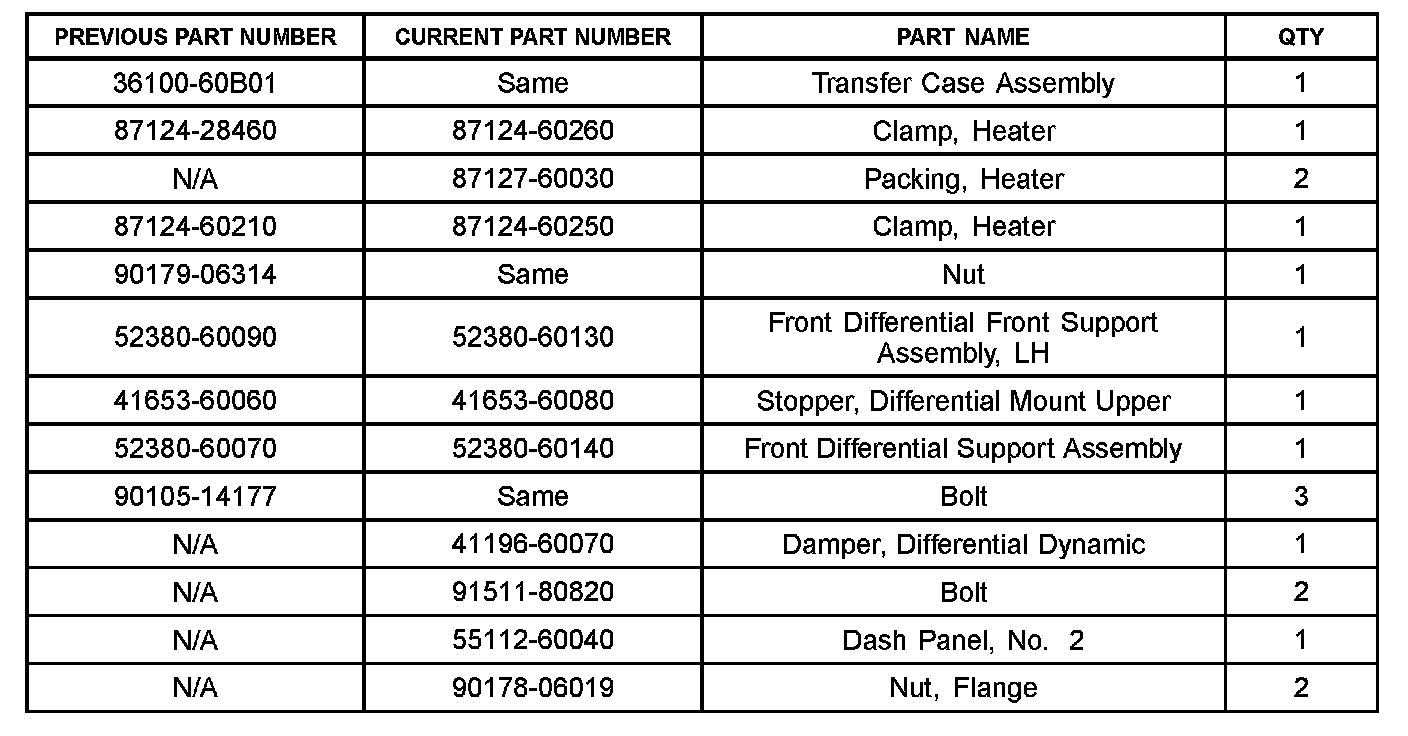
Parts Information

Required Tools & Equipment
Repair Procedure
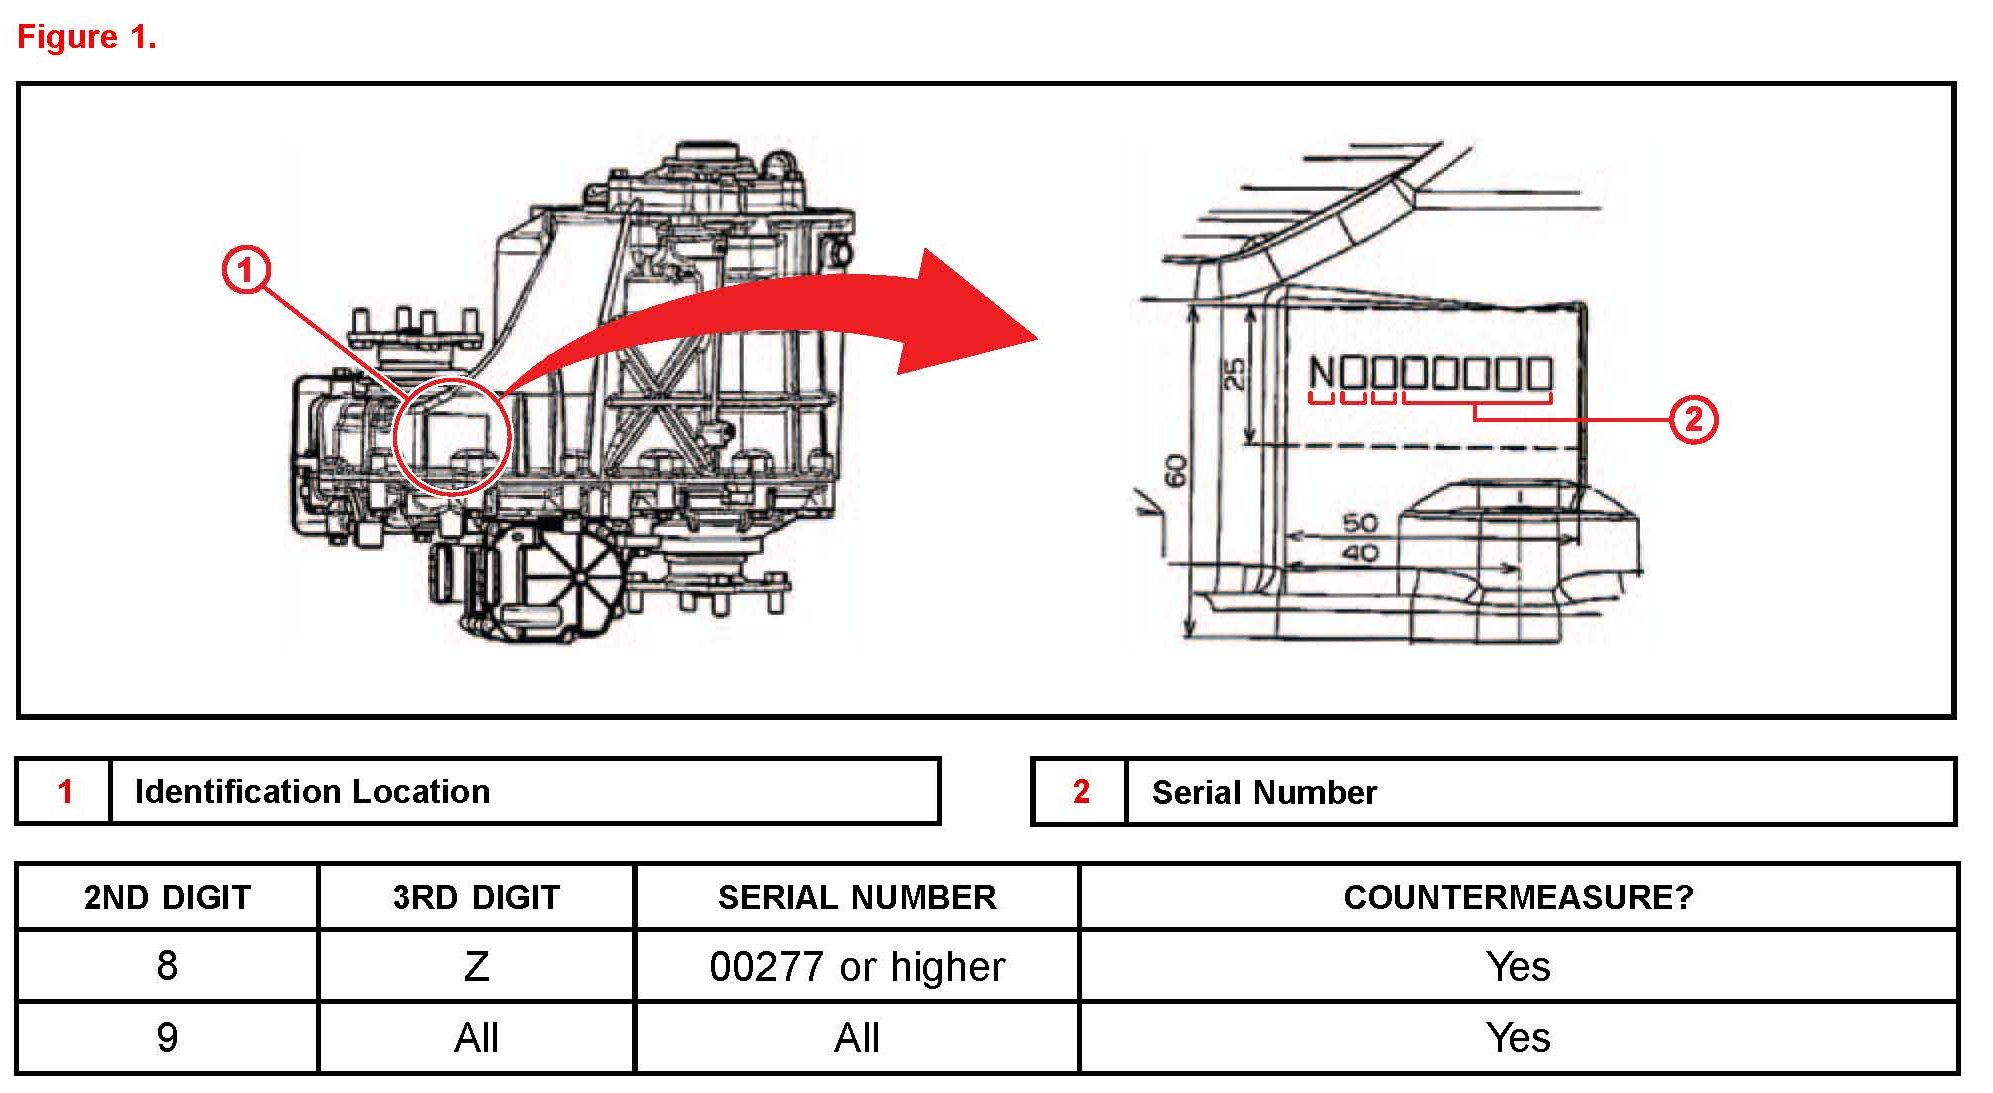
1. Confirm that the transfer case assembly is NOT a countermeasure part.
^ If the identification number is prior to "N8Z00277" continue to step 2.
^ If the identification number is "N8Z00277 or higher or begins with "N9" continue to step 3.
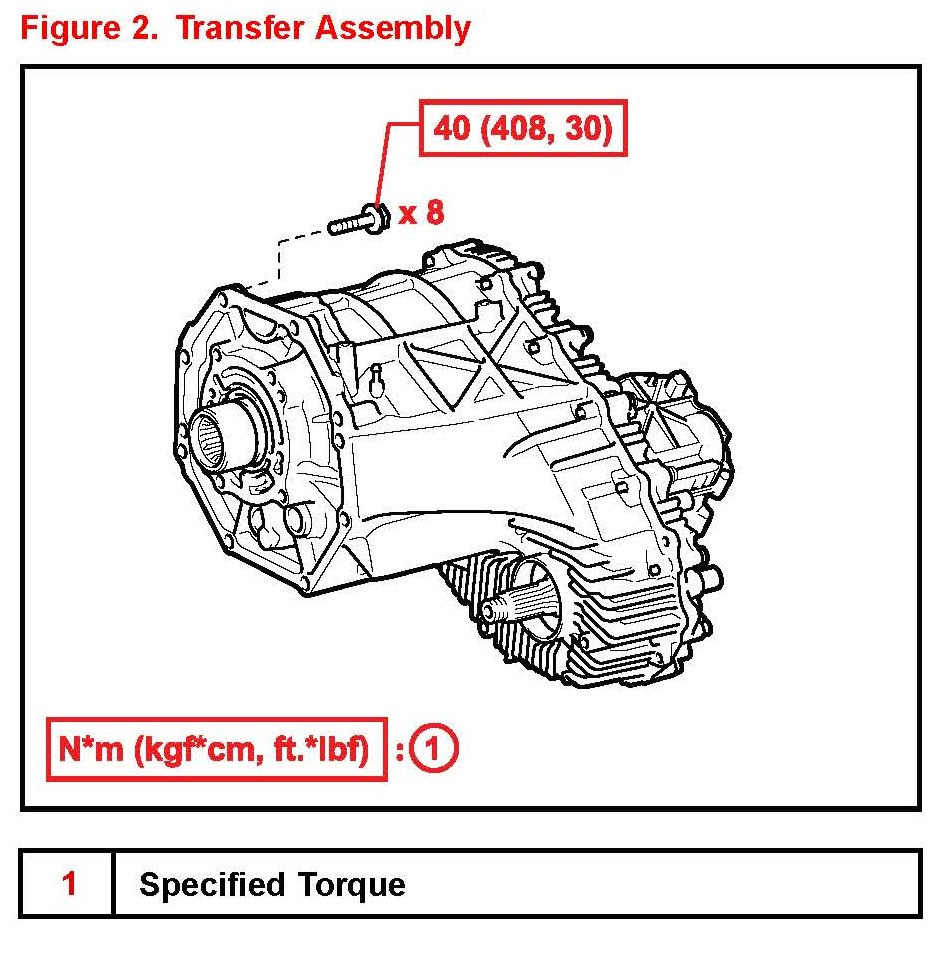
2. Remove and replace the transfer case assembly.
Refer to the Technical Information System (TIS) applicable model year LX 570 Repair Manual:
2008 / 2009 LX 570 Drivetrain - Transfer/4Wd/Awd
- "JF2A Transfer / 4WD / AWD: Transfer Assembly:
Removal"
2008 / 2009 LX 570 Drivetrain - Transfer/4wd/Awd
- "JF2A Transfer/4WD / AWD: Transfer Assembly:
Installation"
Torque: 40 N*m (408 kg*cm, 30 ft*lbf)
3. Install the heater pipe clamp cushion.
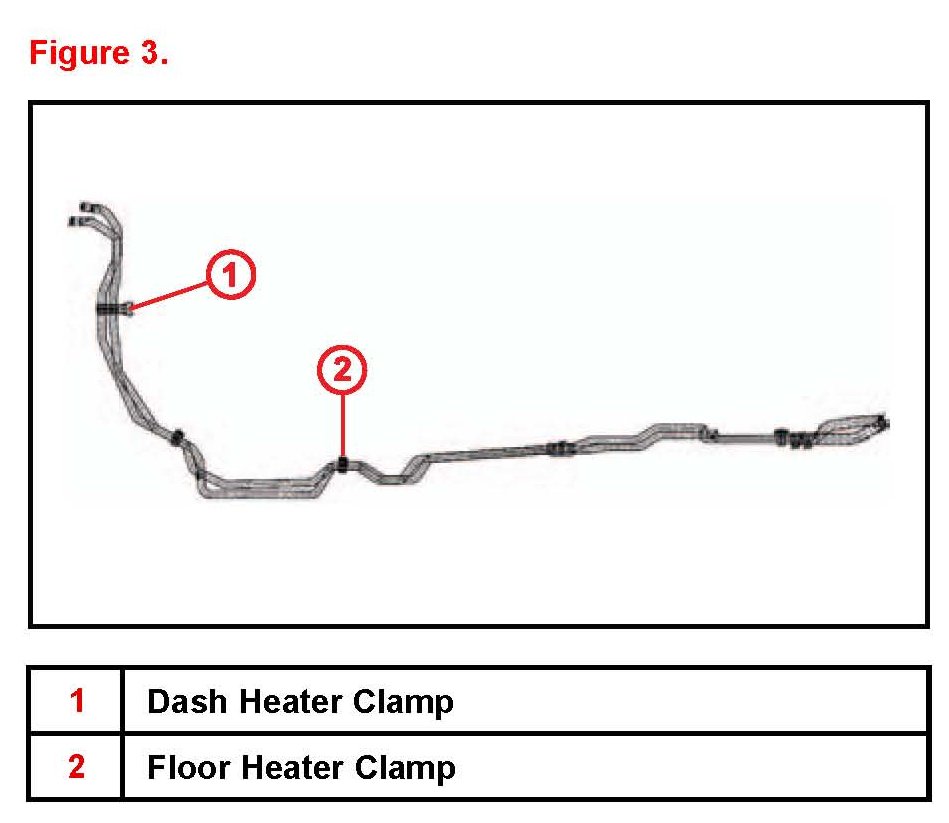
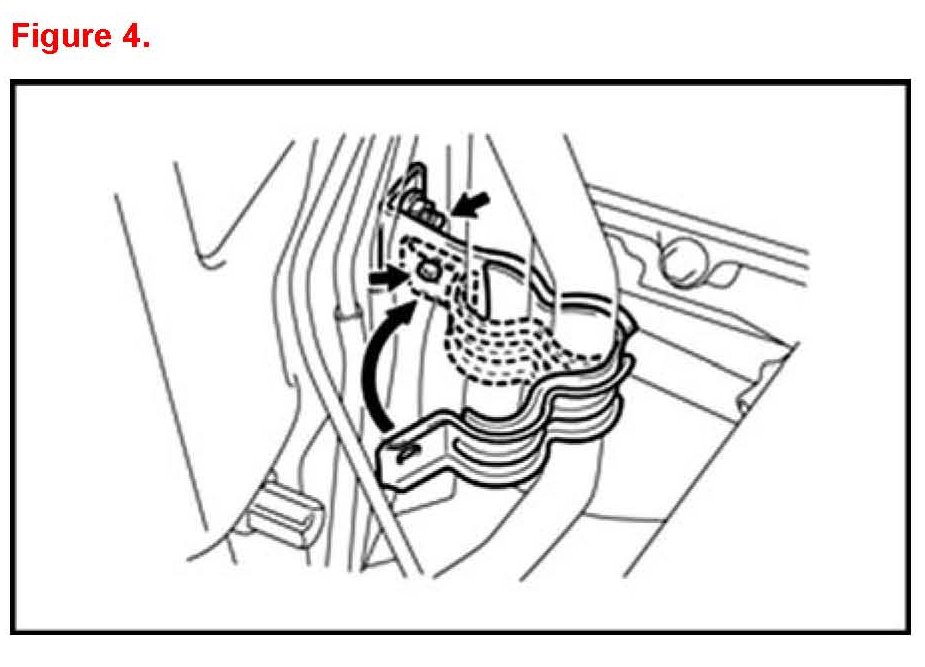
A. Remove and replace the dash heater clamp with the revised part.
Torque: 9.8 N*m (100 kg*cm, 87 in*lbf)
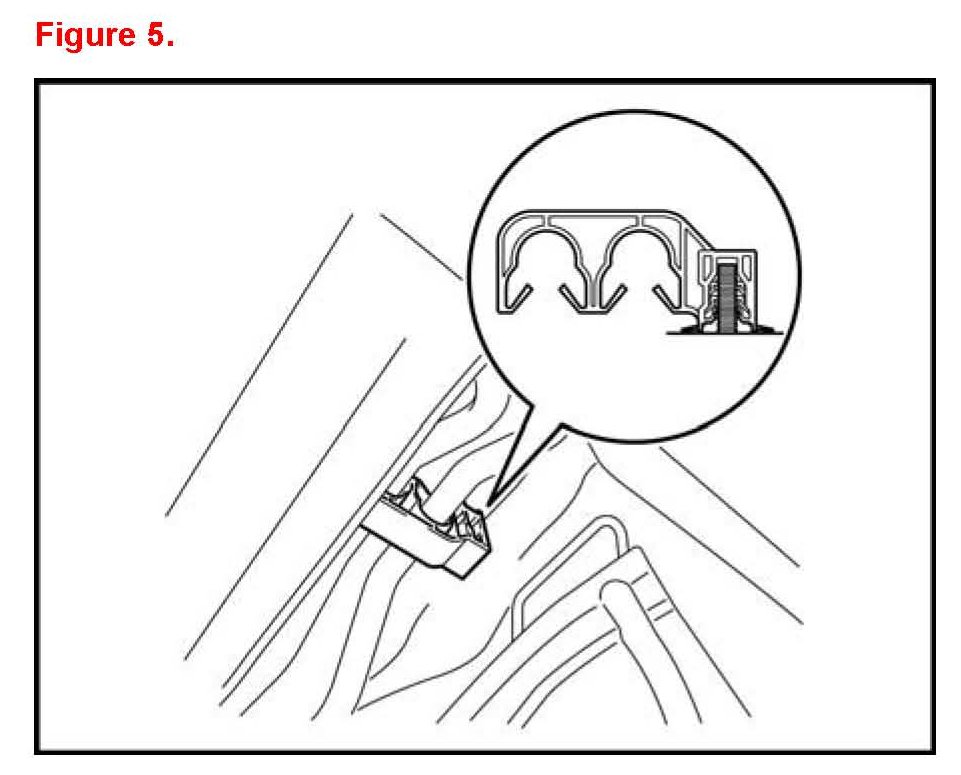
B. Remove the floor heater clamp.
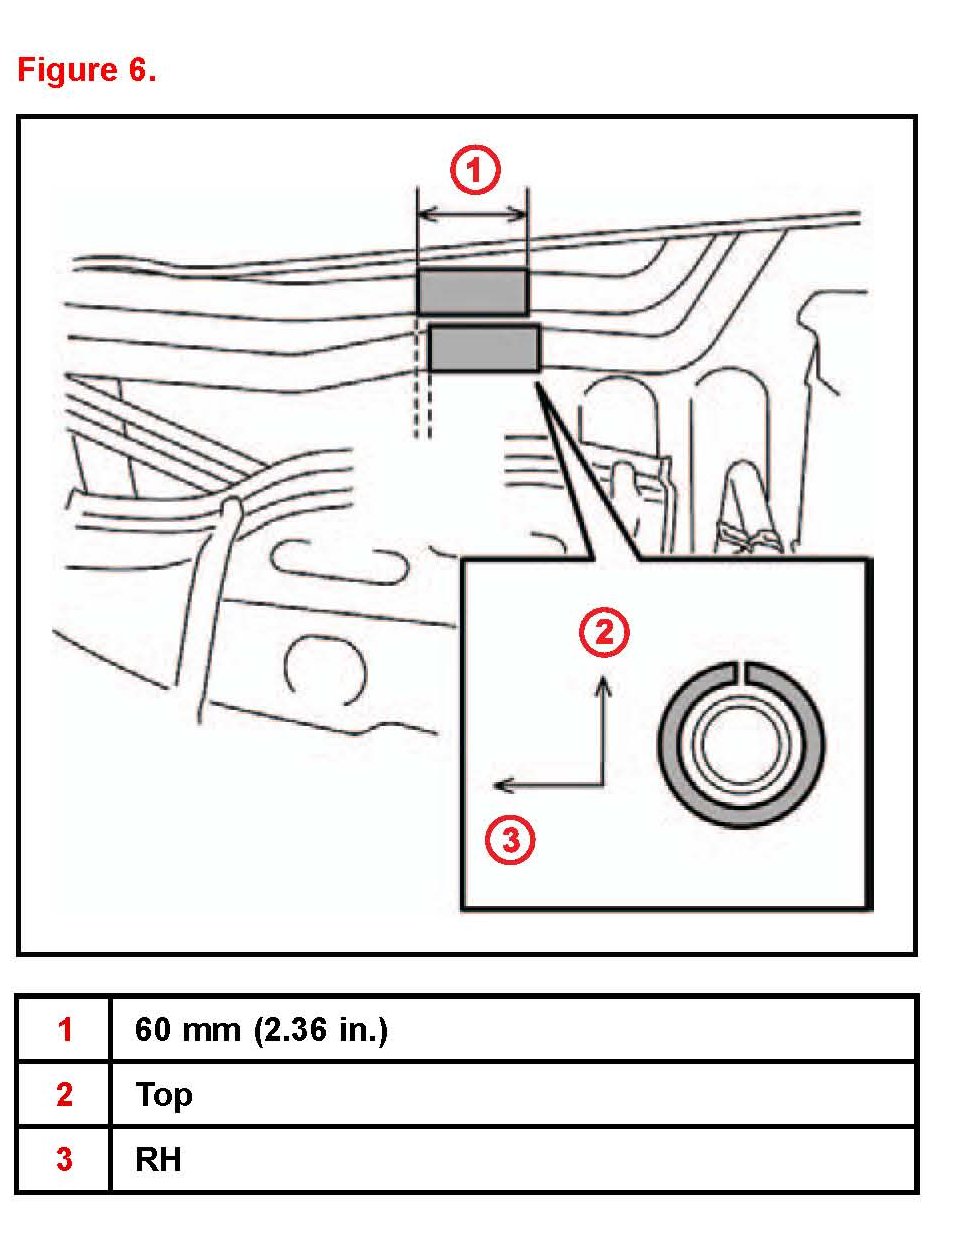
C. Adhere the sponge tape (heater packing P/N 87127-60030) to the heater pipe as shown and install the revised floor heater clamp.
4. Install the front differential carrier assembly supports.
A. Support the front differential carrier assembly using a transmission support or equivalent.
B. Remove and replace the Front Differential Front Support Assembly LH the 3 mounting bolts (P/N 90105-14177) and Upper Differential Mount Stopper with revised parts.
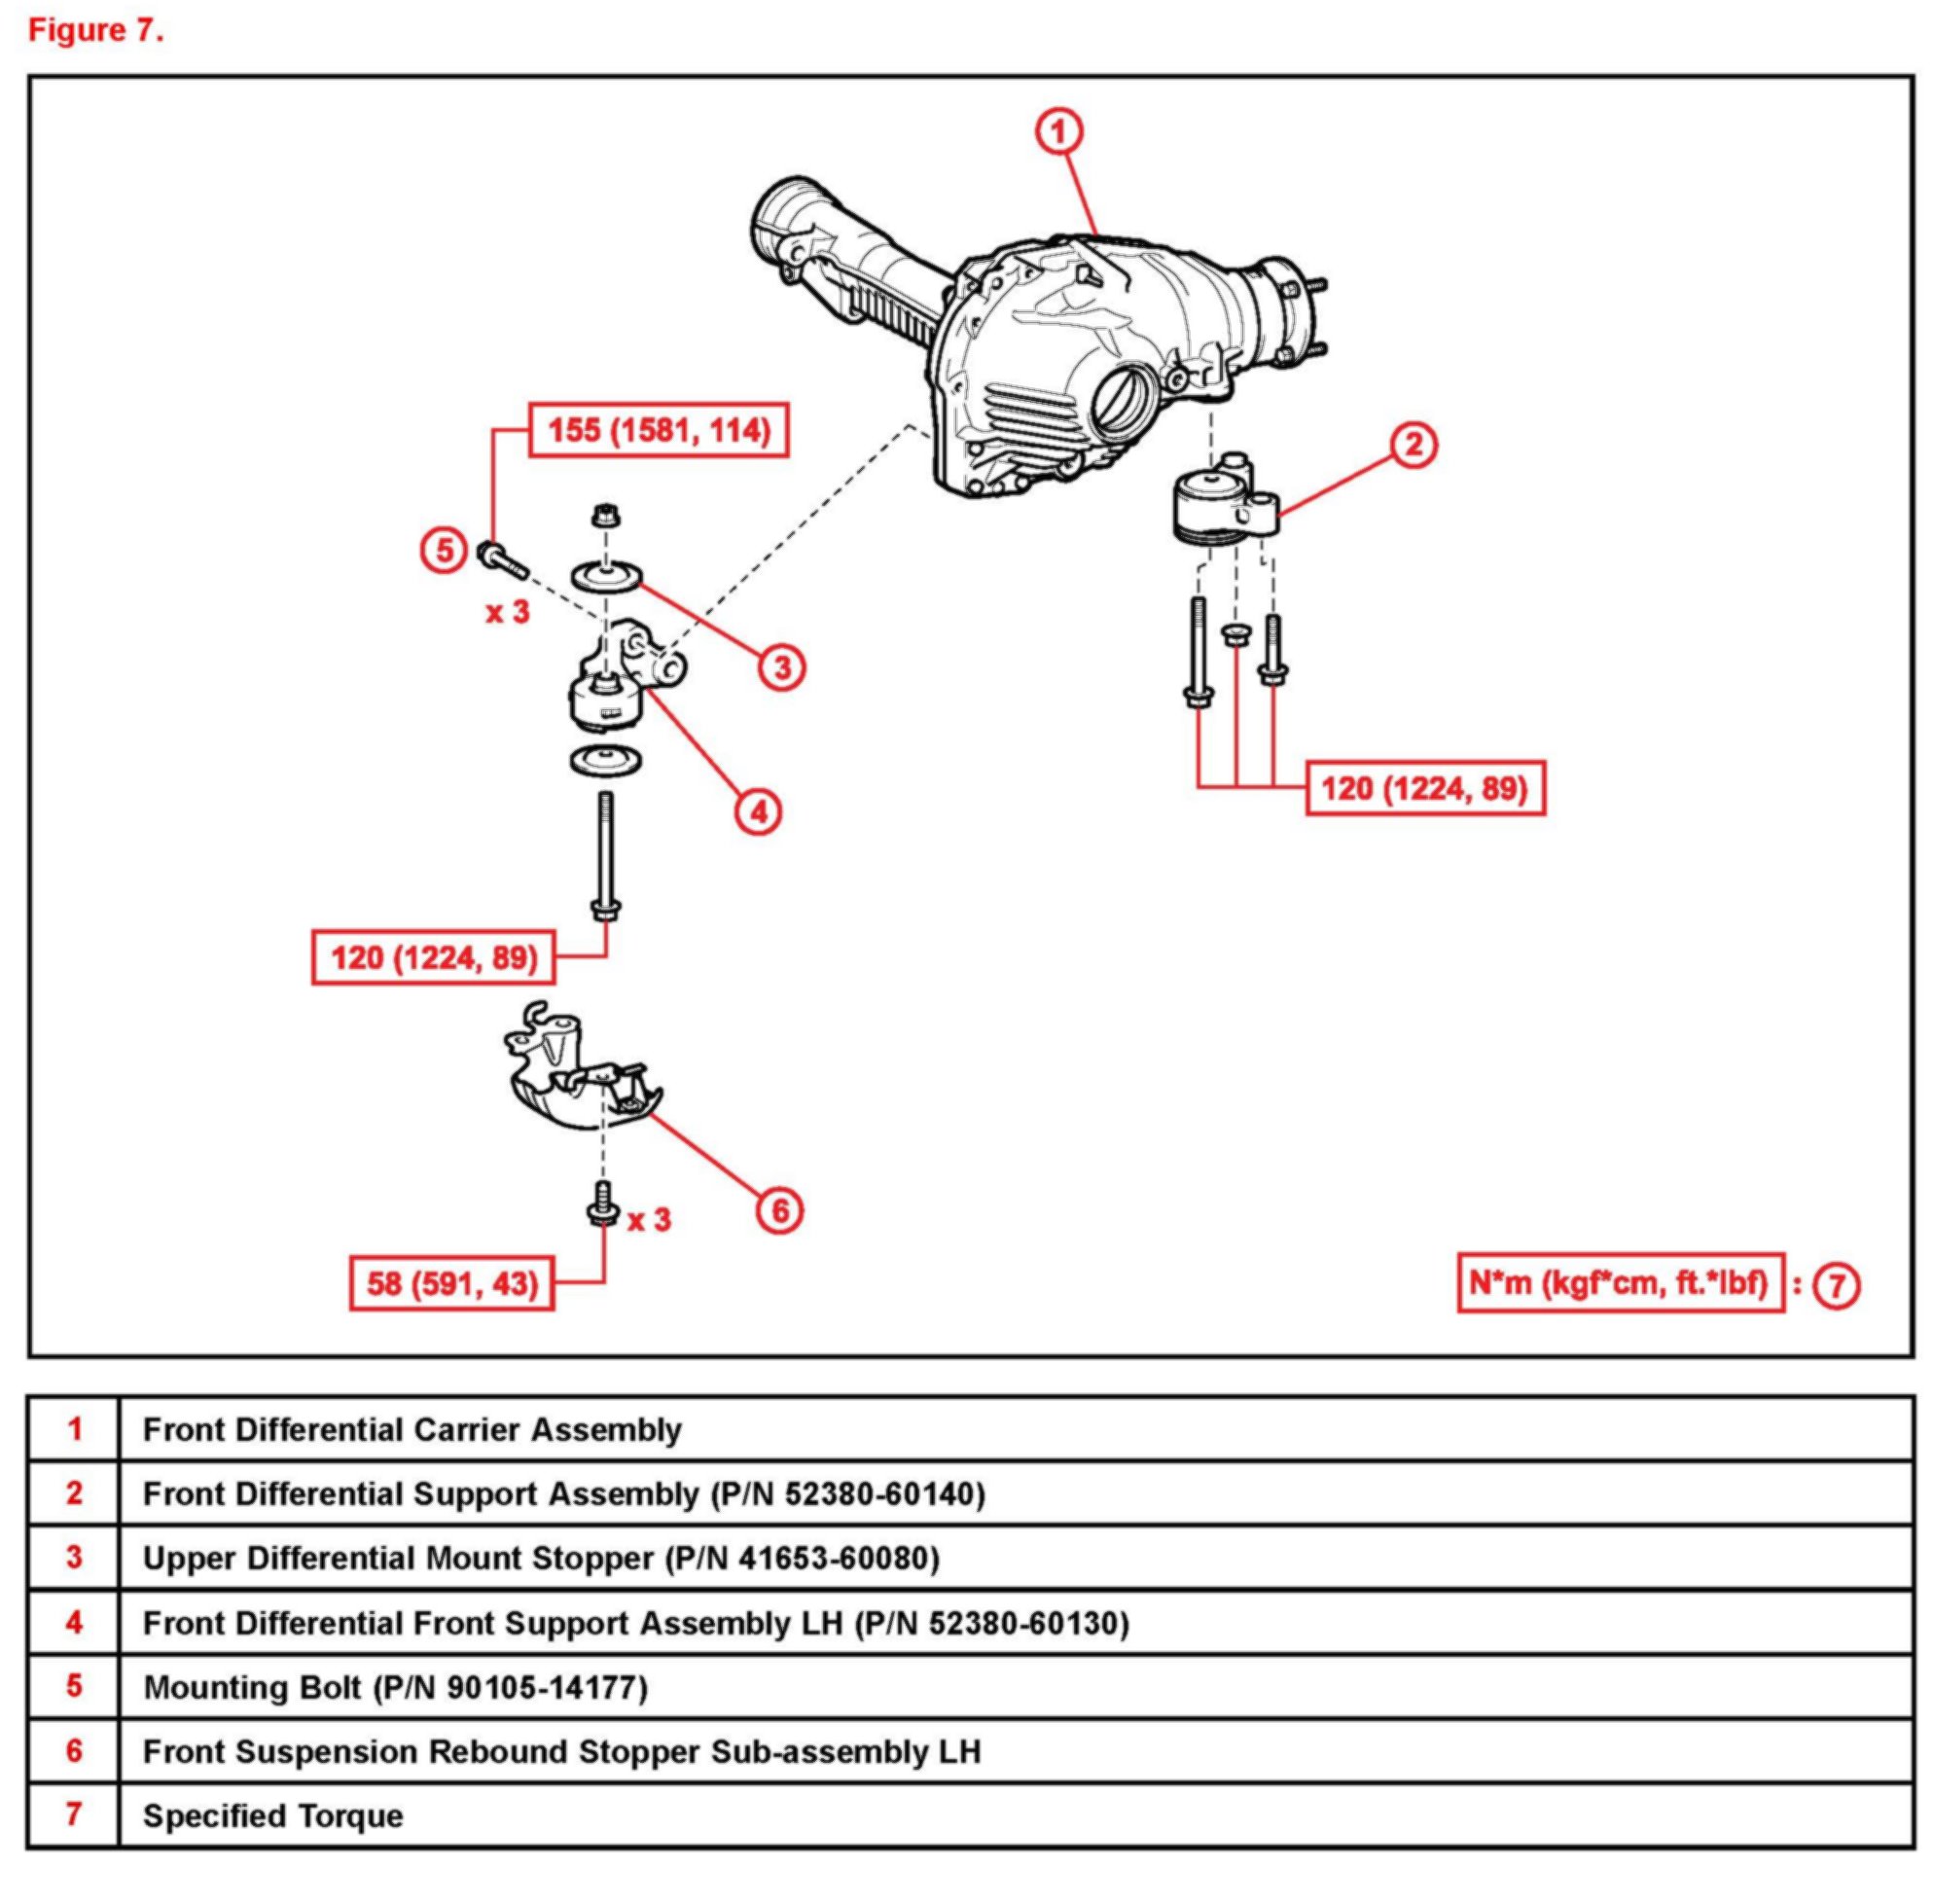
C. Remove and replace the Front Differential Support Assembly with the revised part.
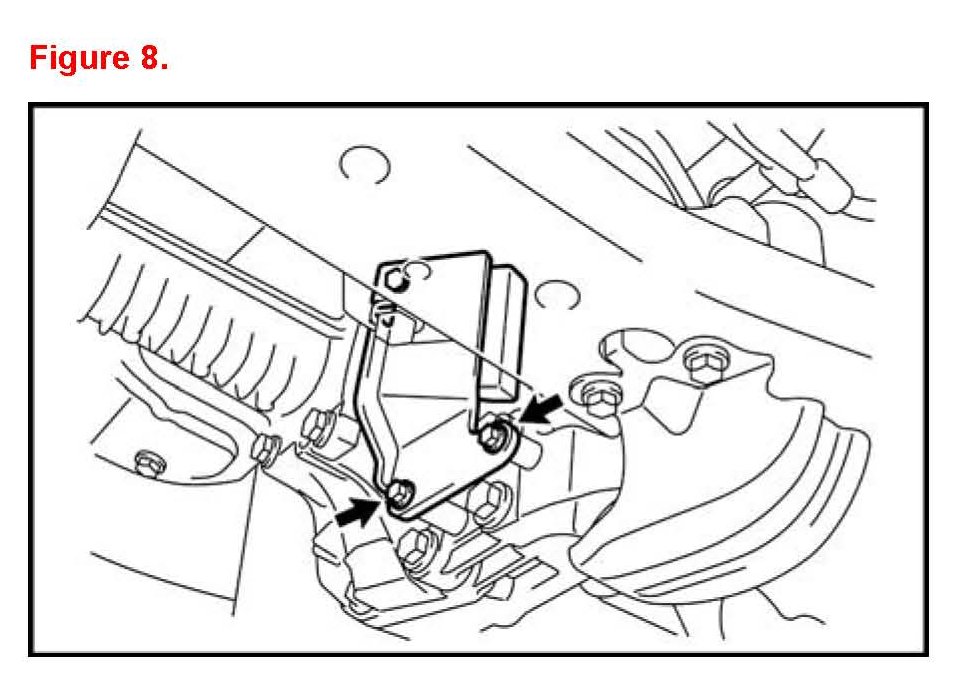
D. Install the dynamic damper with the two bolts to the Front Differential Front Support Assembly LH.
Torque: 25 N*m (255 kg*cm, 18 ft*lbf)
E. Drive vehicle using the following driving pattern:
^ Drive the vehicle at highway speeds for 40 minutes to warm up the front differential gear oil to operating temperature.
^ Place the shifter in the Si position and quickly accelerate to 25 mph (40 km/h) and then coast down to 12 mph (19 km/h). Repeat the acceleration/coast pattern another 14 times.
F. Inspect the front differential housing in the Front Differential Front Support Assembly LH mounting area for any leaks. If any leaks are detected reseal the front differential following the instructions in the Repair Manual.
5. Install dash panel No.2.
A. Remove the accelerator pedal.
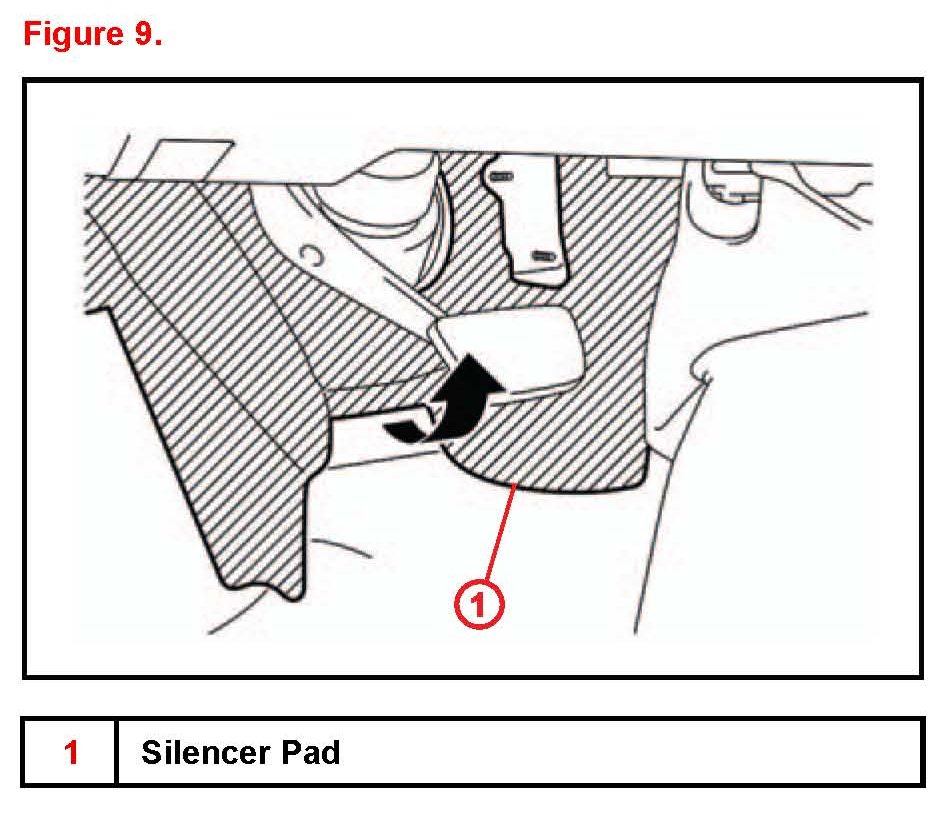
B. Lift the dash silencer pad to gain access to the dash panel area.
^ Steps C through E should be completed within 30 minutes.
^ Refer to the instructions for 3M Scotch-Weld(TM) DP-460 Adhesive (or equivalent).
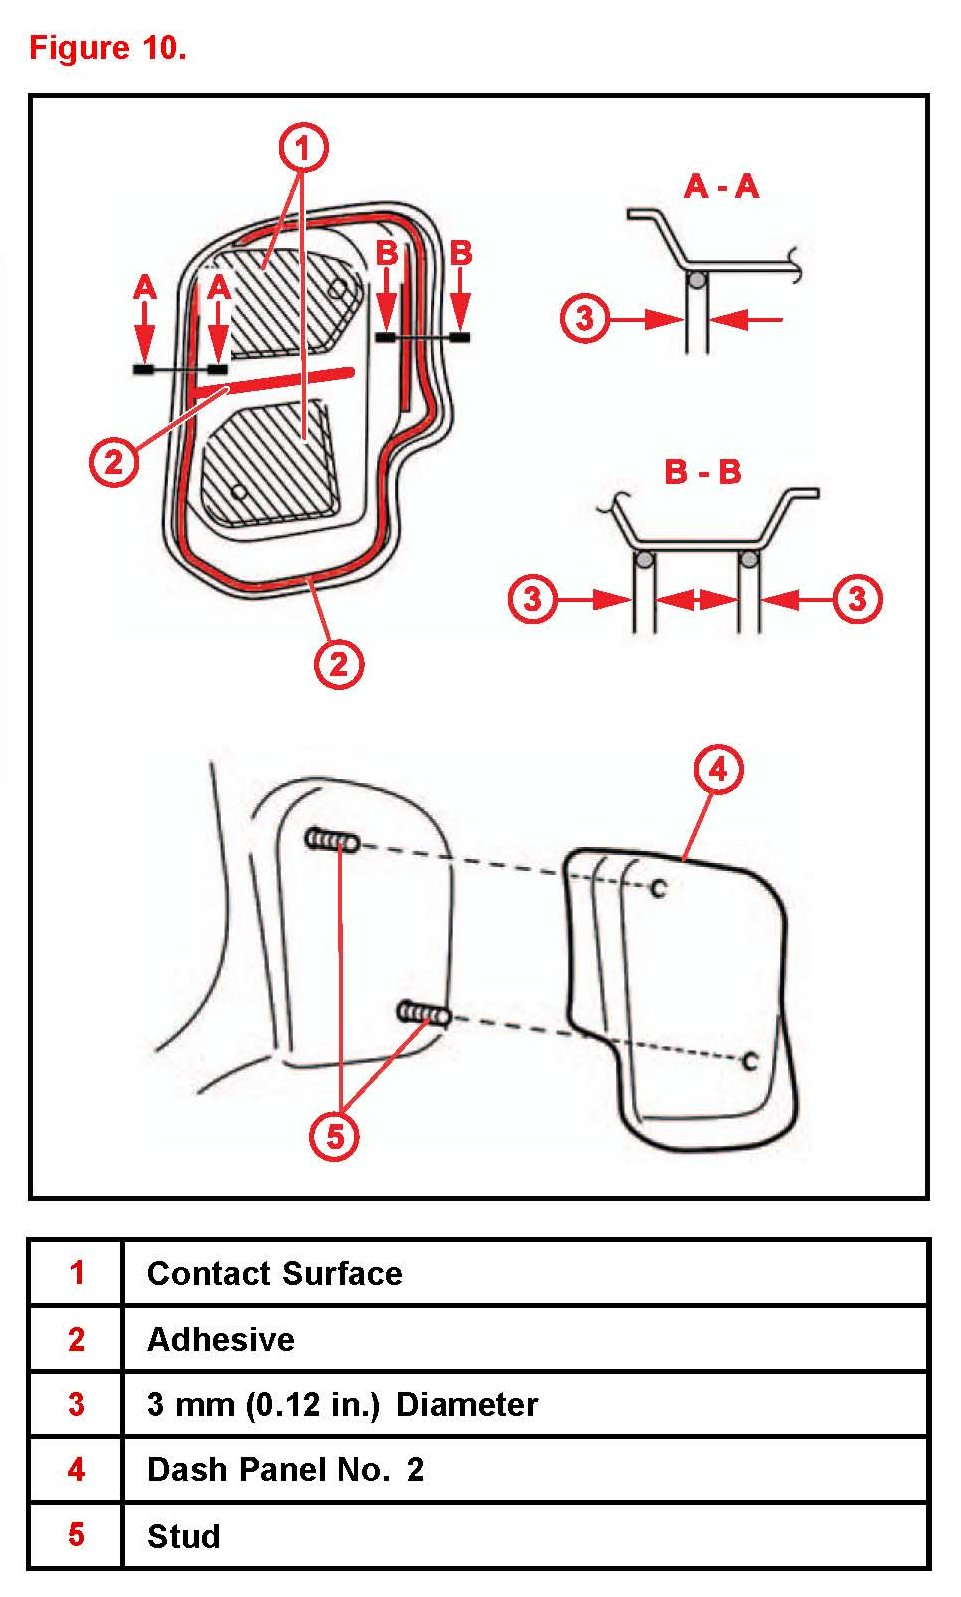
C. Apply 3M Scotch-Weld(TM) DP-460 Adhesive (or equivalent) in a continuous line as shown in the illustration including the flat surface between the contact surfaces.
^ Do NOT apply the adhesive to the contact surface areas of dash panel No.2.
^ Be careful NOT to get adhesive on the studs.
^ Wipe off any adhesive immediately as it can cause improper torque.
E. Install the accelerator pedal using NEW nuts.
Torque: 7.0 N*m (71 kgf*cm, 5.2 ft*lbf)
NOTE
^ Allow the adhesive to cure for 24 hours at 77°F (25°C) after application.
^ Be careful NOT to get adhesive on any other parts.
^ Do NOT touch the accelerator pedal until adhesive is completely cured (at least 24 hours).
^ Refer to the instructions for 3M Scotch-Weld(TM) DP-460 Adhesive (or equivalent).
F. Re-inspect the front differential housing in the Front Differential Front Support Assembly LH mounting area for any leaks. If any leaks are detected reseal the front differential following the instructions in the Repair Manual.
6. Test drive the vehicle to verify the condition has been improved.