A/C Expansion Valve - Removal
REMOVAL
WARNING: Refer to the applicable Warnings and Cautions for this system before performing the following operation Service Precautions and . Failure to follow these instructions may result in possible serious or fatal injury.
NOTE: 3.6L engine model shown. 2.8L engine model similar.
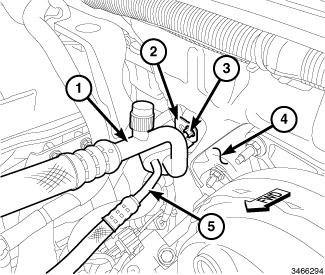
1. Disconnect and isolate the negative battery cable.
2. Remove the engine trim cover.
3. Recover the refrigerant from the refrigerant system Service and Repair.
4. Remove the nut (3) that secures the bracket (2) containing the A/C suction line (1) and A/C liquid line (5) to stud on the cowl panel (4).
5. Disengage the refrigerant line bracket from the stud.
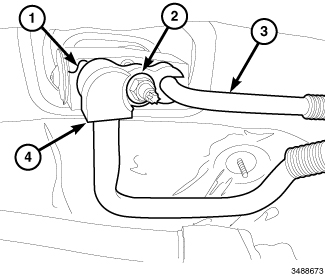
6. On 3.6L engine models, remove the intake manifold Intake Manifold - Removal.
7. Remove the nut (2) that secures the A/C liquid line (3) and A/C suction line (4) to the A/C expansion valve (1).
8. Disconnect the A/C liquid and suction lines from the A/C expansion valve, remove and discard the O-ring seals and position the refrigerant line assembly out of the way.
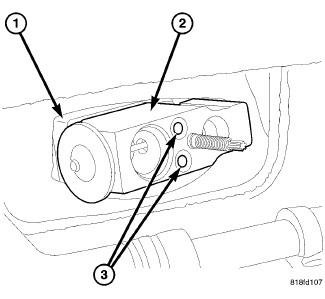
9. Remove the two bolts (3) that secure the A/C expansion valve (2) to the evaporator tube tapping block (1).
10. Remove the A/C expansion valve from the evaporator tube tapping block and remove and discard the O-ring seals.
11. Install plugs in, or tape over the opened refrigerant line and evaporator tube fittings and all expansion valve ports.