Front Suspension Lower Ball Joint - Installation
INSTALLATION
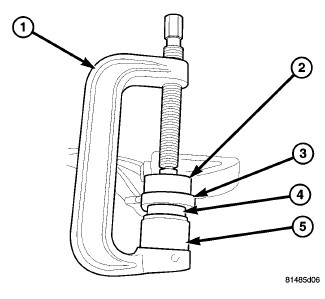

NOTE: Extreme pressure lubrication must be used on the threaded portions of the tool. This will increase the longevity of the tool and insure proper operation during the removal and installation process.
1. Install the ball joint (4) into the control arm (3) and press in using special tools C-4212F (press) (1), 9654-1 (Driver) (5) and 9654-2 (Receiver) (2).
2. Stake the ball joint flange in four evenly spaced places around the ball joint flange, using a chisel and hammer.
3. Install the steering knuckle Front Steering Knuckle - Installation.
4. Install the tie rod end into the steering knuckle Tie Rod End - Installation.
5. Install and tighten the halfshaft nut to 136 Nm (100 ft. lbs.). (If Equipped).
6. Install the brake caliper and rotor Brake Rotor - Installation.
7. Install the tire and wheel assembly Removal and Replacement.
8. Check the vehicle ride height Service and Repair.
9. Perform a wheel alignment Service and Repair.