Windshield Washer Reservoir: Service and Repair
WASHER RESERVOIRREMOVAL
1. Disconnect and isolate the battery negative cable.
2. Remove the air cleaner housing from the top of the left front fender wheel house.
Fig. 28 Washer Reservoir Filler Neck Mounting:
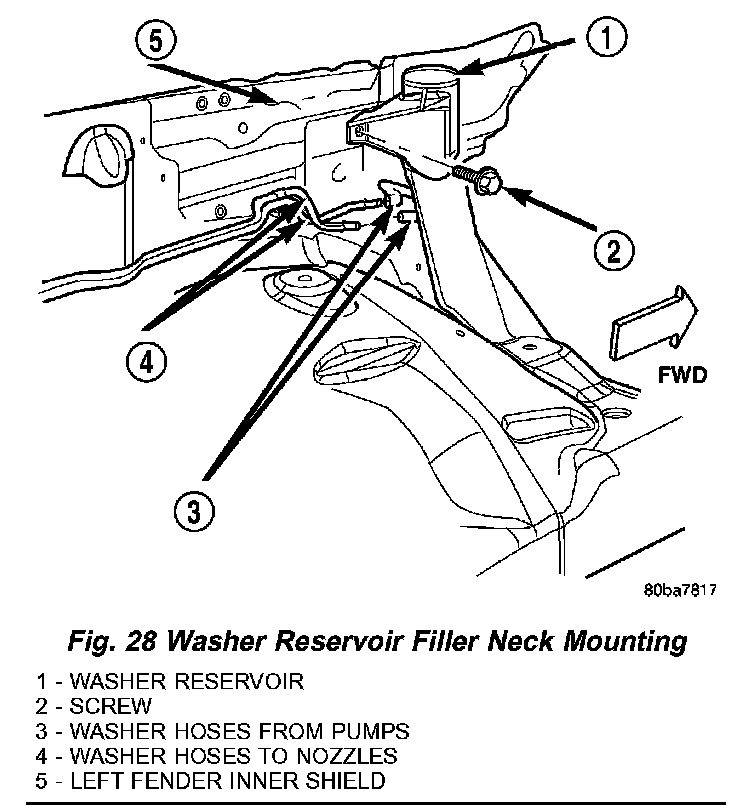
3. Disconnect the two washer reservoir washer hoses from the two engine compartment washer hoses at the inline connectors located on the top of the left front fender wheel house.
4. Open the washer reservoir filler cap and unsnap the filler cap hinge from the hook on the filler neck.
5. Remove the one screw that secures the washer reservoir filler neck to the left inner fender shield.
6. Raise and support the vehicle.
7. Remove the liner from the left front fender wheel house.
Fig. 29 Washer Reservoir:
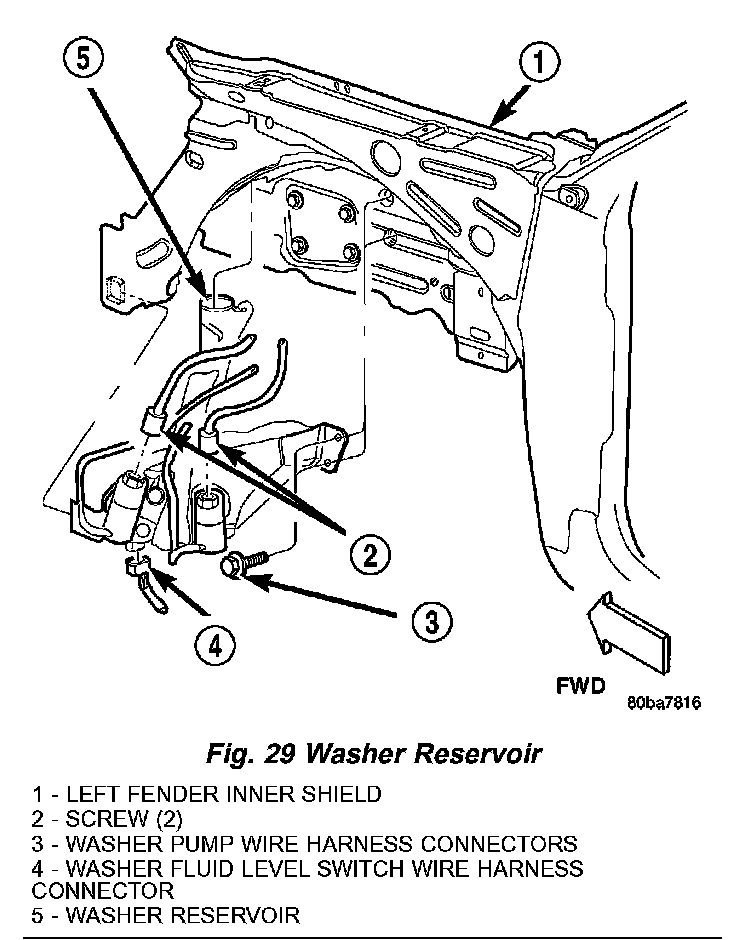
8. Disconnect the left headlamp and dash wire harness connectors for the two washer pump/motor units from the pump/motor connector receptacles.
9. Remove the two screws that secure the inboard mounting flange of the washer reservoir to the left front inner wheel house.
10. Pull the bottom of the washer reservoir rearward far enough to access the left headlamp and dash wire harness connector for the washer fluid level switch on the front of the reservoir.
11. Disconnect the left headlamp and dash wire harness connector for the washer fluid level switch from the switch connector receptacle.
12. Pull the bottom of the washer reservoir rearward far enough to disengage the outboard mounting tab from the mounting slot on the left front inner fender shield.
13. Rotate the washer reservoir far enough so that the inboard mounting flange clears the front suspension components, then lower the reservoir far enough to disengage the filler neck from the hole in the left front wheel house extension.
14. Remove the washer reservoir from the left front fender wheel house.
INSTALLATION
1. Position the washer reservoir into the left front fender wheel house.
2. Raise the washer reservoir filler neck through the hole in the left front fender wheelhouse extension into the engine compartment and rotate the reservoir as needed to orient the inboard mounting flange over the top of the front suspension components.
3. Pull the bottom of the washer reservoir rearward far enough to engage the outboard mounting tab with the mounting slot in the left front inner fender shield.
4. Pull the bottom of the washer reservoir rearward far enough to access the washer fluid level switch connector receptacle on the front of the reservoir.
5. Reconnect the left headlamp and dash wire harness connector for the washer fluid level switch to the switch connector receptacle.
6. Install and tighten the two screws that secure the inboard mounting flange of the washer reservoir to the left inner wheel house. Tighten the screws to 7.4 Nm (66 in. lbs.).
7. Reconnect the left headlamp and dash wire harness connectors for the two washer pump/motor units to the pump/motor unit connector receptacles.
8. Reinstall the liner into the left front fender wheel house.
9. Lower the vehicle.
10. Install and tighten the one screw that secures the washer reservoir filler neck to the left inner fender shield. Tighten the screw to 7.4 Nm (66 in. lbs.).
11. Reinstall the washer reservoir filler cap hinge onto the hook on the filler neck and close the cap.
12. Reconnect the two washer reservoir washer hoses to the two engine compartment washer hoses at the inline connectors located on the top of the left front fender wheel house.
13. Reinstall the air cleaner housing onto the top of the left front fender wheel house.
14. Reconnect the battery negative cable.