Service Procedure
1. Visually inspect each of the front seat cushions and seat backs for holes or discoloration due to excessive heat.> If holes or discoloration due to excessive heat is found on either front seat, a new seat cover should be ordered before performing this repair.
> If no holes or discoloration due to excessive heat was found on either front seat, continue with Step 2 of this procedure.
2. Place both front seats in the full forward position and partially recline the seatback rearward. This seat position will allow access to all bolts during the repair procedure.
3. Open the hood and disconnect the negative battery cable.
4. Remove the headrests from both front seats.
5. Remove the four seat assembly attachment bolts from each front seat.
6. Disconnect the seat wiring harness connector located under the seat.
7. With the help of an assistant, remove both front seats from the vehicle.
NOTE:
Perform all seat repairs on a clean work surface.
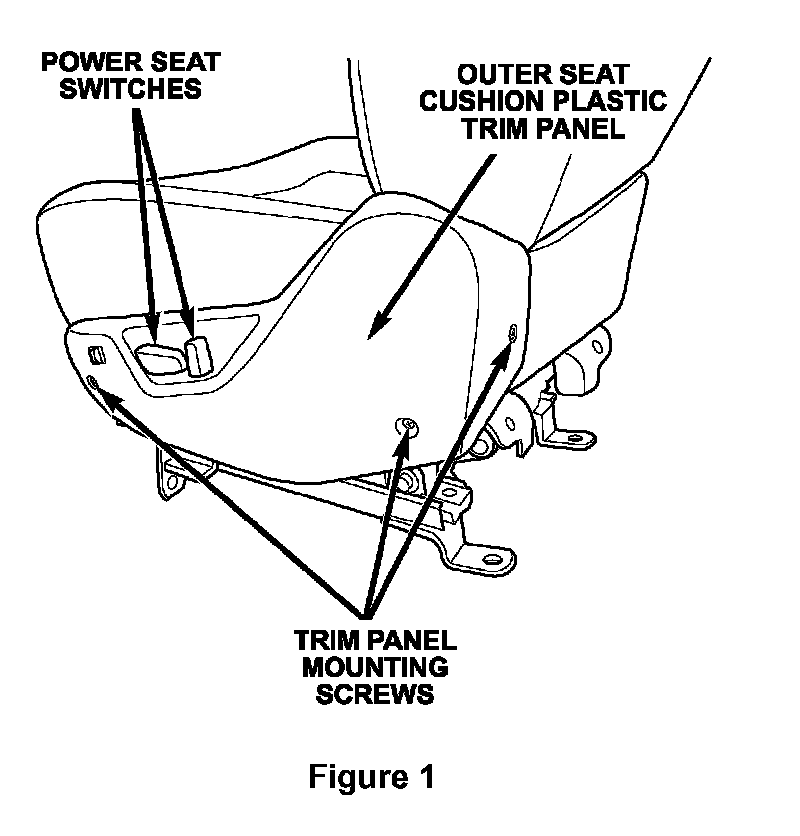
8. Remove the outer seat cushion plastic trim panel screws, disconnect the power seat switches and place the panel aside (Figure 1).
9. Disconnect the seatback wiring harness connectors located behind the plastic trim panel.
10. For vehicles equipped with power seat recliners, disconnect the seatback recliner motor connector.
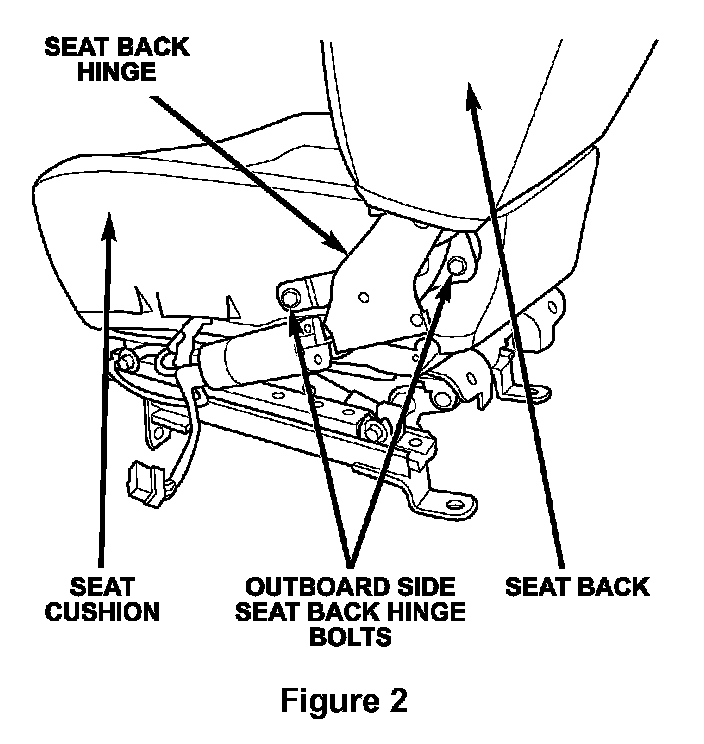
11. Remove the two outboard side bolts and the one inboard side bolt on the seatback hinge (Figure 2).
12. Disconnect seatback heater connector and separate the seatback from the seat cushion.
13. Remove and save the inner seatback hinge black plastic bushing.
14. Turn the seat cushion upside down and unlatch the plastic "J" strap on the inboard side of the cushion.
15. Unhook the plastic clip on the outboard side of the cushion.
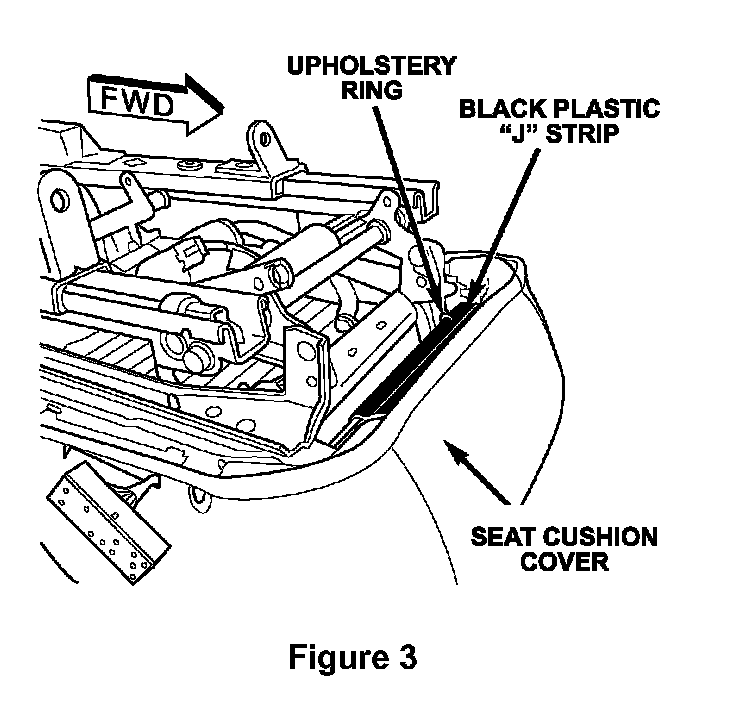
16. Remove the metal upholstery ring from front "J" strap (Figure 3).
17. Unlatch the front "J" strap.
18. Turn the seat over and carefully lift the seat cover to expose the upholstery rings. Carefully cut off all of the upholstery rings.
19. Carefully remove the seat cover from the foam seat cushion.
20. Carefully remove and discard the old seat heater element from the seat foam.
CAUTION:
Never apply the new heating element over the old element. The old heating element must be removed and discarded.
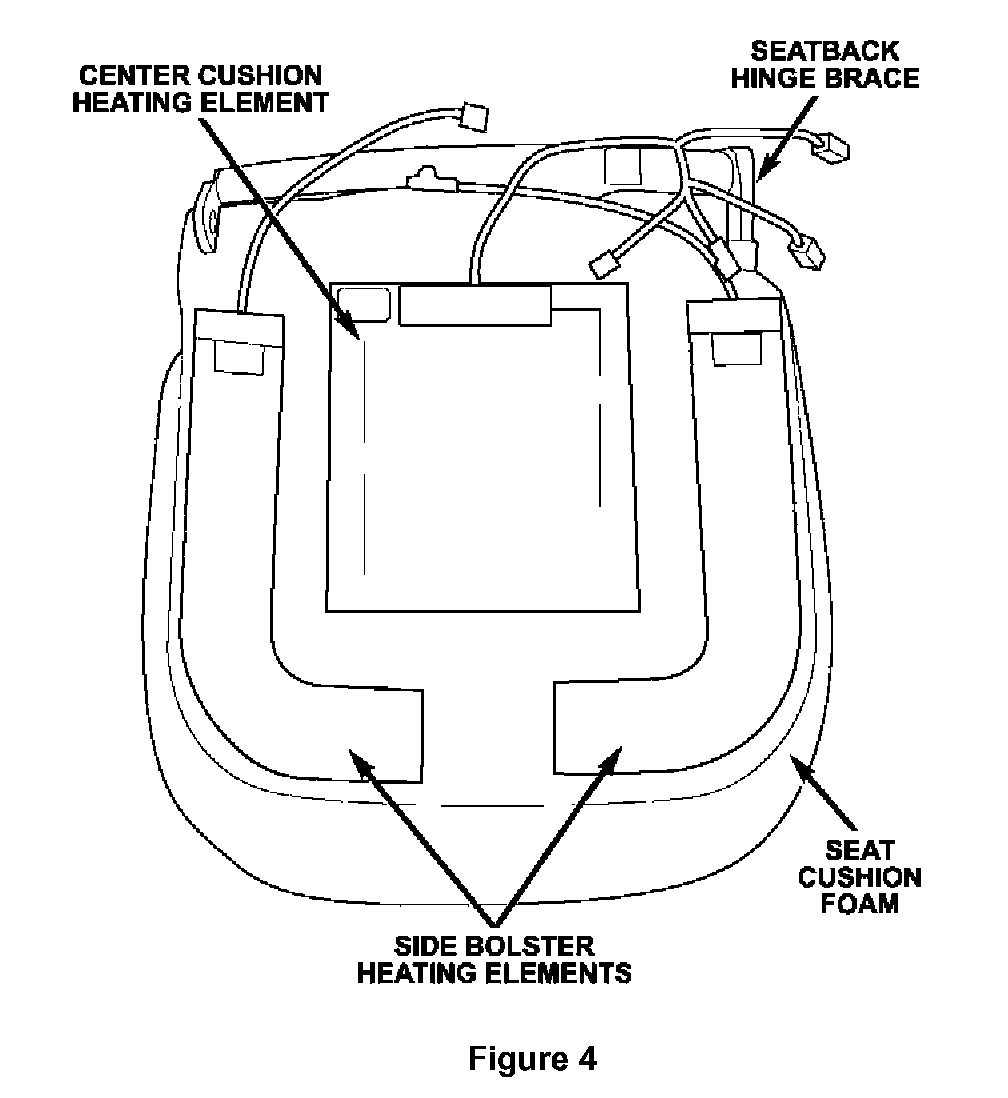
21. Peel off the paper on the adhesive backed heating element and attach the new center cushion heating element as shown in Figure 4. This is the element in the kit that has four electrical connectors.
NOTE:
Each heating element in the kit has a label attached that indicates its intended location.
22. Peel off the paper from each of the adhesive backed side bolster heating elements and attach each heating element to the seat cushion foam as shown in Figure 4.
23. Connect the bolster wiring connectors to the center heating element wiring harness.
24. Route the wiring harness between the rear seat bar and the seat cushion foam.
25. Place the seat cushion cover into position over the seat cushion foam.
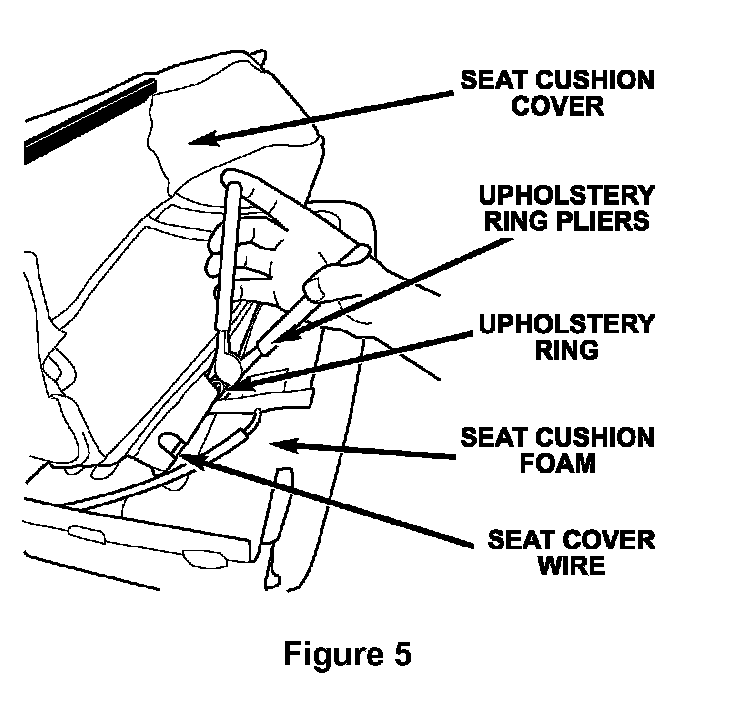
26. Attach the center of the seat cushion cover to the grid wire in the seat foam with the upholstery rings supplied in the kit (Figure 5).
NOTE:
The kit contains four extra upholstery rings.
27. Pull the seat cover into position over the seat cushion foam.
28. Turn the seat cushion upside down and connect the plastic "J" straps, and plastic clip.
29. Connect the rear "J" strap to the seat frame.
30. Install one upholstery ring on the front "J" strap in the same location as was removed earlier (Figure 3).
31. The seat cushion is complete. Set the cushion aside.
32. Place the seatback face-down on a clean work bench.
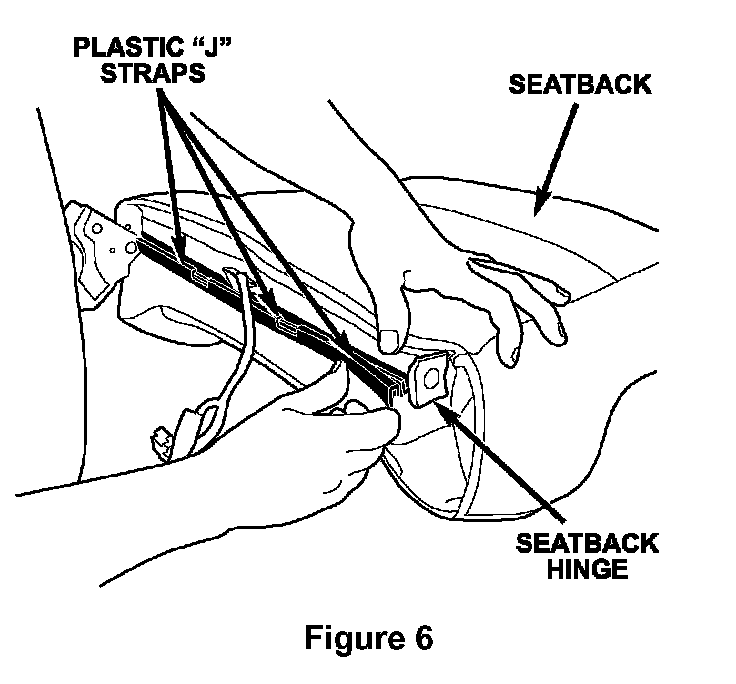
33. Disconnect the "J" strap located on the bottom of the seatback (Figure 6).
34. Partially pull the seatback cover inside out until half of the seatback foam is exposed.
35. Carefully remove the old seat heating element. Discard the old element.
CAUTION:
Never apply the new heating element over the old heating element. The old heating element must be removed and discarded.
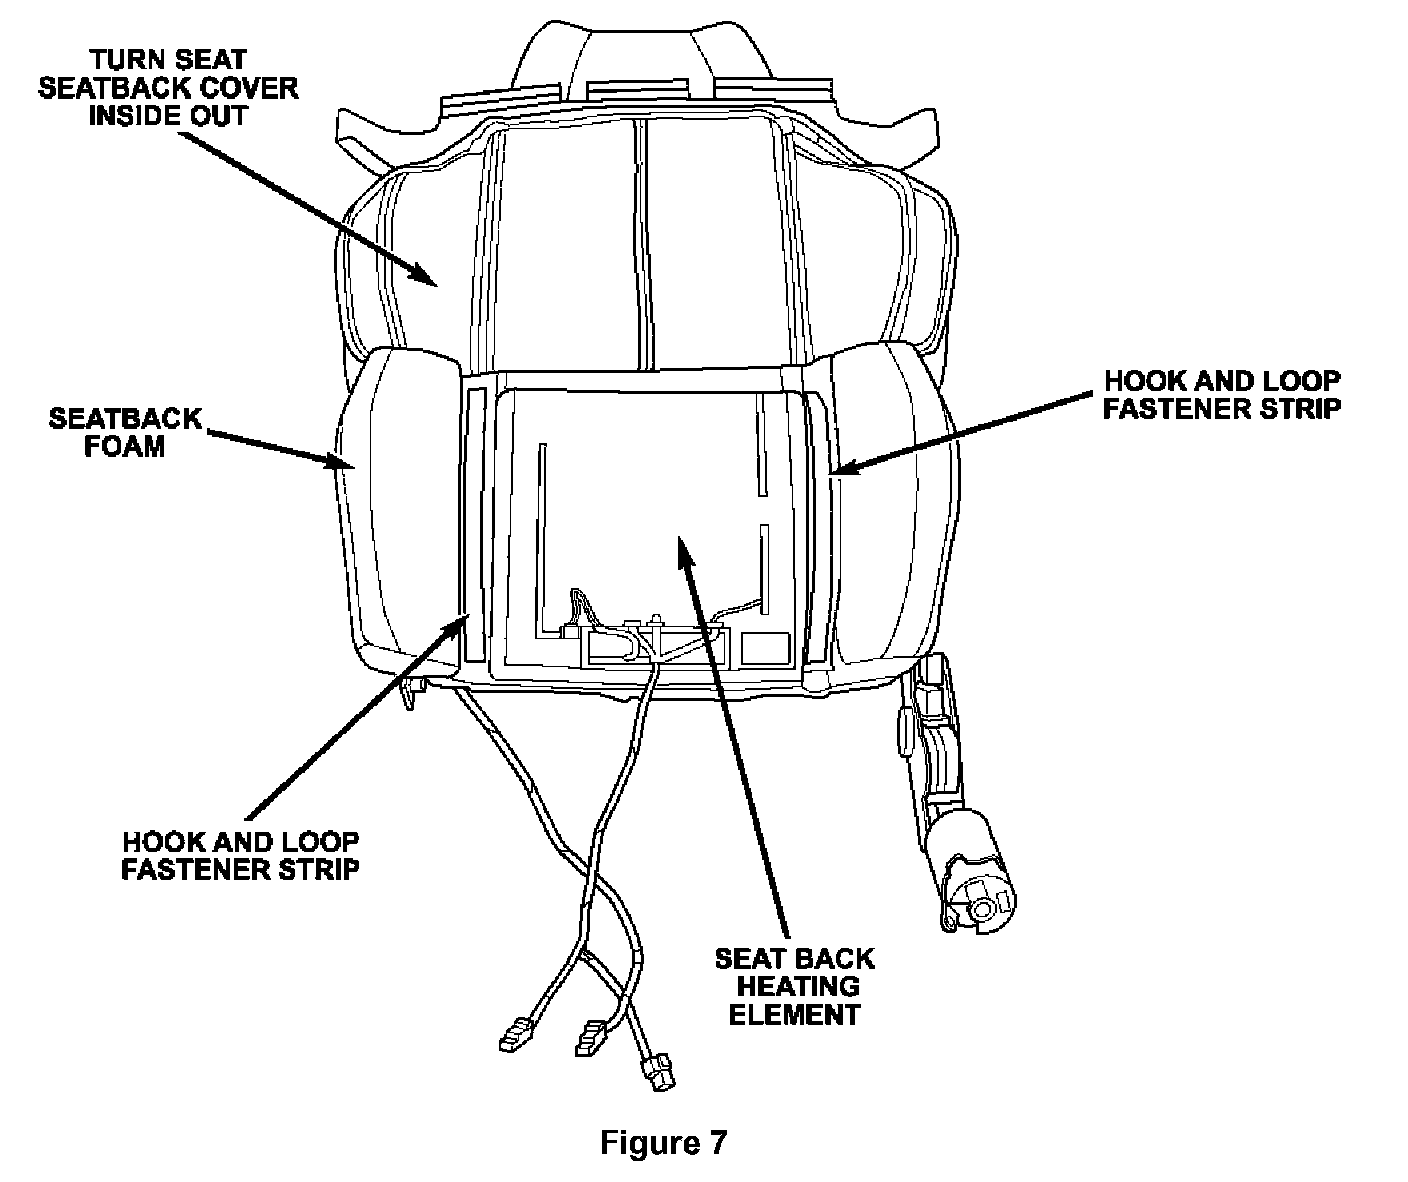
36. Peel off the paper on the adhesive backed heating element and attach the new seatback heating element onto the seatback foam as shown in Figure 7.
37. Carefully pull the seat cover down over the foam and element.
38. Connect the "J" straps located on the bottom of the seatback.
39. Install the black plastic inner seat hinge bushing.
40. Place the seatback onto the seat cushion and install the seatback hinge bolts.
Tighten the two outboard seatback hinge bolts to 20 ft. lbs (28 N.m) and the one inboard seatback hinge bolt to 35 ft. lbs (47 N.m).
NOTE:
The two short bolts are used to fasten the outboard seatback hinge and the single long bolt is used to fasten the inboard seatback hinge.
41. Route the heated seat wiring through the lower cushion slot.
42. Connect the seatback wiring to the seat cushion wiring harness.
43. Latch the rear "J" strap to the seat frame.
44. Connect the power seat switch harness to the seat switch and place the outer seat cushion plastic trim panel into position. Install and tighten the three fastening screws.
45. Repeat steps 8 through 44 on the remaining front seat.
46. With the help of an assistant, place the front seats into the vehicle.
47. Connect the power seat wiring connector to the body harness.
48. Install seats into position and install the fasteners. Tighten the fasteners to 30 ft. lbs. (40 N.m).
49. Install the headrests on both front seats.