Seat Belt and Retractor - Rear Outboard
REMOVALWARNING: DURING AND FOLLOWING ANY SEAT BELT SERVICE, CAREFULLY INSPECT ALL SEAT BELTS, BUCKLES, MOUNTING HARDWARE, AND RETRACTORS FOR PROPER INSTALLATION, OPERATION, OR DAMAGE. REPLACE ANY BELT THAT IS CUT, FRAYED, OR TORN. STRAIGHTEN ANY BELT THAT IS TWISTED. TIGHTEN ANY LOOSE FASTENERS. REPLACE ANY BELT THAT HAS A DAMAGED OR INOPERATIVE BUCKLE OR RETRACTOR. REPLACE ANY BELT THAT HAS A BENT OR DAMAGED LATCH PLATE OR ANCHOR PLATE. NEVER ATTEMPT TO REPAIR A SEAT BELT COMPONENT. ALWAYS REPLACE DAMAGED OR FAULTY SEAT BELT COMPONENTS WITH THE CORRECT, NEW AND UNUSED REPLACEMENT PARTS LISTED IN THE MOPAR PARTS CATALOG.
1. Disengage the rear seat cushion latch by pulling upward on the release strap.
2. Fold the rear seat cushion forward against the back of the front bucket seat.
Fig.36 Rear Outboard Seat Belt & Retractor Remove/Install:
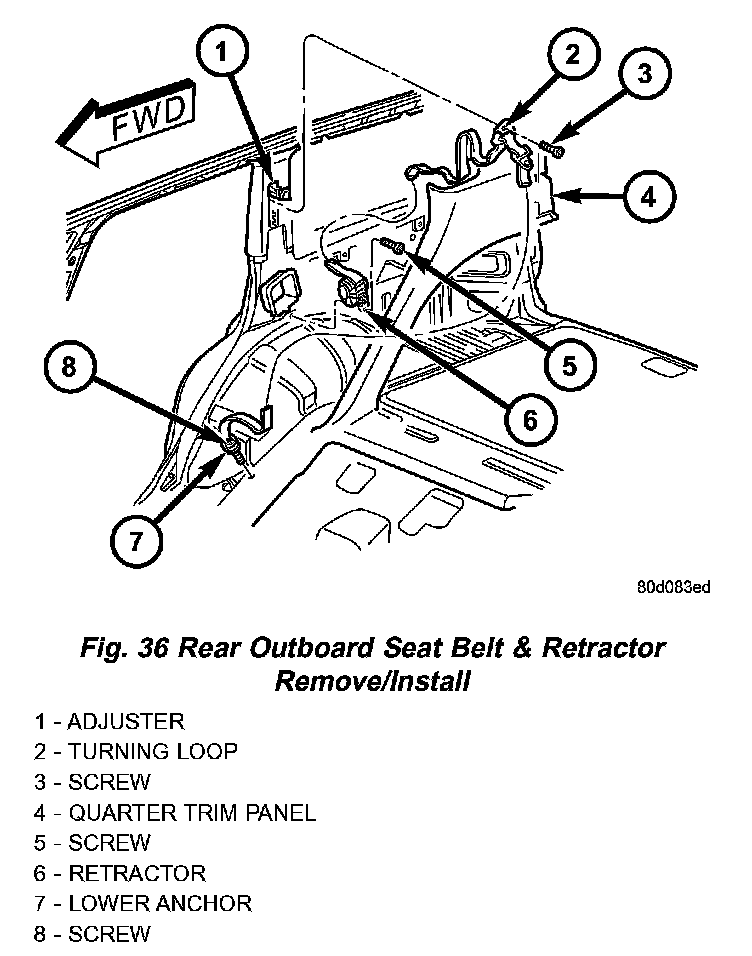
3. Remove the screw that secures the rear outboard seat belt lower anchor to the rear floor panel.
4. Remove the lower anchor from the rear floor panel.
Fig.37 Turning Loop Cover Remove/Install:
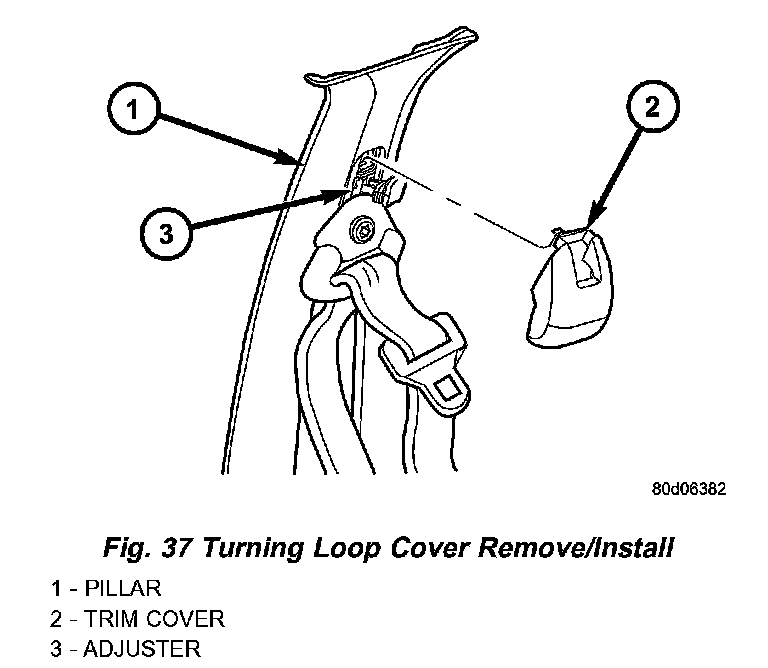
5. Using a trim stick or another suitable wide flat-bladed tool, gently pry the top of the turning loop trim cover to unsnap it from the height adjuster and access the screw that secures the rear outboard seat belt turning loop to the adjuster on the upper C-pillar.
6. Remove the screw that secures the seat belt turning loop to the height adjuster on the upper C-pillar.
7. Remove the seat belt turning loop from the height adjuster.
8. Remove the trim from the quarter inner panel.
9. Remove the screw that secures the retractor to the mounting tab on the inner and outer rear wheelhouse flange.
Fig.38 Rear Outboard Retractor:
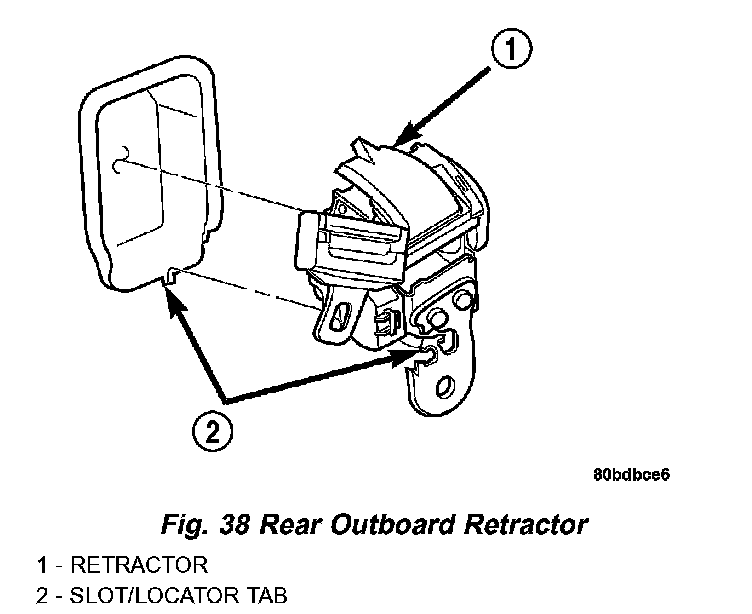
10. Disengage the retractor locator tab from the slot in the lower C-pillar.
11. Remove the rear outboard seat belt and retractor from the C-pillar as a unit.
INSTALLATION
WARNING: DURING AND FOLLOWING ANY SEAT BELT SERVICE, CAREFULLY INSPECT ALL SEAT BELTS, BUCKLES, MOUNTING HARDWARE, AND RETRACTORS FOR PROPER INSTALLATION, OPERATION, OR DAMAGE. REPLACE ANY BELT THAT IS CUT, FRAYED, OR TORN. STRAIGHTEN ANY BELT THAT IS TWISTED. TIGHTEN ANY LOOSE FASTENERS. REPLACE ANY BELT THAT HAS A DAMAGED OR INOPERATIVE BUCKLE OR RETRACTOR. REPLACE ANY BELT THAT HAS A BENT OR DAMAGED LATCH PLATE OR ANCHOR PLATE. NEVER ATTEMPT TO REPAIR A SEAT BELT COMPONENT. ALWAYS REPLACE DAMAGED OR FAULTY SEAT BELT COMPONENTS WITH THE CORRECT, NEW AND UNUSED REPLACEMENT PARTS LISTED IN THE MOPAR PARTS CATALOG.
1. Be certain that the retractor shield is properly installed in the C-pillar and in good condition before installing the retractor.
2. Position the retractor in the retractor shield and be certain that the retractor locator tab is engaged in the slot in the lower C-pillar below the retractor shield.
3. Install and tighten the screw that secures the retractor bracket to the mounting tab on the inner and outer rear wheelhouse flange. Tighten the screw to 43 Nm (32 ft. lbs.).
4. Reinstall the trim onto the quarter inner panel.
5. Position the seat belt turning loop to the height adjuster on the upper C-pillar.
6. Install and tighten the screw that secures the seat belt turning loop to the height adjuster. Tighten the screw to 37 Nm (27 ft. lbs.).
7. Using hand pressure, press the top of the turning loop trim cover to snap it onto the height adjuster and cover the screw that secures the rear outboard seat belt turning loop to the adjuster on the upper C-pillar.
8. Position the rear outboard seat belt lower anchor to the rear floor panel.
9. Install and tighten the screw that secures the seat belt lower anchor to the rear floor panel. Tighten the screw to 43 Nm (32 ft lbs).
10. Fold the rear seat cushion back into the seating position.