Cluster Housing Rear Cover
CLUSTER HOUSING REAR COVER
DISASSEMBLY
1. Disconnect and isolate the battery negative cable.
2. Remove the instrument cluster from the instrument panel. Instrument Cluster Replacement
Fig. 7 Cluster Housing Rear Cover Screws:
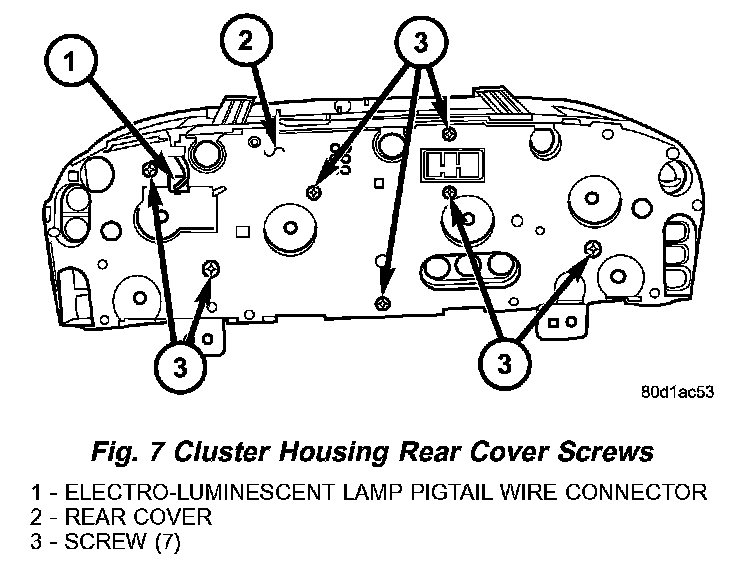
3. On models with a premium cluster only, disconnect the electro-luminescent illumination lamp pigtail wire connector from the receptacle on the cluster electronic circuit board and disengage the pigtail wire from the integral routing clip on the rear cover.
4. Remove the seven screws that secure the rear cover to the back of the cluster housing.
5. Disengage the eight latch features (four on top, four on the bottom) that secure the upper and lower edges of the rear cover to the top and bottom of the cluster housing.
6. Remove the rear cover from the back of the cluster housing.
ASSEMBLY
1. Position the rear cover onto the back of the cluster housing.
2. Press firmly and evenly on the rear cover until each of the eight latches (four on top, four on the bottom) that secure the upper and lower edges of the rear cover to the top and bottom of the cluster housing are fully engaged.
3. Install and tighten the seven screws that secure the rear cover to the back of the cluster housing. Tighten the screws to 2 Nm (20 in. lbs.).
4. On models with a premium cluster only reconnect the electro-luminescent illumination lamp pigtail wire connector to the receptacle on the cluster electronic circuit board and engage the pigtail wire under the integral routing clip on the rear cover.
5. Reinstall the instrument cluster onto the instrument panel. Instrument Cluster Replacement
6. Reconnect the battery negative cable.