Bumper Crossmember (Front) - Squeaks
NUMBER: 13-001-02GROUP: Frame & Bumper
DATE: May 20, 2002
SUBJECT:
Squeak-Like Sound From Front Bumper
OVERVIEW:
This bulletin involves drilling holes and installing six rivets at two specified locations on the left and right side of the front bumper crossmember.
MODELS:
2002 (KJ) Liberty / Cherokee
NOTE:
THIS BULLETIN APPLIES TO VEHICLES BUILT PRIOR TO FEBRUARY 01, 2002.
SYMPTOM/CONDITION:
A customer may experience a squeak-like sound when driving slowly over driveway entrances, road bumps, or when performing parking lot maneuvers. The squeak-like sound may occur when the vehicle body/frame is flexed (twists). This condition may occur when the front edge flange of either frame rail rubs against the backside of the front bumper crossmember.
DIAGNOSIS:
With the vehicle stopped and in park, slowly rock the vehicle from side-to-side. Applying force to the top edge of the driver or front passenger side door opening may be of assistance. If present, the squeak-like sound will come from behind the front bumper fascia and in the immediate area below either front headlamp.
Another diagnostic method is to set the parking brake, start the vehicle engine, and while in park slowly turn the vehicle front wheels from side-to-side (to flex the body) while someone listens at the front of the vehicle.
If the above condition is present perform the Repair Procedure to both the left and right side of the front bumper crossmember.
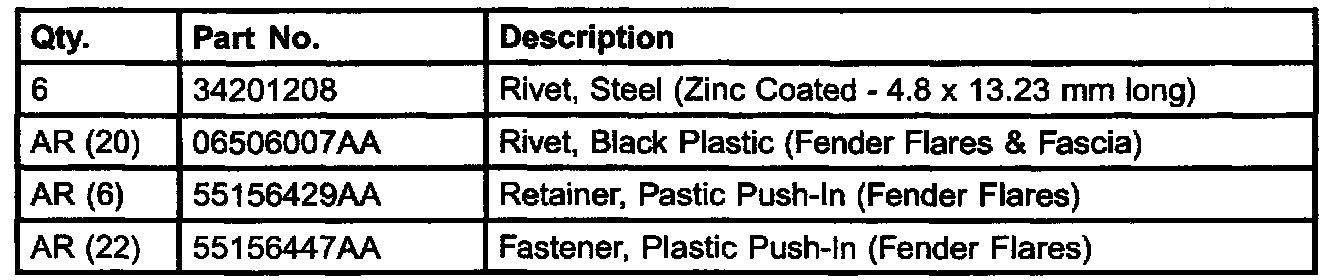
PARTS REQUIRED
REPAIR PROCEDURE:
1. Remove the vehicle front grill and fascia. For additional disassembly and assembly instructions refer to the Frame & Bumper Section of the appropriate 2002 Service Manual.
2. Remove the screw used to secure the right side frame rail end cap to the front bumper crossmember. The frame rail cap covers the rectangular access hole in the crossmember. Remove the end cap.
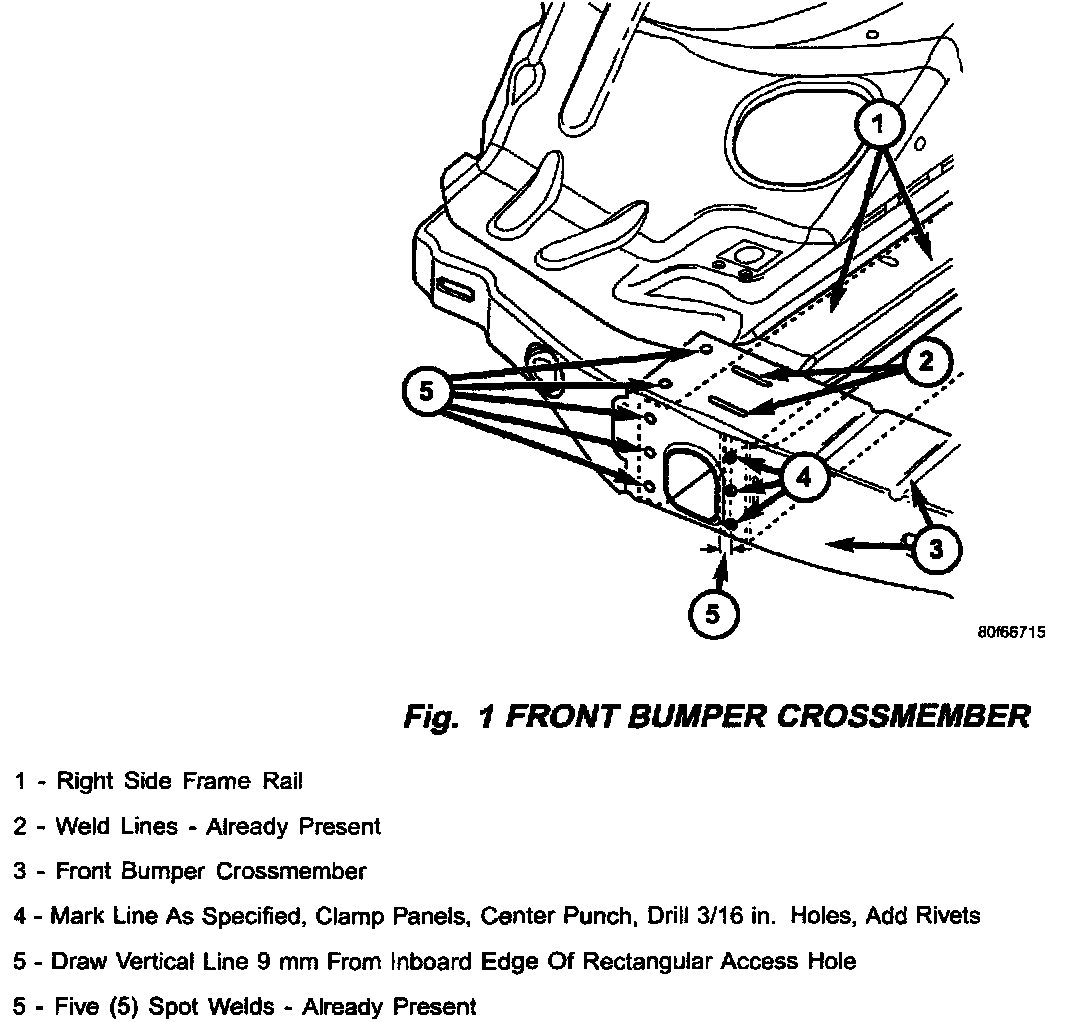
3. Draw a vertical line from top to bottom across the width of the front crossmember. The vertical line should be positioned so that it is 9 mm to the right, and parallel to, the inboard vertical edge of the right access hole (in the crossmember). See illustration (Fig. 1).
4. Mark the vertical line in three places as illustrated. Each top and bottom mark is to be 20 mm (.750 in.) from the top and bottom edge of the crossmember respectively. The middle mark is to be centered at 50 mm (2.0 in.) from the top and bottom edge of the crossmember.
5. Center punch all three marks to prevent drill bit drift and improperly positioned holes.
6. Position locking pliers through the rectangular hole in the crossmember. Tightly clamp the crossmember panel to the frame rail edge flange. Position the locking pliers so that it will not interfere with the drilling of the three holes or with the heads of the rivets when they are installed.
7. Using a 3/16 size drill bit, drill a hole at each of the three marks made on the vertical line. Drill all the way through both metal panels (the crossmember and frame rail edge flange).
8. Make sure the area around the three drilled holes are free of metal burrs. Install a suitable corrosion resistant material (e.g. paint primer) to the drilled holes.
9. With the two panels securely held together by the locking pliers, install a rivet (p/n 34201208) in each drilled hole.
10. Remove the locking pliers.
11. Move to the rectangular access hole located at the left side (driver side) of the front bumper crossmember.
12. Perform steps 2 through 10 in a similar manner so that the installed rivets are positioned along the inboard edge of the driver side rectangular access hole. The left side repair should mirror the repairs made to the right side.
13. Verify that the squeak-like sound condition has been corrected.
14. Install both end caps and screws.
15. Install the front fascia and grill.
POLICY:
Reimbursable within the provisions of the warranty.

TIME ALLOWANCE

FAILURE CODE