Passenger Airbag
REMOVALThe following procedure is for replacement of a faulty or damaged passenger airbag. If the airbag is faulty or damaged, but not deployed, review the recommended procedures for handling non-deployed supplemental restraints. (Refer to ELECTRICAL/ RESTRAINTS - STANDARD PROCEDURE - HANDLING NON-DEPLOYED SUPPLEMENTAL RESTRAINTS). If the passenger airbag has been deployed, review the recommended procedures for service after a supplemental restraint deployment before removing the airbag from the vehicle. (Refer to ELECTRICAL/RESTRAINTS - STANDARD PROCEDURE - SERVICE AFTER A SUPPLEMENTAL RESTRAINT DEPLOYMENT).
WARNING:
- ON VEHICLES EQUIPPED WITH AIRBAGS, DISABLE THE SUPPLEMENTAL RESTRAINT SYSTEM BEFORE ATTEMPTING ANY STEERING WHEEL, STEERING COLUMN, DRIVER AIRBAG, PASSENGER AIRBAG, FRONT IMPACT SENSOR, SIDE IMPACT SENSOR, SIDE CURTAIN AIRBAG, OR INSTRUMENT PANEL COMPONENT DIAGNOSIS OR SERVICE. DISCONNECT AND ISOLATE THE BATTERY NEGATIVE (GROUND) CABLE, THEN WAIT TWO MINUTES FOR THE SYSTEM CAPACITOR TO DISCHARGE BEFORE PERFORMING FURTHER DIAGNOSIS OR SERVICE. THIS IS THE ONLY SURE WAY TO DISABLE THE SUPPLEMENTAL RESTRAINT SYSTEM. FAILURE TO TAKE THE PROPER PRECAUTIONS COULD RESULT IN ACCIDENTAL AIRBAG DEPLOYMENT AND POSSIBLE PERSONAL INJURY.
- WHEN REMOVING A DEPLOYED AIRBAG, RUBBER GLOVES, EYE PROTECTION, AND A LONG-SLEEVED SHIRT SHOULD BE WORN. THERE MAY BE DEPOSITS ON THE AIRBAG UNIT AND OTHER INTERIOR SURFACES. IN LARGE DOSES, THESE DEPOSITS MAY CAUSE IRRITATION TO THE SKIN AND EYES.
1. Disconnect and isolate the battery negative cable. Wait two minutes for the system capacitor to discharge before further service.
2. Remove the top pad from the instrument panel.
3. Disconnect the passenger airbag pigtail wire connector from the instrument panel wire harness connector for the airbag. This connector is secured to the outside of the outboard airbag unit end bracket. To disconnect the connector:
a. Slide the red Connector Position Assurance (CPA) lock on the top of the connector toward the side of the connector.
b. Depress the connector latch tab and pull the two halves of the connector straight away from each other.
Fig.32 Passenger Side Airbag Module Remove/Install:
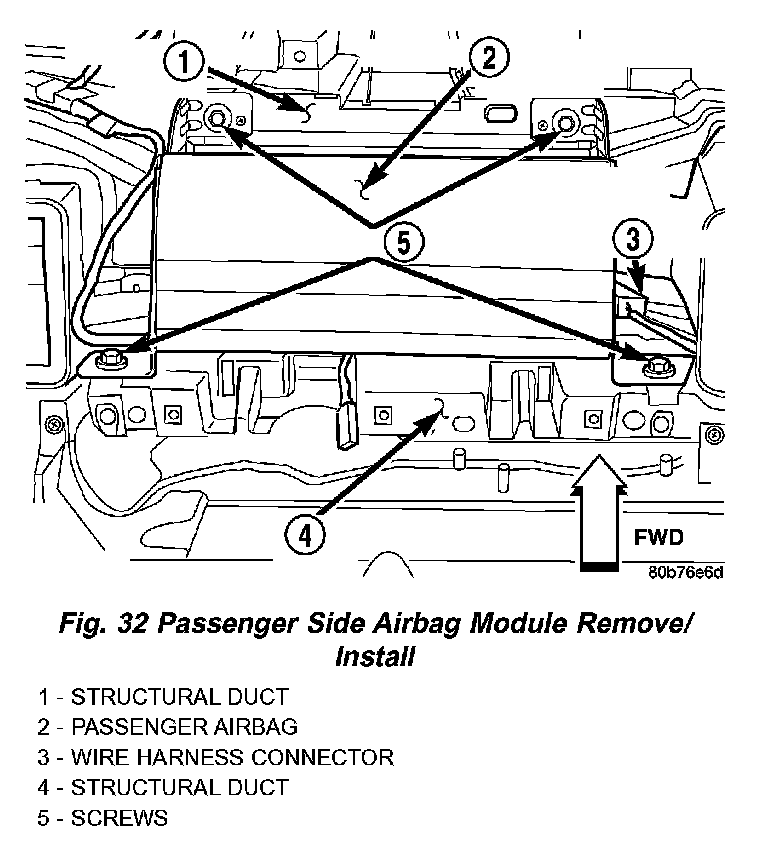
4. Remove the two screws that secure the two airbag end bracket front mounting tabs to the top of the instrument panel structural duct.
5. Remove the two screws that secure the two airbag end bracket rear mounting tabs to the rear of the structural duct, just above the instrument panel upper glove box opening reinforcement.
6. Remove the passenger airbag from the instrument panel structural duct as a unit.
INSTALLATION
The following procedure is for replacement of a faulty or damaged passenger airbag. If the airbag is faulty or damaged, but not deployed, review the recommended procedures for handling non-deployed supplemental restraints. (Refer to ELECTRICAL/ RESTRAINTS - STANDARD PROCEDURE - HANDLING NON-DEPLOYED SUPPLEMENTAL RESTRAINTS). If the passenger airbag has been deployed, review the recommended procedures for service after a supplemental restraint deployment before removing the airbag from the vehicle. (Refer to ELECTRICAL/RESTRAINTS - STANDARD PROCEDURE - SERVICE AFTER A SUPPLEMENTAL RESTRAINT DEPLOYMENT).
WARNING:
- ON VEHICLES EQUIPPED WITH AIRBAGS, DISABLE THE SUPPLEMENTAL RESTRAINT SYSTEM BEFORE ATTEMPTING ANY STEERING WHEEL, STEERING COLUMN, DRIVER AIRBAG, PASSENGER AIRBAG, FRONT IMPACT SENSOR, SIDE IMPACT SENSOR, SIDE CURTAIN AIRBAG, OR INSTRUMENT PANEL COMPONENT DIAGNOSIS OR SERVICE. DISCONNECT AND ISOLATE THE BATTERY NEGATIVE (GROUND) CABLE, THEN WAIT TWO MINUTES FOR THE SYSTEM CAPACITOR TO DISCHARGE BEFORE PERFORMING FURTHER DIAGNOSIS OR SERVICE. THIS IS THE ONLY SURE WAY TO DISABLE THE SUPPLEMENTAL RESTRAINT SYSTEM. FAILURE TO TAKE THE PROPER PRECAUTIONS COULD RESULT IN ACCIDENTAL AIRBAG DEPLOYMENT AND POSSIBLE PERSONAL INJURY.
- WHEN REMOVING A DEPLOYED AIRBAG, RUBBER GLOVES, EYE PROTECTION, AND A LONG-SLEEVED SHIRT SHOULD BE WORN. THERE MAY BE DEPOSITS ON THE AIRBAG UNIT AND OTHER INTERIOR SURFACES. IN LARGE DOSES, THESE DEPOSITS MAY CAUSE IRRITATION TO THE SKIN AND EYES.
- USE EXTREME CARE TO PREVENT ANY FOREIGN MATERIAL FROM ENTERING THE PASSENGER AIRBAG, OR BECOMING ENTRAPPED BETWEEN THE PASSENGER AIRBAG CUSHION AND THE INSTRUMENT PANEL TOP PAD. FAILURE TO OBSERVE THIS WARNING COULD RESULT IN OCCUPANT INJURIES UPON AIRBAG DEPLOYMENT.
- THE INSTRUMENT PANEL TOP PAD MUST NEVER BE PAINTED. REPLACEMENT TOP PADS ARE SERVICED IN THE ORIGINAL COLORS. PAINT MAY CHANGE THE WAY IN WHICH THE MATERIAL OF THE TOP PAD RESPONDS TO AN AIRBAG DEPLOYMENT. FAILURE TO OBSERVE THIS WARNING COULD RESULT IN OCCUPANT INJURIES UPON AIRBAG DEPLOYMENT.
1. Carefully position the passenger airbag onto the instrument panel structural duct.
2. Install and tighten the four screws that secure the passenger airbag to the instrument panel structural duct. Tighten the screws to 11.8 Nm (105 in. lbs.).
3. Reconnect the instrument panel wire harness connector for the passenger airbag to the passenger airbag pigtail wire connector. This connector is secured to the outside of the outboard airbag unit end bracket. Be certain that the latch on the connector and the red Connector Position Assurance (CPA) lock are each fully engaged.
4. Reinstall the top pad onto the instrument panel.
5. Do not reconnect the battery negative cable at this time. The supplemental restraint system verification test procedure should be performed following service of any supplemental restraint system component (Refer to ELECTRICAL/RESTRAINTS - STANDARD PROCEDURE VERIFICATION TEST).