B. Replace Fuel Tank
NOTE:
Only fuel tanks that have a sticking check valve, as determined by the inspection in Section A, require replacement. Very few vehicles are expected to require fuel tank replacement.
1. Remove the clamp from the fuel filler recirculation hose and then lower the vehicle.
2. Remove the fuel pump relay from the Power Distribution Center (PDC).
3. Start and run the engine until it runs out of fuel.
4. Attempt to restart the engine until it will no longer run.
5. Disconnect the negative battery cable.
NOTE:
To enhance customer satisfaction, remember to reset the clock when you have completed the service procedure.
6. Install the fuel pump relay into the PDC.
7. Insert a length of 3/8" O.D. thinwall clear tubing (Tygon tubing) into the fuel filler tube.
8. Attach the other end of the tubing to an approved gasoline storage container and drain the fuel from the tank.
9. Raise the vehicle on the hoist.
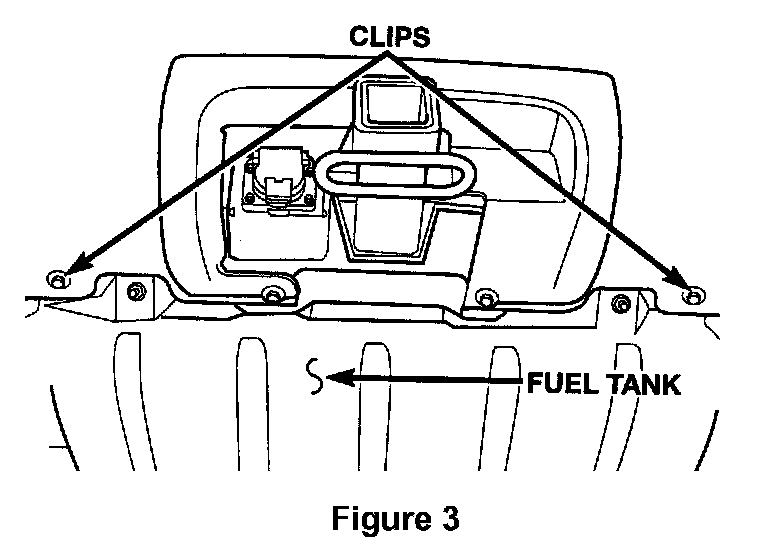
10. Remove the four (4) fuel tank-to-rear bumper fascia clips (Figure 3).
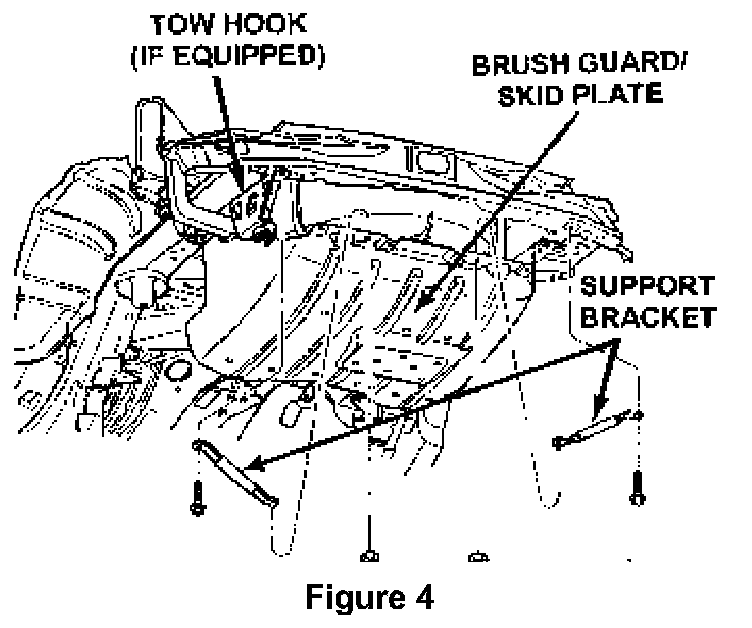
11. Remove the two (2) rear brush guard/skid plate-to-frame support brackets (Figure 4).
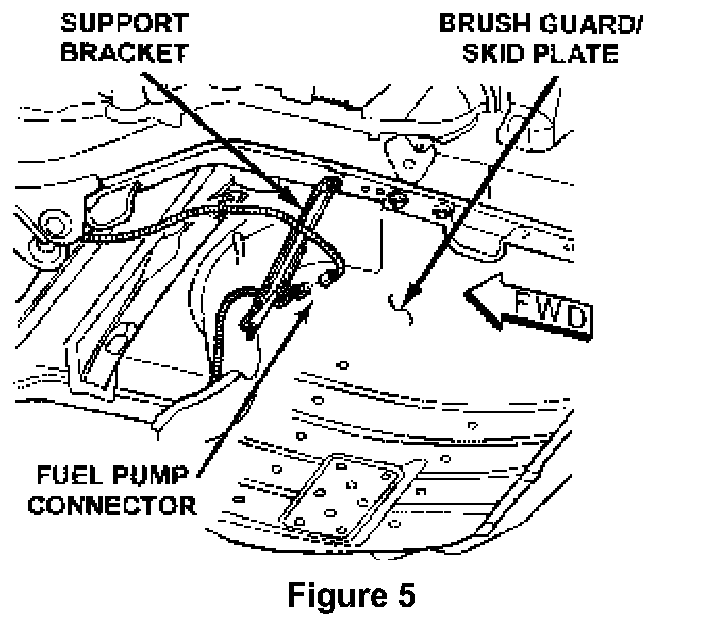
12. Disconnect the fuel pump electrical connector (Figure 5).
13. Remove the brush guard/skid plate-to-frame bracket at the front of the fuel tank (Figure 5).
14. Disconnect the two (2) fuel lines from the fuel filter.
15. Disconnect the wiring harness and evaporative hose clips from the brush guard.
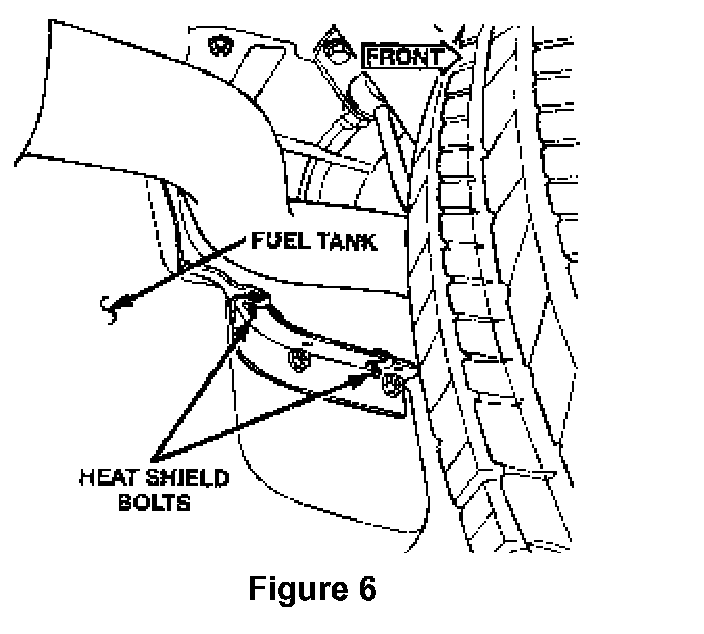
16. Remove the fuel tank heat shield mounting bolts (Figure 6).
17. Support the fuel tank using an OTC Powertrain Lift with Fuel Tank Handling Adapters (PSE HOT-1585 with # OT-62338 adapter or equivalent.
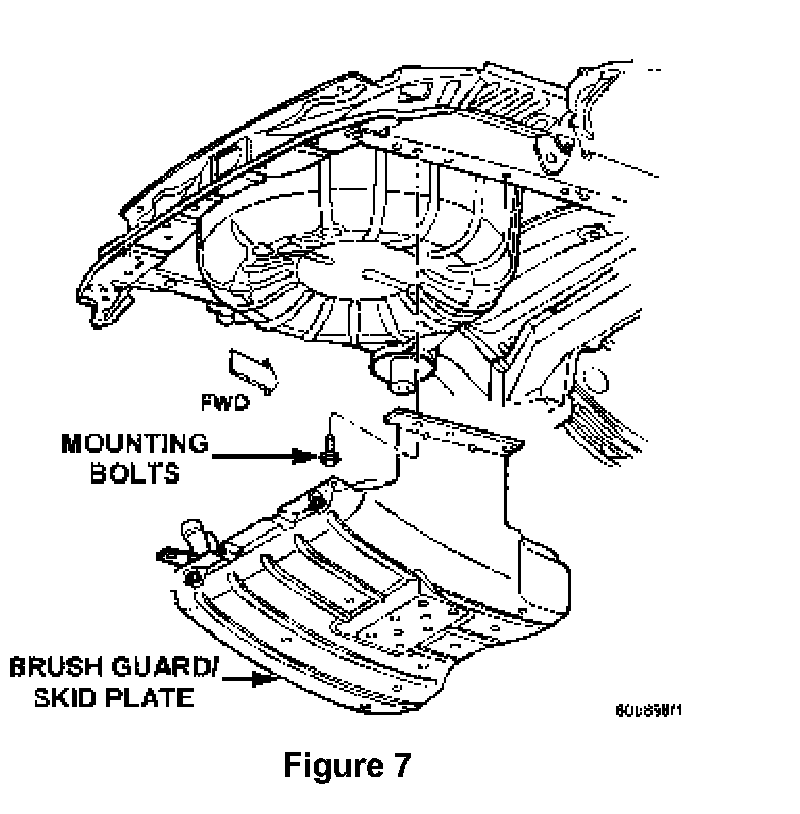
18. Remove the seven (7) brush guard/skid plate mounting bolts (Figure 7).
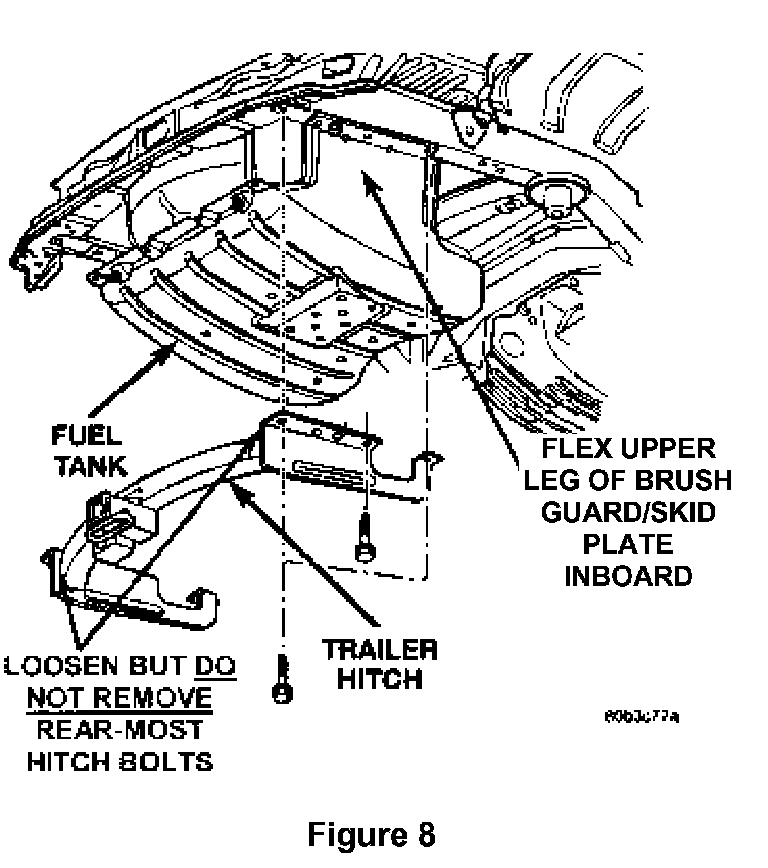
19. For vehicles equipped with a trailer hitch, loosen but do NOT remove, the two (2) rear-most trailer hitch bolts (Figure 8).
20. For vehicles equipped with a trailer hitch, use a pry bar (between brush guard/skid plate and hitch) to flex the left upper leg of the brush guard/skid plate inboard to allow it to pass below the trailer hitch (Figure 8).
21. For vehicles equipped with a trailer hitch, use a pry bar (between brush guard/skid plate and hitch) to flex the right upper leg of the brush guard/skid plate inboard to allow it to pass below the trailer hitch (Figure 8).
22. Lower the fuel tank assembly about 4-6 inches.
23. Loosen the fuel filler hose clamp at the fuel tank nipple. Disconnect the filler hose from the fuel tank.
24. Disconnect the vapor vent hoses from the fuel tank vents.
25. Lower the fuel tank assembly and place it on the floor.
26. Clean any dirt and debris from the area around the fuel pump module.
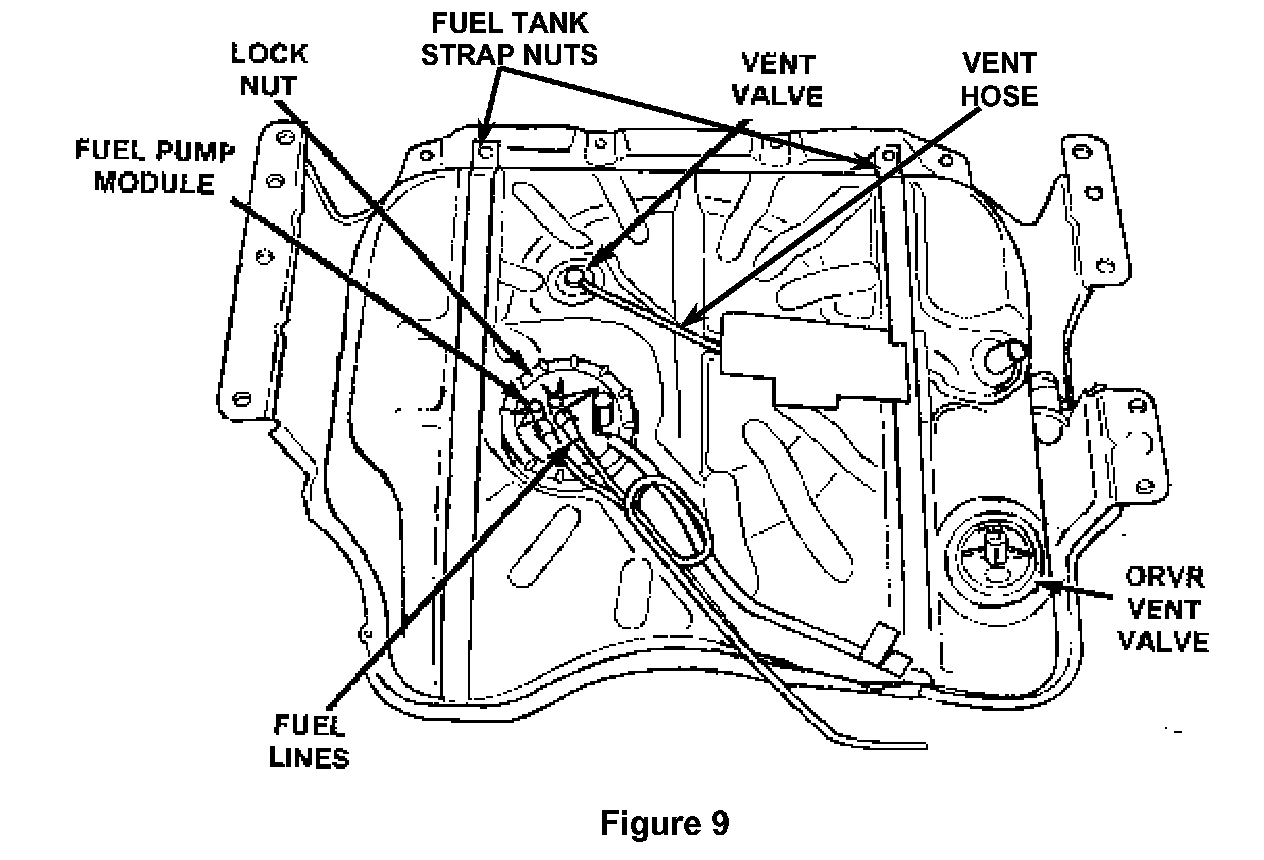
27. Disconnect the two (2) fuel lines from the fuel pump module fittings (Figure 9).
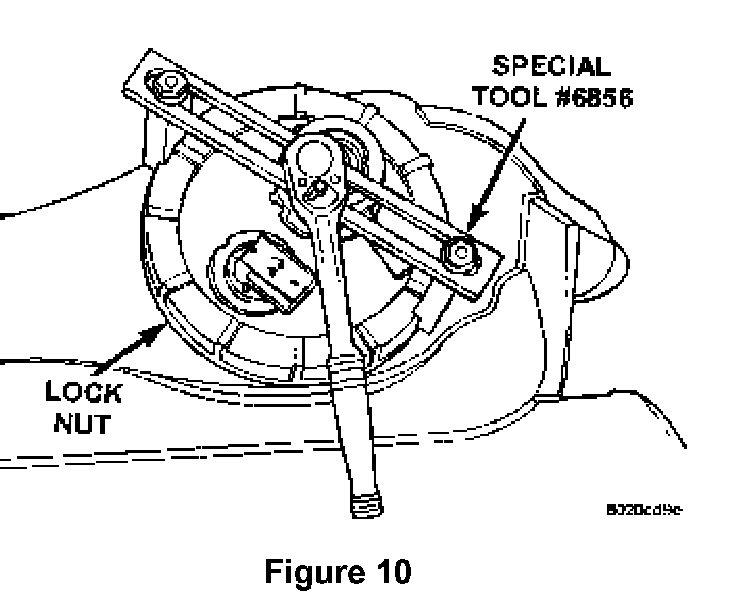
28. Using Special Tool # 6856, remove the fuel pump module lock nut (Figure 10).
29. Remove the fuel pump module from the fuel tank. Be careful to not damage the fuel gauge float (Figure 9).
30. Remove the two (2) fuel tank strap nuts (Figure 9).
31. Remove the fuel tank vent hose from the fuel tank (Figure 9).
32. Separate the fuel tank from the fuel tank brush guard/skid plate.
33. Install the new fuel tank into the fuel tank brush guard/skid plate.
34. Install the fuel tank vent hose onto the fuel tank (Figure 9). Make sure that the vent hose is fully seated into the fuel tank channel.
35. Tighten the fuel tank strap bolts to 37 ft-lbs (50 N.m).
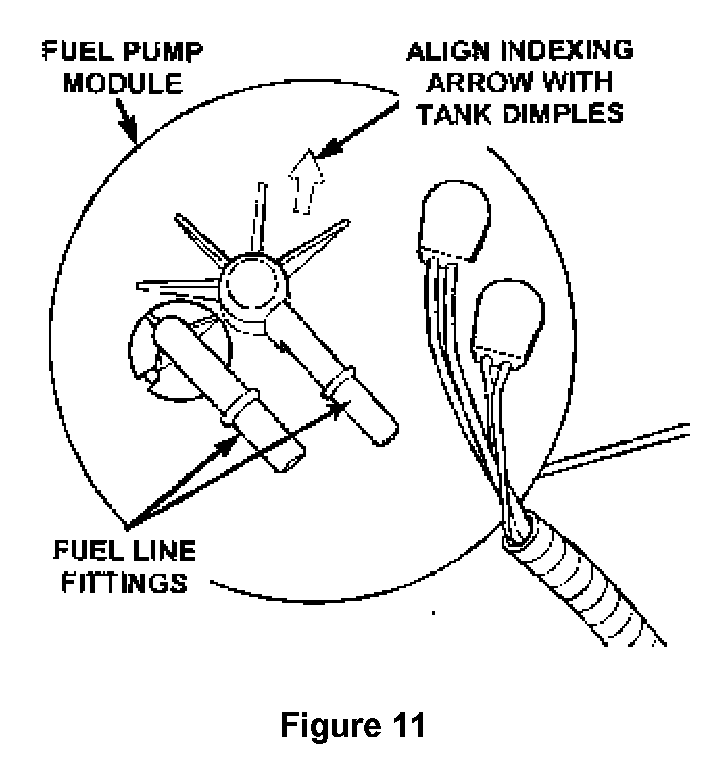
36. Using the provided seal, install the original fuel pump module into the new fuel tank (Figure 9). Rotate the module until the indexing arrow is pointing between the two dimples on the fuel tank (Figure 11).
37. Install the fuel pump module lock nut. Using Special Tool # 6856, tighten the lock nut to 55 ft-lbs (74 N.m) (Figure 10).
38. Connect the two (2) fuel lines to the fuel pump module.
NOTE:
To ensure proper fuel line routing, make sure that the fuel line-to-filter quick connect fittings are positioned above the tank and that the loop in the lines is leaning toward the right side of the tank channel.
39. Position the fuel tank assembly onto the fuel tank lift and raise it into position. Make sure that the fuel tank assembly is inboard of the trailer hitch (if equipped) and that the filler tube and vent hoses align with the brush guard/skid plate cutout.
40. Connect the vapor vent hoses to the fuel tank vents.
41. Connect the fuel filler hose to the fuel tank nipple. Tighten the clamp to 25 in-lbs (3 N.m).
42. Raise the fuel tank assembly fully into position.
43. For vehicles equipped with a trailer hitch, use a pry bar (between brush guard/skid plate and hitch) to flex the left upper leg of the brush guard/skid plate inboard to allow it to pass above the trailer hitch (Figure 8). Position the brush guard/skid plate flange between the trailer hitch and the frame.
IMPORTANT:
To ease installation the left side of the brush guard/skid plate should be installed first.
44. For vehicles equipped with a trailer hitch, use a pry bar (between brush guard/skid plate and hitch) to flex the right upper leg of the brush guard/skid plate inboard to allow it to pass above the trailer hitch (Figure 8). Position the brush guard/skid plate flange between the trailer hitch and the frame.
45. Attach the wiring harness and vapor hose clips to the skid plate.
46. Install the fuel tank assembly and trailer hitch (if equipped) mounting bolts (Figure 7). Tighten the bolts to 60 ft-lbs (81 N.m).
47. Remove the fuel tank lift.
48. Install the fuel tank heat shield (Figure 6).
49. Connect the fuel pressure and return lines to the fuel filter.
50. Connect the fuel pump module electrical connector (Figure 5).
NOTE:
Remove the connector clip from the reinforcement bracket and attach it to the connector if necessary.
51. Install the brush guard/skid plate-to-frame brace at the front of the fuel tank (Figure 5).
52. Attach the fuel pump module connector to the brace (Figure 5).
53. Install the two (2) rear brush guard/skid plate-to-frame support braces (Figure 4).
54. Install the four (4) rear fascia-to-fuel tank push pins (Figure 3).
55. Install the left rear stone shield using the supplied plastic rivets (Figure 1).
56. Install the left rear wheel and tire assembly. Tighten the lug nuts to 100 ft-lbs (136 N.m).
57. Lower the vehicle.
58. Connect the negative battery cable.
59. Refill the fuel tank and then start the engine and verify that there are no fuel leaks.