Radiator Cooling Fan: Service and Repair
Replace Electric Radiator Fan
1. Disconnect the negative battery cable.
Note: To enhance customer satisfaction, remember to reset the clock when you have completed the service procedure.
2. Remove the radiator cap to the coolant recovery bottle hose.
3. Drain the coolant from the radiator into a clean container for reuse later.
4. Remove upper radiator hose.
5. Remove the front fascia.
6. Remove the bolts holding the hood latch assembly and the support braces from the upper radiator core support. Set the hood latch assembly aside.
Note: Do not remove the hood latch cable from the hood latch.
7. Disconnect the electrical connector for the electric radiator fan.
8. Detach the electric radiator fan electrical connector from right side of the shroud.
9. Disconnect transmission cooler line from retaining clip on the left side of the fan shroud.
10. Remove the fan shroud bolts.
Note: The lower left side mounting bolt can only be accessed from under vehicle.
11. Remove air cleaner inlet tube.
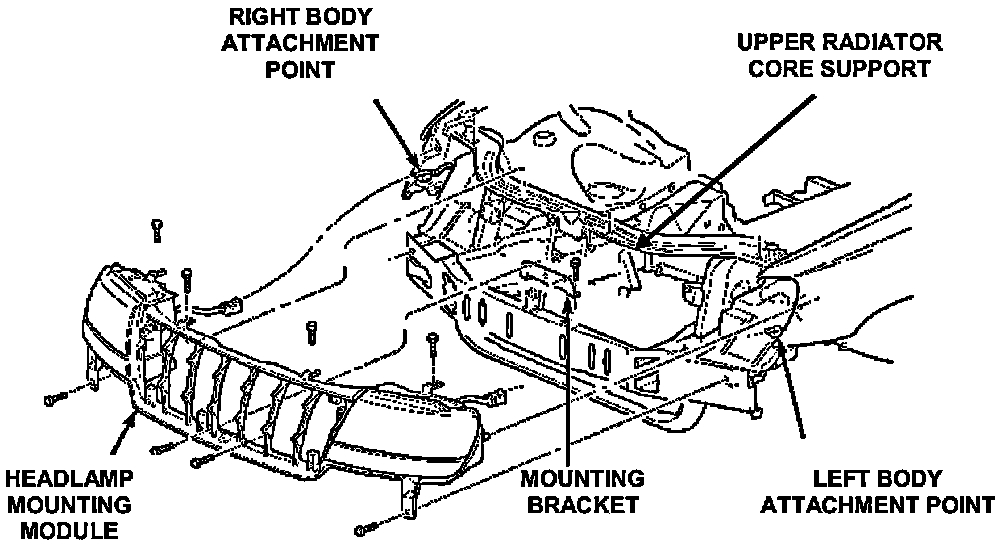
12. Remove the headlamp mounting module as follows:
a. Remove the right and left headlamp assembly.
b. Disconnect the headlamp wire harness connectors.
c. Remove the bolts attaching headlamp mounting module to body.
d. Disengage the retainer attaching the headlamp mounting module to each side of the body.
e. Remove the headlamp mounting module.
13. Remove the upper radiator core support.
14. Remove the two upper radiator mounting bolts.
15. Gently pull the radiator toward front of the vehicle to provide clearance. Use Special Tool 6958 Spanner Wrench and 8346 Adapter to remove the viscous clutch fan from the water pump and set the viscous clutch fan aside.
Note: Do not lay the viscous clutch engine fan assembly in a horizontal position. Silicone fluid may leak out and damage the clutch.
16. Gently pull the radiator toward front of the vehicle to provide clearance to remove the fan shroud/electric radiator fan assembly.
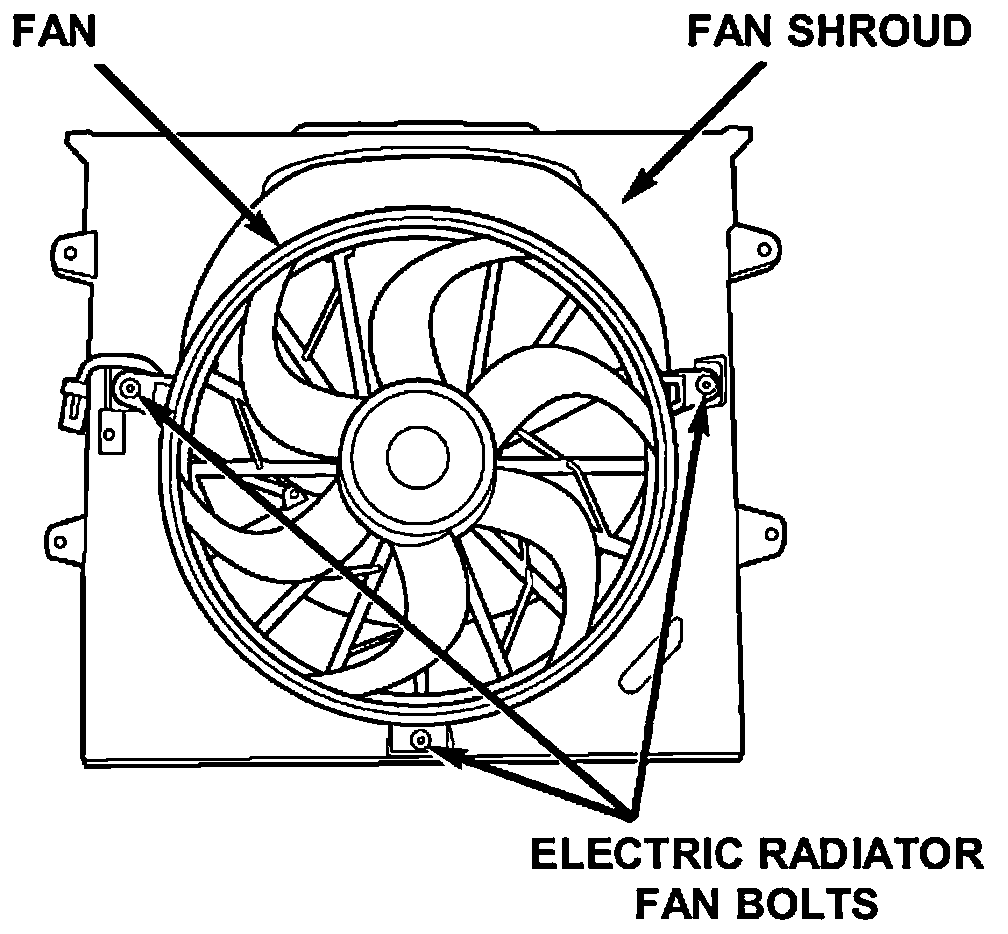
17. Remove the three bolts holding the electric radiator fan to the fan shroud. Discard the old electric radiator fan.
18. Install the new electric radiator fan into the shroud and tighten the three bolts to 50 in lbs (6 Nm)
19. Gently pull the radiator towards the front of the vehicle to provide clearance and install the fan shroud/electric radiator fan assembly.
20. Gently pull the radiator towards the front of the vehicle to provide clearance and install the viscous clutch fan to the water pump hub and hand tighten.
Note: The viscous clutch engine fan will self tighten during normal engine operation.
21. Install the two upper radiator mounting bolts and tighten to 90 in lbs (10 Nm).
22. Position the hood latch and cable near the hood latch support.
23. Install radiator core support and tighten the bolts to 90 in lbs (10 Nm).
24. Install the headlamp mounting module as follows:
a. Align the headlamp mounting module to the attachment points.
b. Push the far ends of the headlamp mounting module retainers into the right and left body attachment points and lock the fastener on the headlamp mounting module.
c. Install and tighten the screws holding the headlamp mounting module to the core support and body.
d. Install the light bulb sockets into the right and left headlamp assemblies.
e. Install the right and left headlamp assemblies into the headlamp mounting module and tighten fastener.
25. Install air cleaner inlet tube.
26. Install the fan shroud and tighten the bolts to 50 in lbs (6 Nm).
27. Connect the transmission cooler line to the retaining clip on the fan shroud.
28. Connect the electric radiator fan electrical connector.
29. Attach the electric radiator fan electric connector to the right side of the fan shroud.
30. Install the front fascia as follows:
a. Align the fascia to the right and left fender clips.
b. Push the fascia and align the fascia to the headlamp mounting module.
c. Install the screws and tighten.
d. Install the lower fascia push pin fasteners (replace as needed with 55176248).
Caution: Use care not to scratch the pain on the fender or the fascia. Use tape if necessary.
31. Install hood latch and tighten bolts to 96 in lbs (11 Nm).
32. Install the upper radiator hose.
33. Pour the engine coolant saved in Step 3 into the radiator.
34. Install the radiator cap.
35. Connect the negative battery cable.
36. Start the engine to ensure that there are no coolant leaks and check the electric radiator fan for proper operation by turning the air conditioning on to maximum cooling.