Timing Belt & Sprockets: Installation
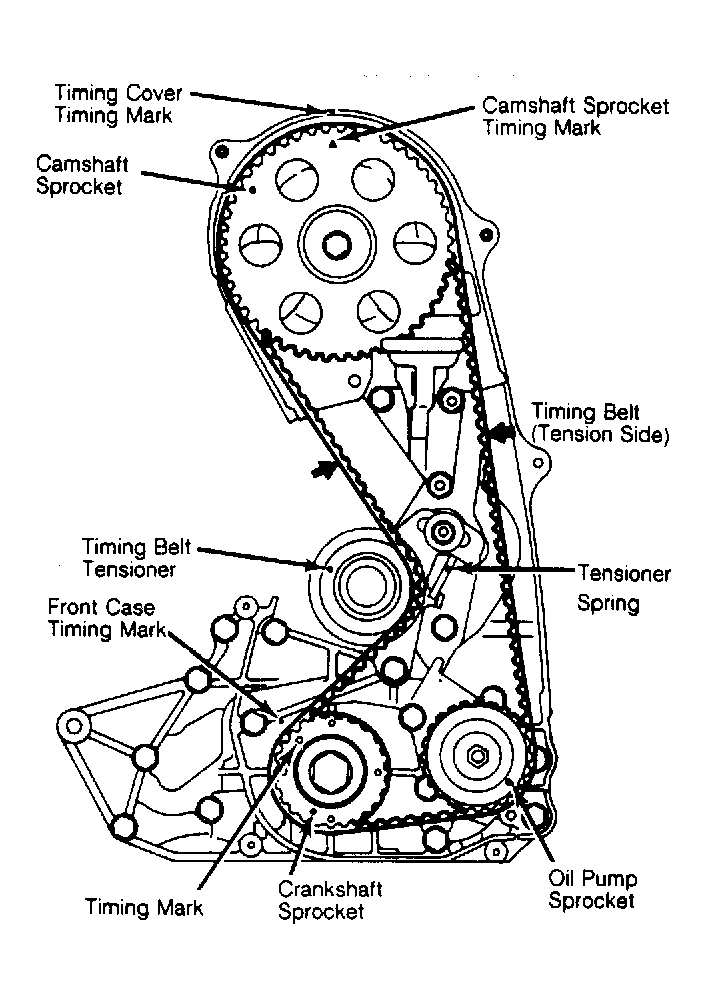
- Install flange and crankshaft sprocket. See Fig 1. Install camshaft sprocket and tighten retaining bolt. Align camshaft and crankshaft sprocket timing marks with No. 1 piston at TDC on compression stroke. See Figure.
- Mount belt tensioner, spring and spacer. Temporarily tighten bolt. Position spring against tensioner first, then against case and tighten bolt. See Fig 2. Position and secure tensioner toward water pump.
- Install timing belt on crankshaft and camshaft sprockets. Ensure tension side is tight and timing marks are aligned when pressure is applied to turn camshaft in reverse direction.
- Align dowel and install crankshaft pulley. Loosen tensioner spring bolt and then slotted tensioner bolt. This will give the timing belt only spring tension. Ensure tensioner and belt are properly positioned. With only spring tension applied to belt, tighten slotted tensioner bolt first and tensioner spring bolt last.
- Slowly turn crankshaft one revolution clockwise and realign crankshaft sprocket timing mark at TDC. DO NOT
push or shake belt while turning. DO NOT
turn crankshaft in counterclockwise direction.
- Loosen tensioner spring bolt first, then slotted tensioner bolt. Then tighten tensioner bolts by tightening slotted tensioner bolt first and tensioner spring bolt last.
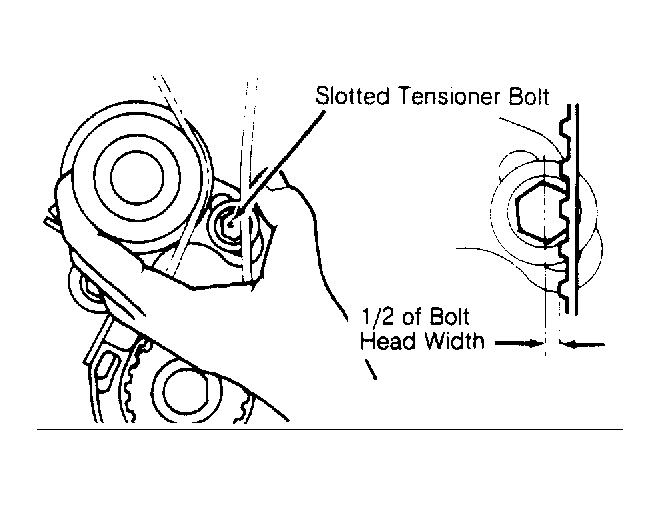
- Check belt tension by pushing tension side of timing belt in horizontally, using about 11 lbs. (5 kg) force. Timing belt tooth end should be approximately 1/4 of tensioner mounting bolt head width (across flats) away from bolt head center. See Fig 3.
 Courtesy of MITSUBISHI MOTOR SALES OF AMERICA.
- Install spacer, flange and crankshaft sprocket. See Figure. Align crankshaft sprocket timing mark with front case timing mark. See Fig 1. Lightly oil camshaft spacer and insert onto camshaft.
- Install camshaft sprocket, tighten bolt to specification and align timing marks. Install tensioner spring and tensioner and temporarily tighten bolt. Rotate tensioner flange and install flange bolts.
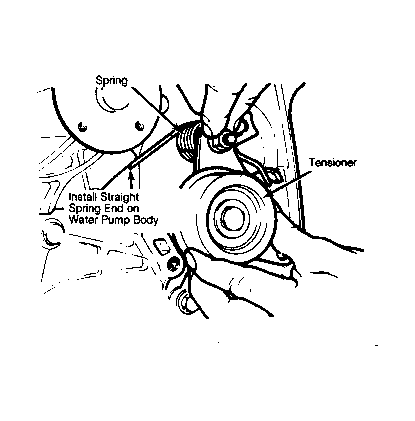
- Install tensioner spring with bent end at right angle on tensioner projection and straight end of spring on water pump body. See Fig 2. Secure tensioner in position nearest water pump.
 Courtesy of MITSUBISHI MOTOR SALES OF AMERICA.
 Courtesy of MITSUBISHI MOTOR SALES OF AMERICA.
- Ensure all individual timing marks are aligned. Install timing belt on crankshaft sprocket, oil pump sprocket and camshaft sprocket.
- Ensure tension side of belt is tight. Align dowel and temporarily install crankshaft pulley. Loosen tensioner bolt and nut so spring tension is applied to belt. Lightly push tensioner by hand to ensure belt and sprocket are in complete mesh.
- Tighten tensioner nut, and then tighten bolt. Turn crankshaft smoothly one revolution clockwise, without pushing or jerking. DO NOT
turn crankshaft counterclockwise. Loosen tensioner bolt and nut to allow spring pressure to tighten belt.
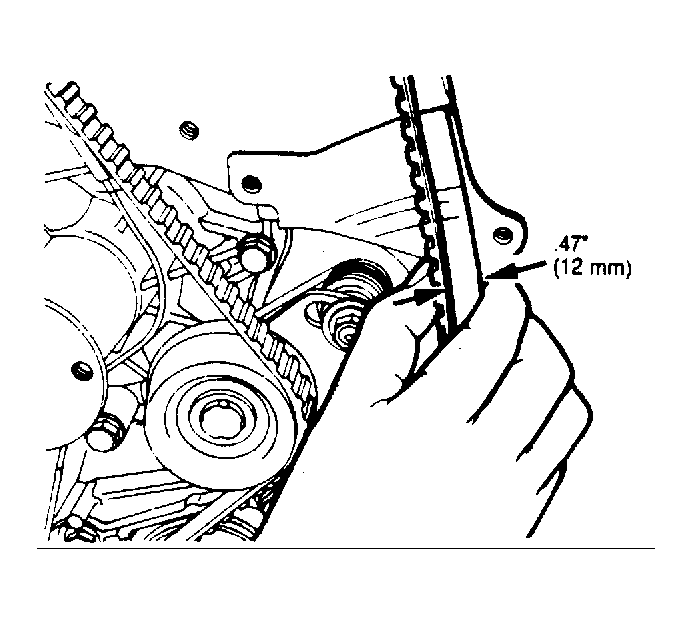
- Retighten tensioner nut, then tighten bolt. Check tensioner adjustment by holding center of tension side of belt and seal line of inner cover between thumb and forefinger. See Fig 3.
 Courtesy of MITSUBISHI MOTOR SALES OF AMERICA.
- Clearance should be .23" (6.0 mm). Readjust if necessary. Remove crankshaft pulley and install timing belt upper and lower front covers. Install crankshaft pulley and tighten.