Headlamp Replacement (Non HID)
WARNING: This page does not describe the selected car, but rather 8 other vehicles, including the 2008 GMC Yukon XL, 2008 GMC Yukon, 2008 Chevrolet Tahoe, 2008 Chevrolet Suburban, and 2008 Chevrolet Avalanche. However, it is still accessible from the selected car via links, so may be relevant.
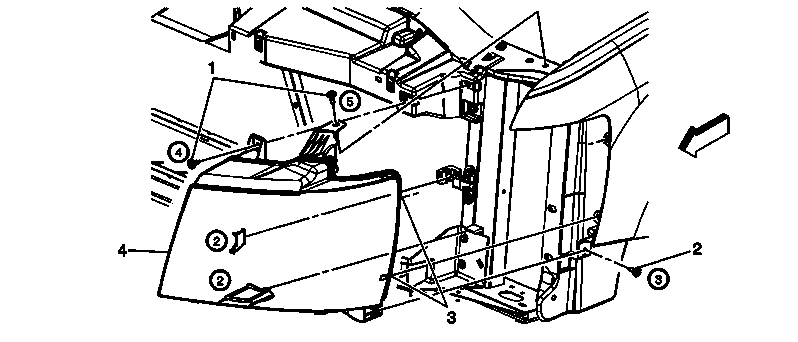 Courtesy of GENERAL MOTORS CORP.
| Callout |
Component Name |
|
Preliminary Procedures
- Remove the 2 forward screws (1).
- Remove the 2 wheelhouse to washer container pushpins (LH only).
- Open the hood.
- Remove the underhood beauty panel (Cadillac only).
- Remove the 6 upper fascia/grille bolts all the way to latch.
- Remove the lower rear fascia bolt from the support bracket.
- Loosen the 2 fascia to fender bolts from the bottom of fascia.
- Pull the outboard end of the front fascia straight outboard until it disengages from the fender attachment bracket.
- Pull the fascia forward and downward to allow enough clearance to remove the headlamp assembly.
- Remove the cross-car lower outboard headlamp attachment bolt.
- Remove the 2 remaining upper headlamp attachment bolts.
- Loosen the cross-car lower outboard headlamps attachment bolts.
- Grasp the headlamp at the upper inboard and lower outboard corners and pull the lamp straight forward until it disengages from the snap feature.
- Pull the outboard side of the headlamp forward until the locating pins disengage from the fender.
- Rock and cam the headlamp out of the vehicle.
- Disconnect the electrical harness connector.
|
| 1 |
Headlamp Screw (Qty: 2)
Tighten:
6 N.m (53 lb in)
|
| 2 |
Headlamp Screw Tighten:
6 N.m (53 lb in)
|
| 3 |
Headlamp Assembly Alignment Tabs (Qty: 2)
Tip:
Pull to release the tabs on the back of the headlamp assembly. |
| 4 |
Headlamp Assembly
Tip:
Disconnect the electrical connectors. |