CVT Driven Pulley Pressure Control Solenoid Valve Removal/Installation
- Disconnect the CVT driven pulley pressure control solenoid valve 2P connector (A) and the inhibitor solenoid 2P connector (B).
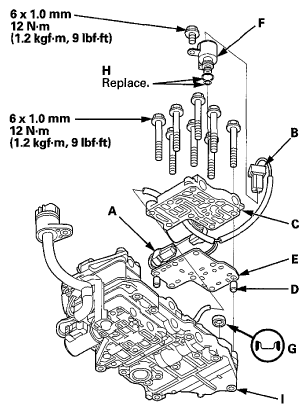 Courtesy of AMERICAN HONDA MOTOR CO., INC.
- Remove the CVT driven pulley pressure control solenoid valve (C), the dowel pins (D), and the separator plate (E), and remove the inhibitor solenoid (F) from the CVT driven pulley pressure control solenoid valve.
- Check that the filter (G) is in good condition, and replace it if it is clogged or damaged.
- Remove the two O-rings (H) from the inhibitor solenoid.
- Install the two O-rings on the inhibitor solenoid, then install the inhibitor solenoid on the CVT driven pulley pressure control solenoid valve.
- Install the CVT driven pulley pressure control solenoid valve with the two dowel pins and the separator plate on the lower valve body (I).
- Connect the CVT driven pulley pressure control solenoid valve 2P connector and the inhibitor solenoid 2P connector.