Blower Unit Removal/Installation
- Remove the glove box (see
GLOVE BOX REMOVAL/INSTALLATION
) and passenger's dashboard undercover (see
PASSENGER'S DASHBOARD UNDERCOVER REMOVAL/INSTALLATION
).
- Remove the glove box damper (see
GLOVE BOX LOCK CYLINDER REPLACEMENT
).
- Remove the passenger's middle panel (see
PASSENGER'S MIDDLE PANEL REMOVAL/INSTALLATION
).
- With navigation: Remove the stereo amplifier (see
AUDIO DISPLAY UNIT REMOVAL/INSTALLATION
).
- Remove the engine mount control unit (see
ENGINE MOUNT CONTROL UNIT REPLACEMENT
).
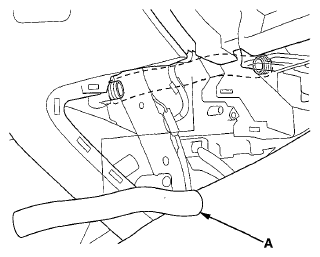
- With cool box: Remove the cool box inlet hose (A).
 Courtesy of AMERICAN HONDA MOTOR CO., INC.
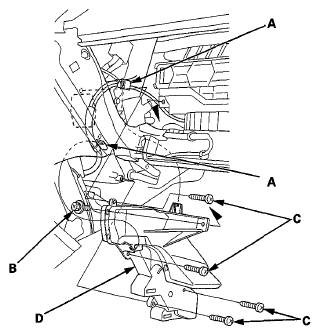
- Detach the wire harness clips (A), then remove the self-tapping screw (B), the self-tapping screws (C), and the passenger's heater duct and cover (D).
 Courtesy of AMERICAN HONDA MOTOR CO., INC.
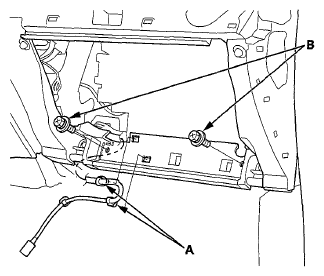
- With USB adapter: Detach the harness clips (A).
 Courtesy of AMERICAN HONDA MOTOR CO., INC.
- Remove the self-tapping screws (B).
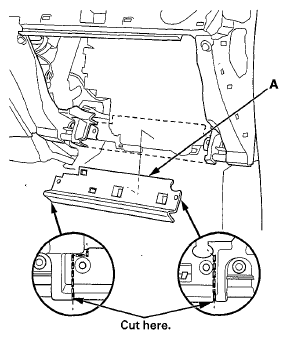
- Cut the plastic cross brace (A) in the glove box opening with diagonal cutters in the area shown. Retain the plastic cross brace to be reinstalled later.
 Courtesy of AMERICAN HONDA MOTOR CO., INC.
- Disconnect the connectors (A) from the front blower motor. Detach the wire harness clips (B) and the connector clip (C).
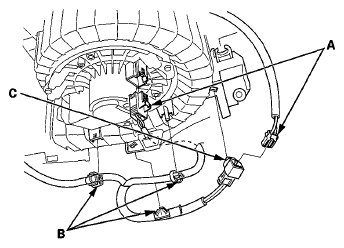 Courtesy of AMERICAN HONDA MOTOR CO., INC.
- Disconnect the connector (A) from the recirculation control motor. Remove the self-tapping screws, the mounting nuts, and the blower unit (B).
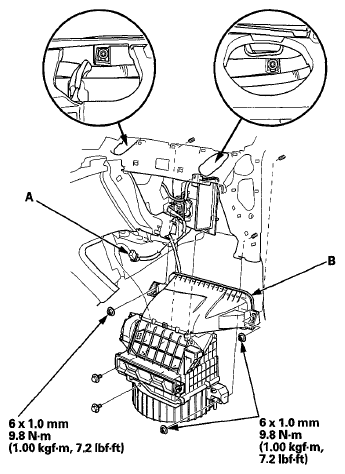 Courtesy of AMERICAN HONDA MOTOR CO., INC.
- Install the unit in the reverse order of removal. Make sure that there is no air leakage.