No Sound Is Heard From Speaker(s) (Display Is Normal)
No sound is heard from speaker(s) (display is normal)NOTE:
- Check the vehicle battery condition first.
- Set the fader and balance positions to the center.
- Before performing symptom troubleshooting, do the power switch will not turn ON troubleshooting.
- For vehicles with factory installed audio unit, do the individual speaker test to help isolate the speaker.
1. Turn the ignition switch ON (II).
2. Turn on the audio unit and check that the volume dial is not set to the min level.
Is it at MIN level?
YES - Raise the volume level, and recheck the function.
NO - Go to step 3.
3. Check to see if there is a specific speaker that has no sound.
Is there a specific speaker?
YES - Go to step 4.
NO - Go to step 7.
4. Turn the ignition switch OFF.
5. Check the speaker with no sound for any damage.
Is there any damage?
YES - Substitute the speaker and recheck.
NO - Go to step 6.
6. Remove the speaker(s) with no sound, and disconnect its connector.
7. Check the speaker connector for a loose or poor connection.
Reconnect the speaker connector and recheck the symptom; does it still fail?
YES - Go to step 8.
NO - Operation is normal.
8. Measure the resistance between the No.1 and No.2 terminals of the speaker connector.
Is there about 4 ohms?
YES
- EX and SC models: Go to step 13.
- LX model: Go to step 9.
NO - Faulty speaker(s).
9. Remove the audio unit, and disconnect audio unit connector A (20P).
NOTE: Eject all the CDs before remove the audio unit to prevent damaging the CD player's load mechanism.
10. Measure the resistance between following terminals of audio unit connector A (20P) according to the table.
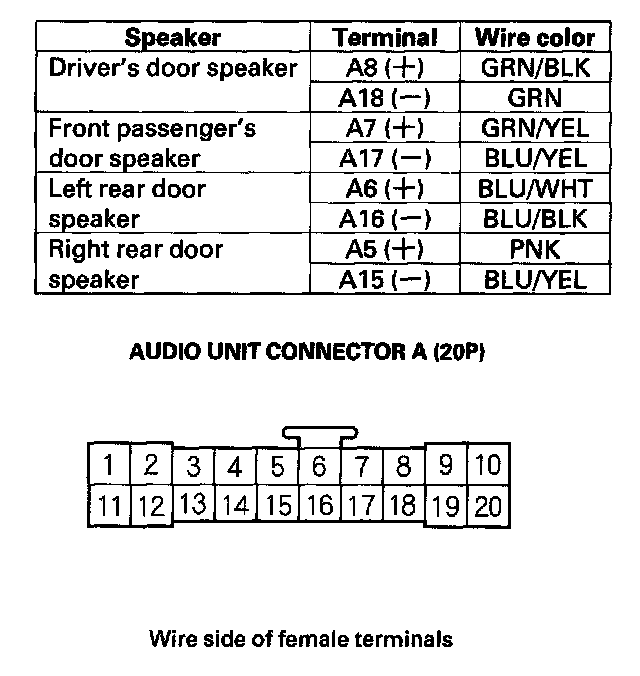
Is there about 4 ohms?
YES - Go to step 11.
NO - Repair short in the wires between the audio unit and speaker.
11. Disconnect the speaker connector.
12. Check audio unit connector A (20P) terminals No.5, 6, 7, 8, 15, 16, 17, and 18 individually for continuity to body ground.
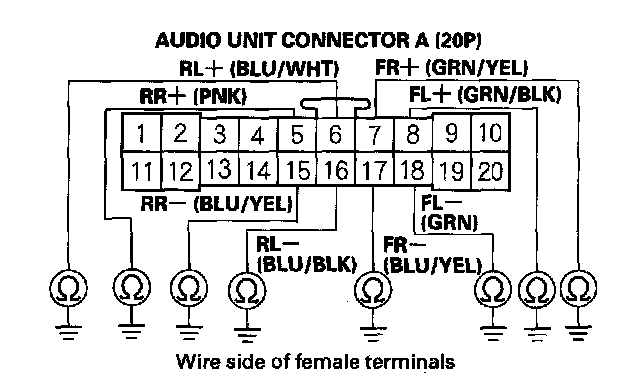
Is there continuity?
YES - Repair short to body ground in the wire between the audio unit and speaker.
NO - Substitute a known-good audio unit and recheck. If the symptom/indication goes away, replace the original audio unit.
13. Disconnect stereo amplifier connector A (14P), and connector B (16P).
14. Measure the voltage between stereo amplifier connector A (14P) No.11 terminal and body ground.
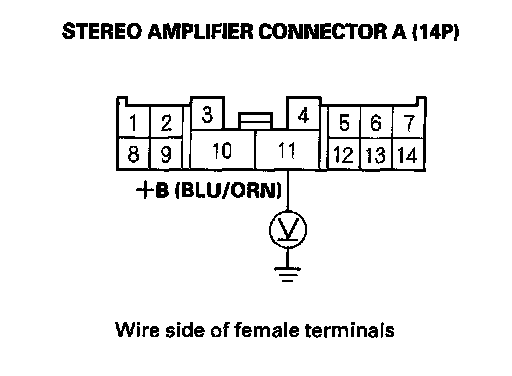
Is there battery voltage?
YES - Go to step 15.
NO - Repair open in the wire between No.7 (20 A) fuse in the under-dash fuse box and stereo amplifier connector A (14P) No.11 terminal.
15. Turn the ignition switch ON (II), and push the PWR button on the audio unit.
16. Measure the voltage between stereo amplifier connector B (16P) No.1 terminal and body ground.
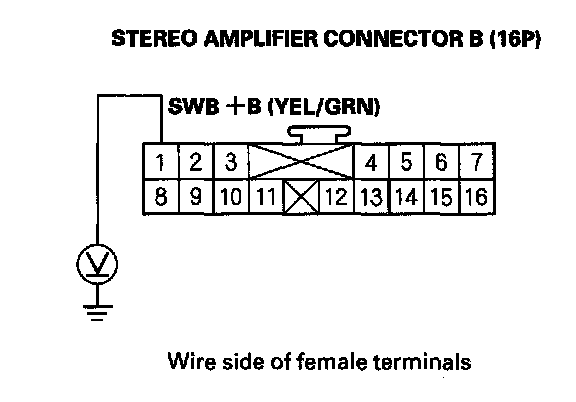
Is there battery voltage?
YES - Go to step 17.
NO - Repair open in the wire between audio unit connector A (20P) No.1 terminal and stereo amplifier connector B (16P) No.1 terminal.
17. Reconnect stereo amplifier connector A (14P), and connector B(16P).
18. Measure the voltage between stereo amplifier connector B (16P) No.10 terminal and body ground.
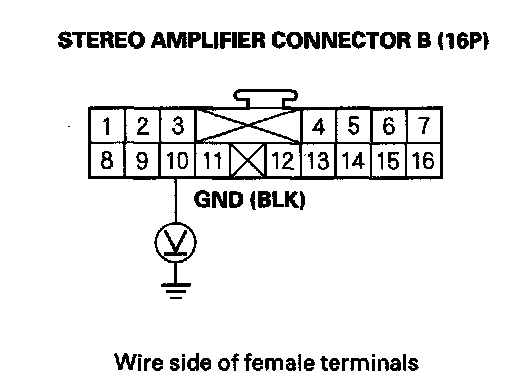
Is there less than 0.1 V on both terminals?
YES - Go to step 19.
NO - Repair open in the wire between stereo amplifier connector B (16P) No.10 terminal and body ground (G503).
19. Disconnect stereo amplifier connector A (14P), and connector B (16P).
20. Measure the resistance between the stereo amplifier connector A (14P) according to the table.
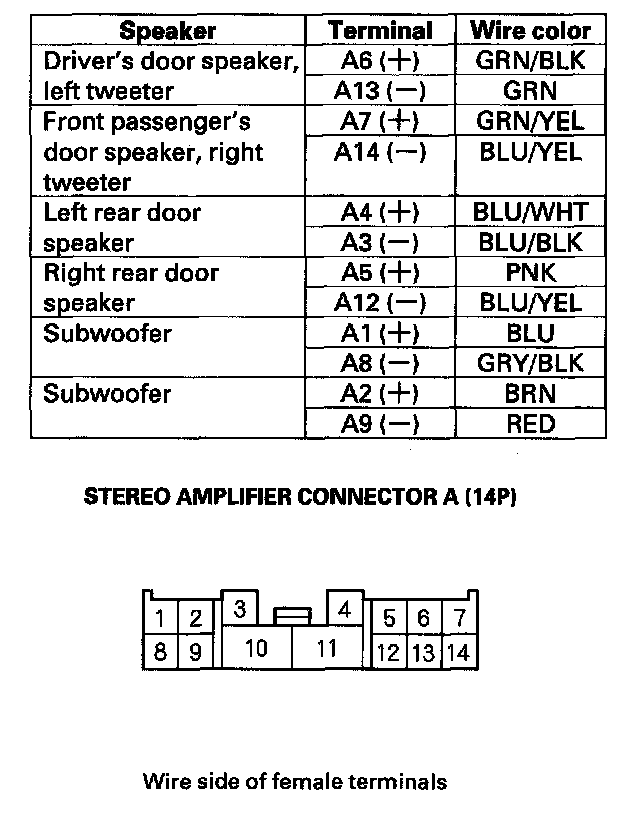
Is there about 40 ohms?
YES - Go to step 21.
NO - Repair short in the wires between the stereo amplifier and speaker.
21. Disconnect the connector(s) to the speaker(s).
22. Check for continuity between stereo amplifier connector A (14P) and body ground according to the table.
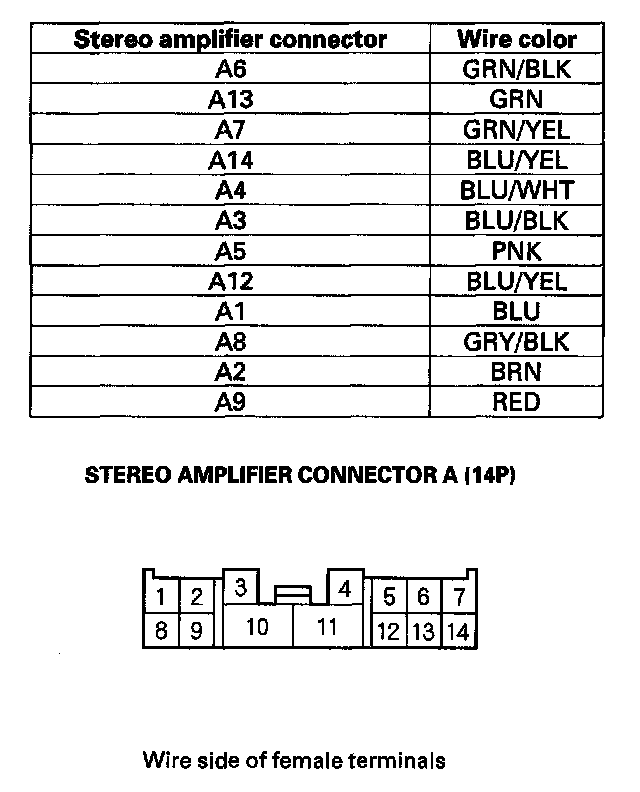
Is there continuity?
YES - Repair short to body ground in the wire between the audio unit and the speaker.
NO - Go to step 23.
23. Remove the audio unit, and disconnect audio unit connector A (20P).
NOTE: Eject all the CDs before remove the audio unit to prevent damaging the CD player's load mechanism.
24. Check for continuity between audio unit connector A (20P) and body ground according to the table.
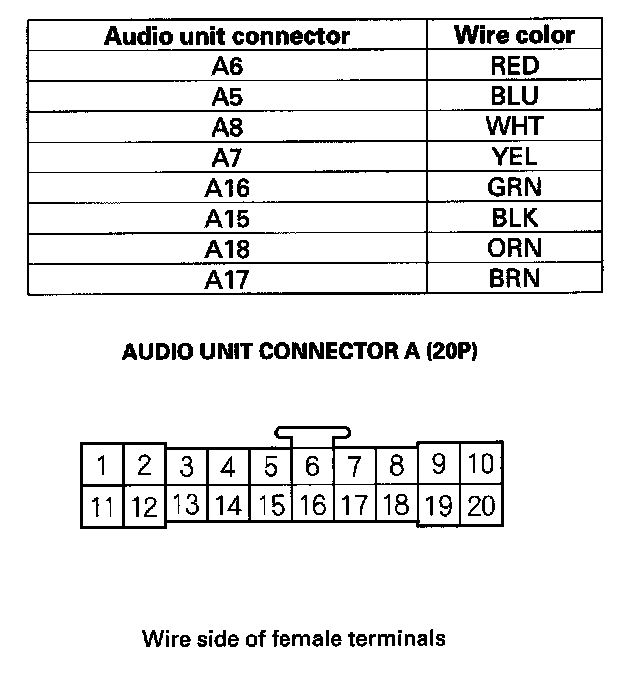
Is there continuity?
YES - Short to body ground in the wire(s) between the stereo amplifier and the audio unit. Replace the affected shielded harness.
NO - Go to step 25.
25. Check for continuity between the audio unit connector A (20P) according to the table.
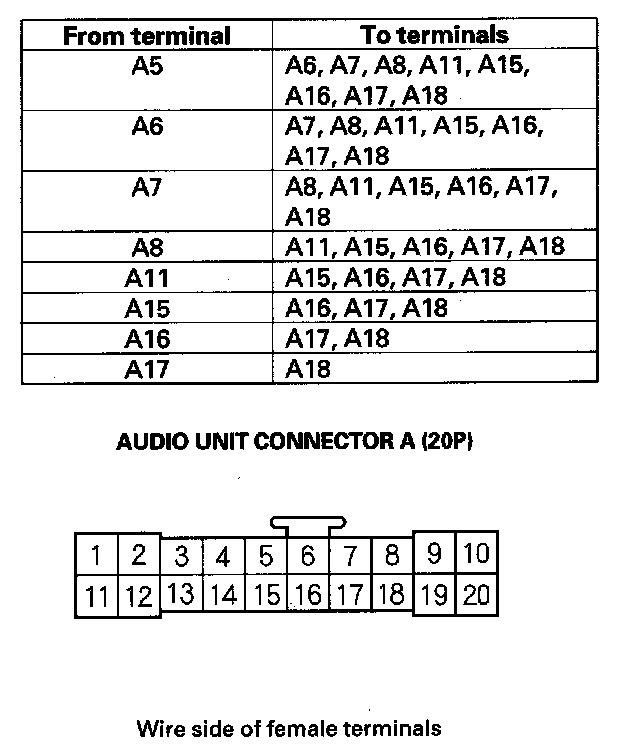
Is there continuity between any of the terminals?
YES - Short in the wire(s) between the stereo amplifier and the audio unit. Replace the affected shielded harness.
NO - Go to step 26.
26. Check for continuity between audio unit connector A (20P) and stereo amplifier connector B (16P) according to the table.
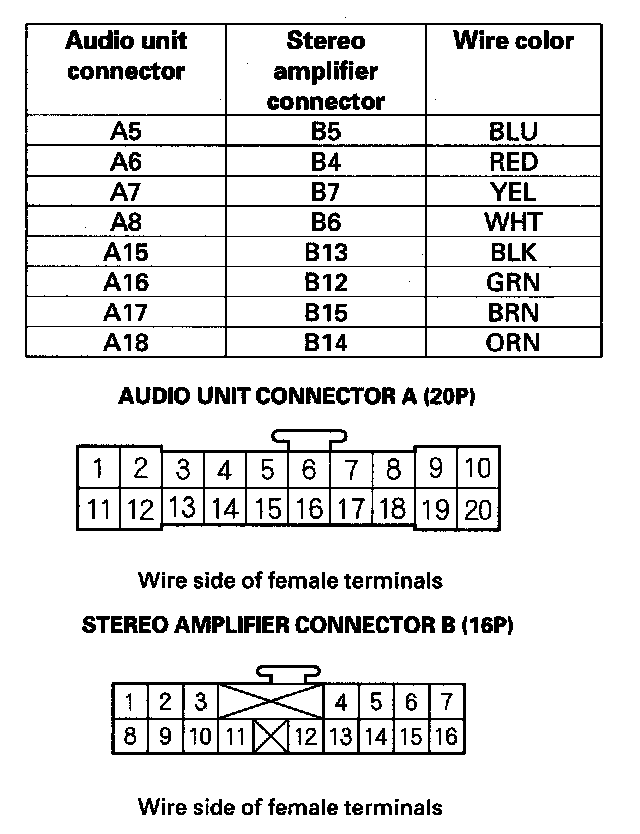
Is there continuity?
YES - Go to step 27.
NO - Open in the wire(s) between the stereo amplifier and the audio unit. Replace the affected shielded harness.
27. Disconnect audio unit connector B (8P).
28. Check for continuity between audio unit connector B (8P) and body ground according to the table.
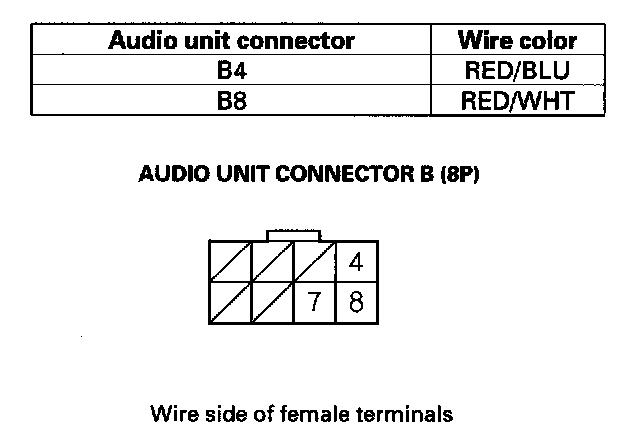
Is there continuity?
YES - Short to body ground in the wire(s) between the stereo amplifier and the audio unit. Replace the affected shielded harness.
NO - Go to step 29.
29. Check for continuity between audio unit connector B (8P) and body ground according to the table.
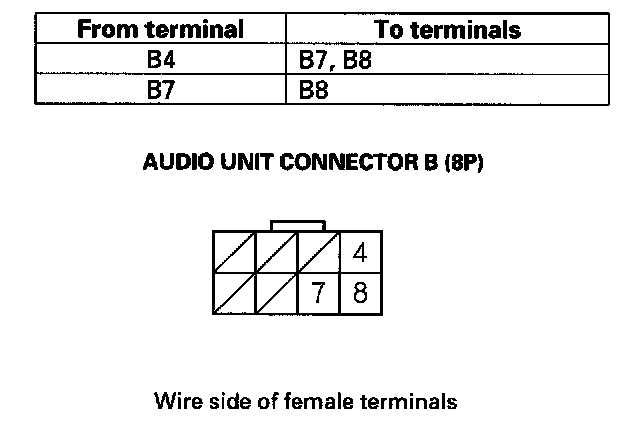
Is there continuity between any of the terminals?
YES - Short in the wire(s) between the stereo amplifier and the audio unit. Replace the affected shielded harness.
NO - Go to step 30.
30. Check for continuity between audio unit connector B (8P) and stereo amplifier connector B (16P) according to the table.
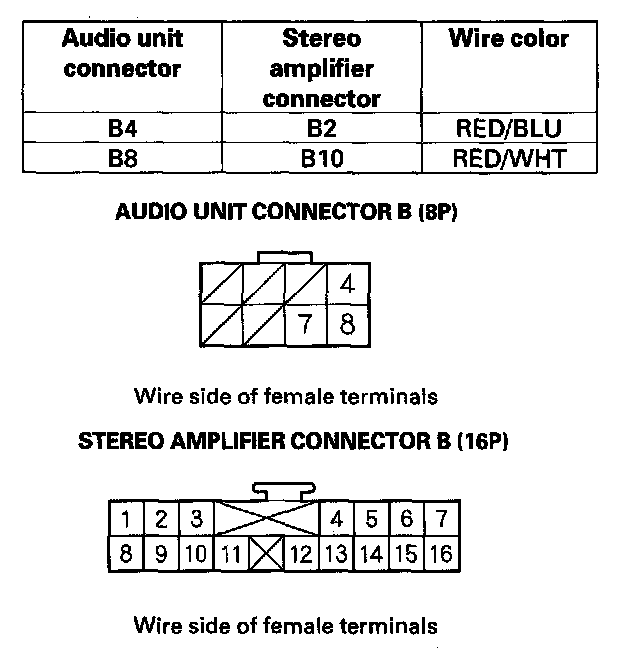
Is there continuity?
YES - Substitute a known-good audio unit and recheck. If the symptom/indication goes away, replace the original audio unit. If symptom is still present, substitute a known-good stereo amplifier and recheck. If the symptom/indication goes away, replace the original stereo amplifier.
NO - Open in the wire(s) between the stereo amplifier and the audio unit. Replace the affected shielded harness.