Lower Crankcase Installation
WARNING: This page is about a different variant/trim than selected.
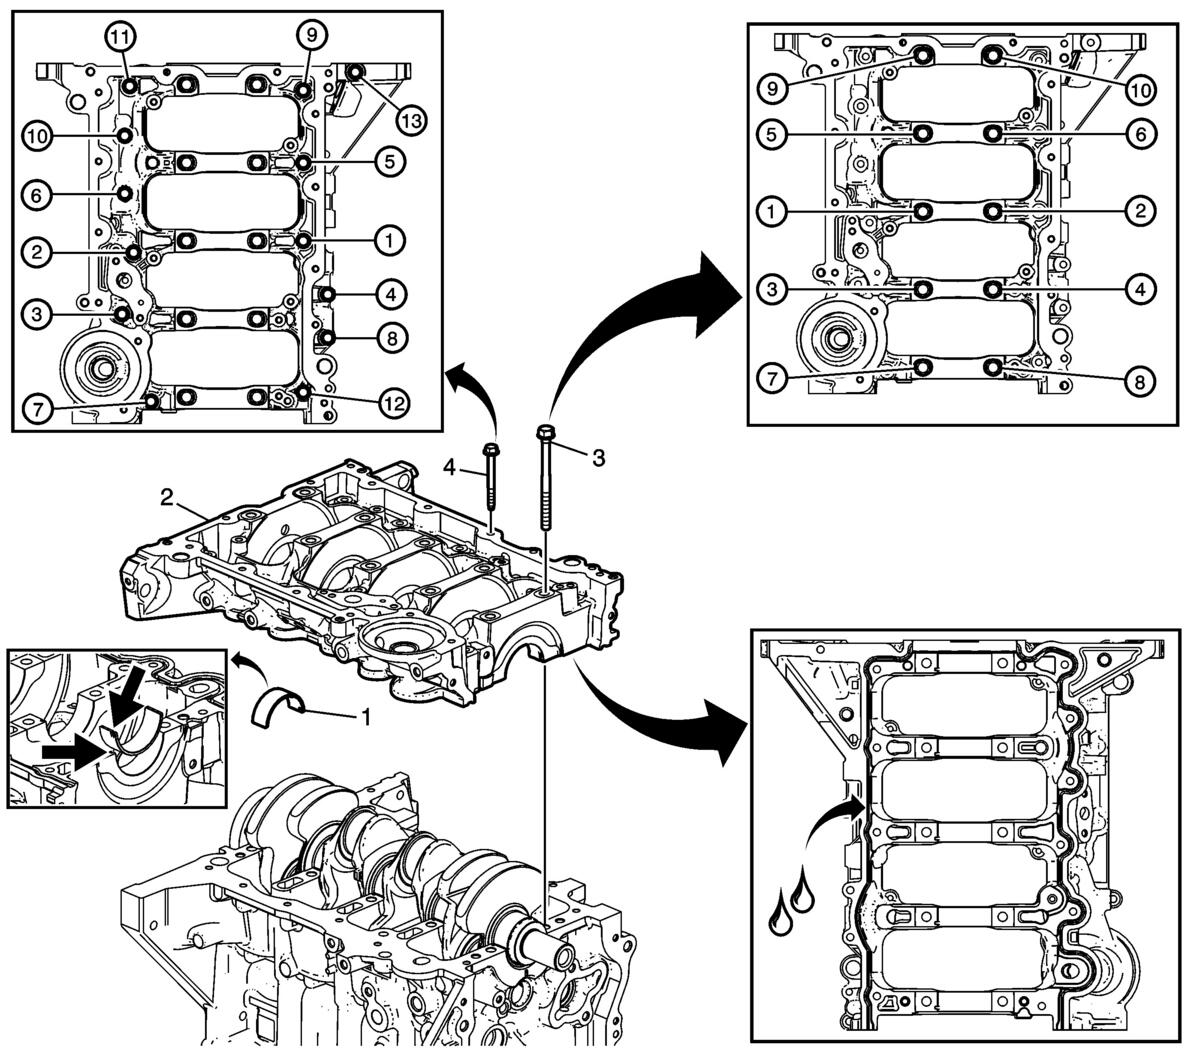 Courtesy of GENERAL MOTORS COMPANY
| Callout |
Component Name |
| 1 |
Crankshaft Lower Bearing (Qty: 5)
Procedure
Install the bearings in the lower crankcase, and ensure that the guide lug on the bearing is properly seated to the notch in the lower crankcase for each bearing. Coat the crankshaft bearing shell with engine oil. |
| 2 |
Lower Crankcase Procedure
- Ensure proper use of room temperature vulcanizing (RTV) sealant. Use of Room Temperature Vulcanizing (RTV) and Anaerobic Sealant
NOTE:
- All sealing surfaces must be free of contamination prior to applying the sealer.
- Installation and final torque specification must be completed within 10 minutes of applying the sealant.
- Apply a 3 mm bead of sealer directly in the groove of the block to bedplate mating surfaces. Refer to Adhesives, Fluids, Lubricants, and Sealers .
- Install the lower crankcase, ensure the lower crankcase is aligned properly on the dowels. Tap gently into place with a suitable tool, if necessary.
|
| 3 |
Lower Crankcase Bolts (Qty: 10)
Procedure
Tighten the NEW lower crankcase bolts in the sequence shown.
- Tighten the bolts in sequence a first pass to 15 N.m (11 lb ft).
- Using the EN 45059
angle meter, tighten the bolts in sequence a final pass to 180 degrees.
Special Tools
EN-45059
Angle Meter
For equivalent regional tools, refer to Special Tools . |
| 4 |
Lower Crankcase Bolts (Qty: 13)
Procedure
- Apply sealant to the lower crankcase perimeter bolts. Refer to Adhesives, Fluids, Lubricants, and Sealers .
- Tighten the lower crankcase bolts in the sequence shown.
- Tighten the bolts in sequence a first pass to 5 N.m (44 lb in).
- Tighten the bolts in sequence a final pass to 10 N.m (89 lb in).
|