Camshaft Timing Chain And Sprocket Cleaning And Inspection
WARNING: This page is about a different variant/trim than selected.
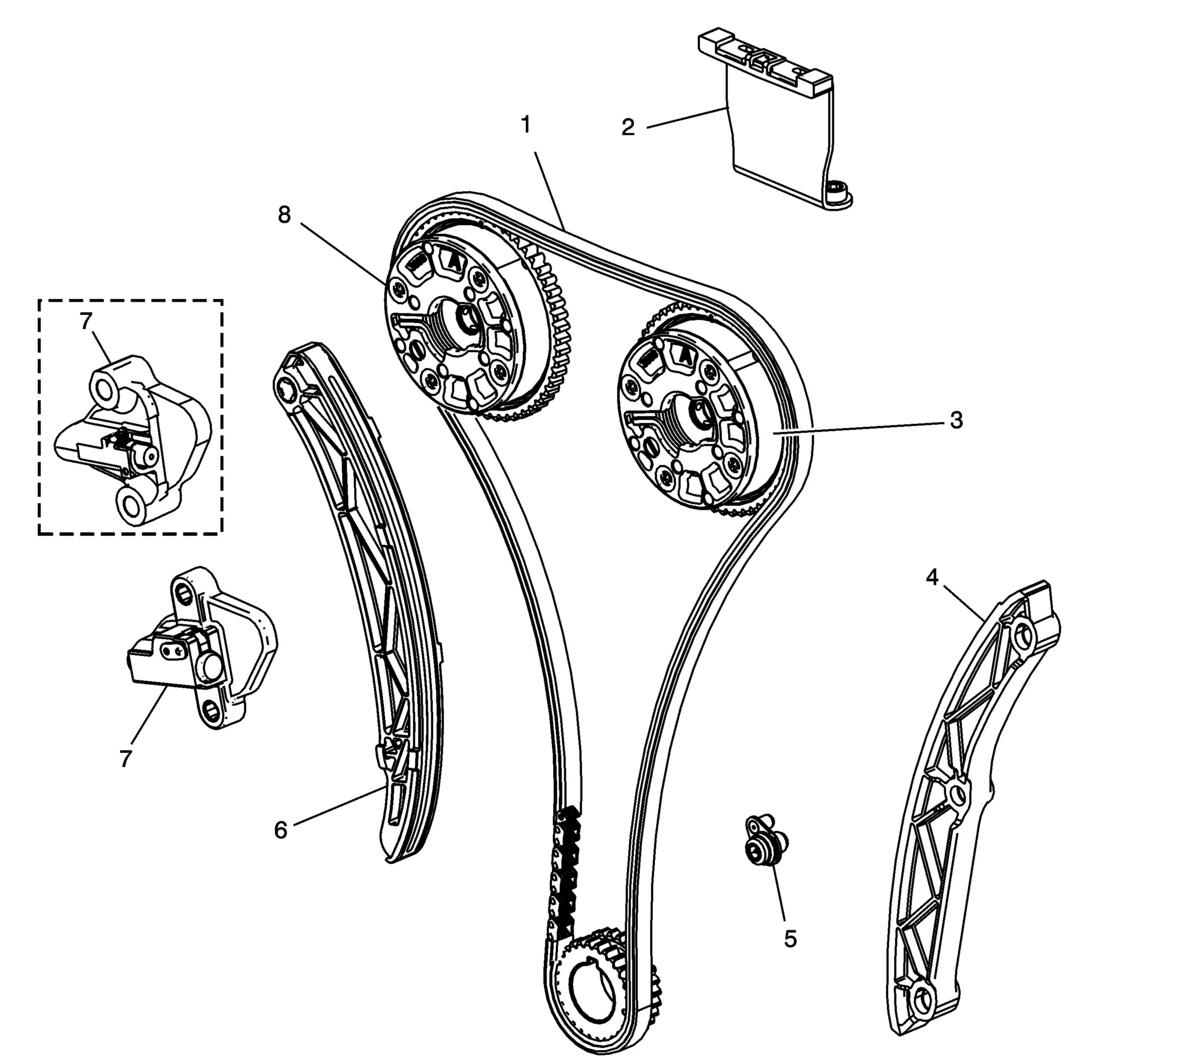 Courtesy of GENERAL MOTORS COMPANY
| Callout |
Component Name |
| 1 |
Timing Chain Procedure
- Inspect the timing chain for binding or worn links.
- Inspect the timing chain for loose links.
- Inspect the timing chain for loose pins.
- Replace the timing chain if binding, excessive wear, or a loose condition is present.
|
| 2 |
Timing Chain Guide Procedure
- Inspect the guide for worn guide surface. Replace the timing chain guides if wear exceeds 1.12 mm (0.045 in) depth on the chain guide surface.
- Inspect the guide for a cracked or broken guide surface.
- Inspect the guide for a cracked or damaged guide base.
- Replace the guide if damage is present.
|
| 3 |
Camshaft Position Actuator Assembly - Exhaust Procedure
- Inspect the camshaft actuator faces for signs of movement.
- Inspect the camshaft actuator for sprocket damage.
- Inspect the actuator bolt seating and sealing inner hub flange for damage.
- Inspect the back of the actuator for locating pin damage.
- Ensure the actuator housing bolts are not loose or missing.
- Inspect the back of the actuator for blockage to the oil passages.
- Replace the actuator if any of these conditions are present.
|
| 4 |
Timing Chain Guide Procedure
- Inspect the guide for wear to the guide surface.
- Inspect the guide for cracked or broken guide surface or base.
- Replace the guide if these conditions are present.
|
| 5 |
Timing Chain Oil Nozzle Procedure
- Inspect the oil nozzle body for collapse or cracks at the bolt boss. Discard and replace the oil nozzle body if it is damaged.
- Verify oil nozzle oil flow with compressed air.
- Replace the nozzle if damage or oil flow restriction is present.
|
| 6 |
Timing Chain Tensioner Shoe Procedure
- Inspect for worn, cracked, or broken shoe surface.
- Inspect the shoe for wear at the tensioner contact pad.
- Replace the shoe if any of these conditions are present.
|
| 7 |
Timing Chain Tensioner Procedure
- Inspect the tensioner for damage to the plunger-to-shoe contact surface.
- Inspect the tensioner for a locked or binding condition. Reset the plunger and ensure the plunger moves freely in and out of the tensioner body.
- If the tensioner has a lever on the front, press down on the lever and depress the plunger. Insert a suitable tool into the hole in the tensioner body to hold the plunger in the retracted position.
- If the tensioner has a retaining clip, press the clip and depress the plunger. Insert a suitable tool into the hole in the tensioner body to hold the plunger in the retracted position.
- Inspect the timing chain tensioner gasket for damage.
- Replace the tensioner if any of these conditions are present.
|
| 8 |
Camshaft Position Actuator Assembly - Intake Procedure
- Inspect the camshaft actuator faces for signs of movement.
- Inspect the camshaft actuator for sprocket damage.
- Inspect the actuator bolt seating and sealing inner hub flange for damage.
- Inspect the back of the actuator for locating pin damage.
- Ensure the actuator housing bolts are not loose or missing.
- Inspect the back of the actuator for blockage to the oil passages.
- Replace the actuator if any of these conditions are present.
|