Rear Side Door Trim Panel Replacement (Extended Wheelbase)
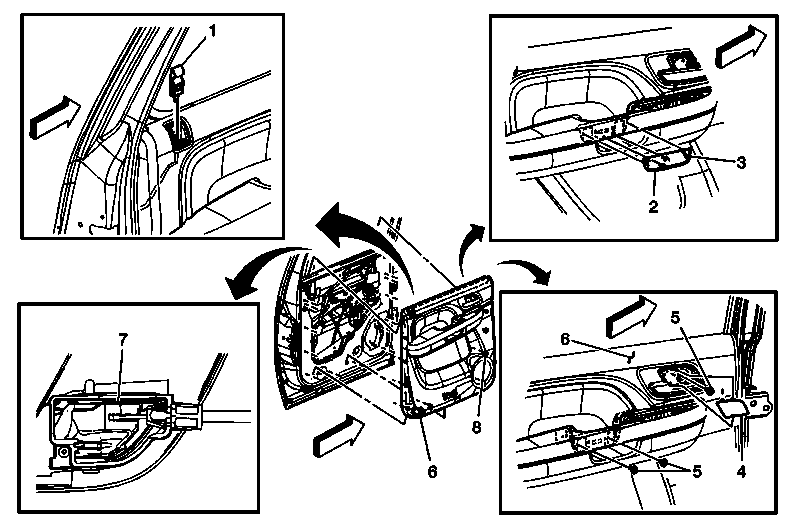 Courtesy of GENERAL MOTORS COMPANY
 Rear Side Door Trim Panel Replacement (Extended Wheelbase)
| Callout |
Component Name |
|
Preliminary Procedures
- Remove the rear door window control switch. Refer to Rear Side Door Window Switch Replacement
.
- If the water deflector remains with the door trim panel, refer to Rear Side Door Water Deflector Replacement .
|
| 1 |
Rear Side Door Locking Rod Knob Assembly Procedure
- Lower the window.
- Ensure locking rod is in the unlocked position.
- Use a flat-bladed tool to disengage detent tab, then remove knob by pulling upward.
- When re-installing, push knob down, until detent tab touches locking rod opening cover.
- Push detent tab in to lock knob to locking rod.
|
| 2 |
Rear Side Door Trim Panel Cover |
| 3 |
Rear Side Door Trim Panel Cover Retainer (Qty: 4) |
| 4 |
Rear Side Door Inside Handle Bezel Cover |
| 5 |
Rear Side Door Trim Panel Bolt (Qty: 3)
Tighten
9 N.m (18 lb in) |
| 6 |
Rear Side Door Trim Panel Assembly Procedure
- Disconnect the electrical connectors.
- There are 2 hooks located on the lower portion of the door trim panel that are being used for service and manufacturing installation.
- If these hooks are damaged during either removal or installation of the door trim panel, replacement of the panel is not required.
|
| 7 |
Rear Side Door Cable Retainer Procedure
- Depress both tabs to remove cable and pull cable rearward out of handle assembly.
- When reinstalling cable make sure that it is fully seated past the guide tab.
|
| 8 |
Rear Side Door Trim Panel Retainer (Qty: 10) |