Front Side Door Trim Panel Replacement (YE9)
WARNING: This page is about a different car, the 2007 GMC Sierra and 2007 Chevrolet Silverado. However, it is still accessible from the selected car via links, so may be relevant.
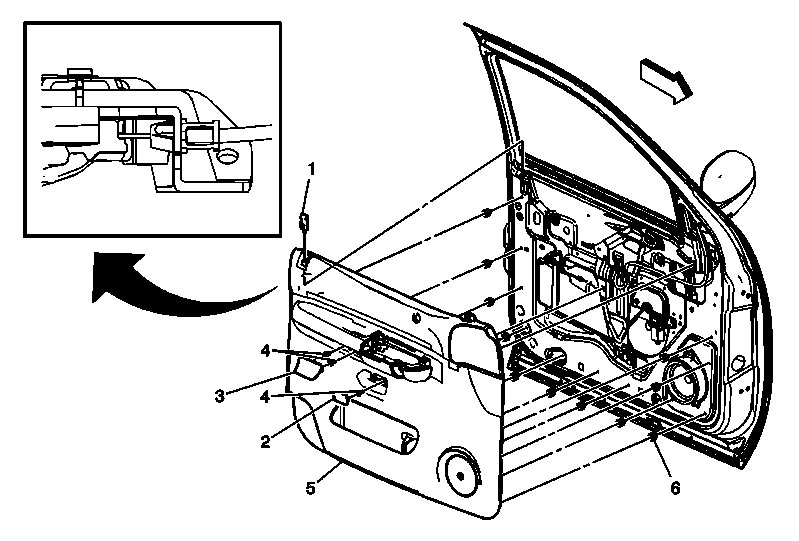 Courtesy of GENERAL MOTORS CORP.
 Front Side Door Trim Panel Replacement (YE9)
| Callout |
Component Name |
|
Preliminary Procedure
- Remove upper extension trim panel. Refer to Upper Extension Trim Panel Replacement .
- Remove door pull handle. Refer to Front Side Door Pull Handle Replacement .
- Remove door lock and window control switch (if equipped). Refer to Door Lock and Side Window Switch Replacement - Driver Side
and Door Lock and Side Window Switch Replacement - Passenger Side
.
- Remove the door window regulator handle (if equipped). Refer to Door Window Regulator Handle Replacement
.
|
| 1 |
Front Side Door Locking Rod Knob Assembly
Tip:
- Lower window.
- Ensure locking rod is in the unlocked position.
- Use a flat-bladed tool to disengage detent tab and then remove knob by pulling upward.
- When re-installing, push knob down until detent tab touches locking rod opening cover.
- Push detent tab in to lock knob to locking rod.
|
| 2 |
Front Side Door Release Handle Cover |
| 3 |
Front Side Door Armrest Opening Cover |
| 4 |
Front Side Door Trim Panel Bolt (Qty: 3)
Tighten:
2 N.m (18 lb in)
|
| 5 |
Front Side Door Trim Panel Assembly
Tip:
- Disengage door lock cable.
- There are two hooks located on the lower portion of the door trim panel that are being used for manufacturing installation ONLY.
- If these hook are damaged during either removal or installation of the door trim panel, replacement of the panel is not required.
|
| 6 |
Front Side Door Trim Panel Retainer (Qty: 11) |