Transmission Fluid Check
WARNING: This page is about a different car, the 2009 Saturn Vue. However, it is still accessible from the selected car via links, so may be relevant.
Special Tools
- DT 48890:
Fluid Fill Adapter
- J 45096-30:
Transmission Cooler Flusher Adapters
For equivalent regional tools, refer to Special Tools .
 Courtesy of GENERAL MOTORS CORP.
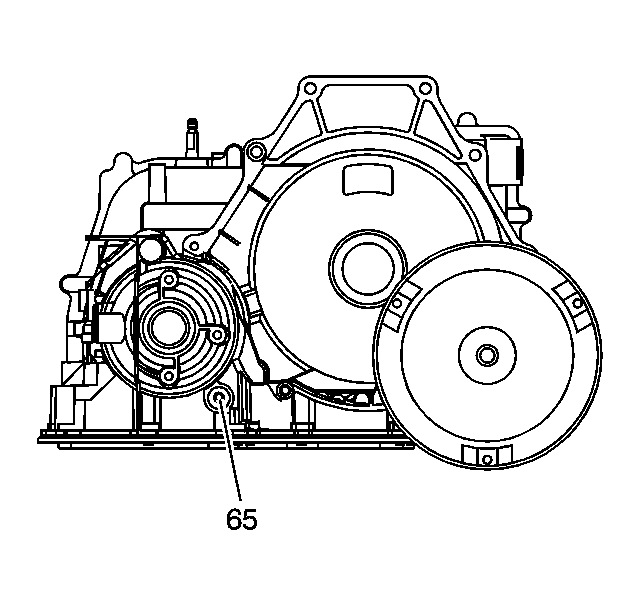
The oil level control plug (65) is located on the torque converter side of the transmission.
| Step |
Action |
Value(s) |
Yes |
No |
| 1 |
- Start the engine and allow the engine to idle until the transmission fluid temperature has reached the value specified.
- Depress the brake pedal and move the shift lever through the gear ranges, pausing a few seconds in each range. Return the shift lever to the PARK range.
- Raise the vehicle on a hoist. The vehicle must be level, with the engine running and the shift lever in the PARK range. Refer to Lifting and Jacking the Vehicle
.
- Remove the transmission oil level control plug (65). Refer to the graphic at the beginning of this procedure.
NOTE:
The transmission fluid may darken with normal use and does not always indicate contamination or oxidation.
- Check the fluid color. If necessary, use a small screwdriver as a dipstick.
Is the fluid color clear red or light brown with no burnt odor? |
At least 40°C (104°F) |
Go to Step 4 |
Go to Step 2 |
| 2 |
Does the fluid have a burnt odor or a dark brown color? |
- |
Go to Step 8 |
Go to Step 3 |
| 3 |
Does the fluid have a cloudy or milky appearance? |
- |
Go to Step 7 |
Go to Step 8 |
| 4 |
Check the fluid level. The fluid level should be even with the bottom of the threaded plug hole.
Is the fluid level low? |
- |
Go to Step 5 |
Go to Step 11 |
| 5 |
- Remove the oil level control plug (65) and install DT 48890:
fluid fill adapter.
- Using DT 48890:
fluid fill adapter and J 45096-30:
flusher adapters or equivalent, add DEXRON®VI automatic transmission fluid in increments of 0.5 L (0.5 qt) until the fluid drains from the plug hole.
Did you add more than 1.5 L (1.6 qt) to the transmission? |
- |
Go to Step 6 |
Go to Step 11 |
| 6 |
The transmission may have a leak. Refer to Fluid Leak Diagnosis .
Was a transmission fluid leak found? |
- |
Go to Step 9 |
Go to Step 11 |
| 7 |
The transmission fluid is contaminated with engine coolant. Repair or replace the transmission cooler in the radiator.
Is the transmission cooler repair complete? |
- |
Go to Step 9 |
- |
| 8 |
- Drain the fluid by removing the bottom pan.
NOTE:
A very small amount of material in the bottom of the bottom pan is a normal condition.
- Check the bottom pan for any excessive debris.
Was excessive debris found? |
- |
Go to Step 9 |
Go to Step 10 |
| 9 |
- Repair the transmission if required. In some cases, overhaul may be required.
- Flush the transmission oil cooler and pipes and check flow. Refer to Transmission Fluid Cooler Flushing and Flow Test (J 45096) or Transmission Fluid Cooler Flushing and Flow Test (SA9165T) .
- Start the engine and allow the engine to idle until the transmission fluid temperature has reached the value specified.
- Depress the brake pedal and move the shift lever through the gear ranges, pausing a few seconds in each range. Return the shift lever to the PARK range.
- Raise the vehicle on a hoist. The vehicle must be level, with the engine running and the shift lever in the PARK range. Refer to Lifting and Jacking the Vehicle
.
- Remove the transmission plug.
- Using DT 48890:
fluid fill adapter and J 45096-30:
flusher adapters or equivalent, add DEXRON®VI automatic transmission fluid in increments of 0.5 L (0.5 qt) until the fluid drains from the plug hole.
NOTE:
Before installing the fill plug (65), apply GM P/N 12345382 (Canadian P/N 10953489) to the thread of the line pressure plug.
- Allow fluid to finish draining out of the plug hole. Remove DT 48890:
fluid fill adapter. Install the plug (65) and tighten to specified value.
- Wipe any excess fluid from the transmission with a rag or shop towel.
Is the repair complete? |
At least 40°C (104°F)
12 N.m (9 lb ft) |
System OK |
- |
| 10 |
- Change the fluid and the fluid filter. Refer to Automatic Transmission Fluid Filter and Seal Replacement .
- Start the engine and allow the engine to idle until the transmission fluid temperature has reached the value specified.
- Depress the brake pedal and move the shift lever through the gear ranges, pausing a few seconds in each range. Return the shift lever to the PARK range.
- Raise the vehicle on a hoist. The vehicle must be level with the engine running and the shift lever in the PARK range. Refer to Lifting and Jacking the Vehicle
.
- Remove the transmission plug (65).
- Using DT 48890:
fluid fill adapter and J 45096-30:
flusher adapters or equivalent, add DEXRON®VI automatic transmission fluid in increments of 0.5 L (0.5 qt) until the fluid drains from the plug hole.
NOTE:
Before installing the fill plug (65), apply GM P/N 12345382 (Canadian P/N 10953489) to the thread of the line pressure plug.
- Allow fluid to finish draining out of the plug hole. Remove DT 48890:
fluid fill adapter. Install the plug (65) and tighten to specified value.
- Wipe any excess fluid from the transmission with a rag or shop towel.
Is the repair complete? |
At least 40°C (104°F)
12 N.m (9 lb ft) |
System OK |
- |
| 11 |
NOTE:
Before installing the fill plug, apply GM P/N 12345382 (Canadian P/N 10953489) to the thread of the line pressure plug.
- Allow fluid to finish draining out of the plug hole. Remove DT 48890:
fluid fill adapter. Install the plug (65) and tighten to specified value.
- Wipe any excess fluid from the transmission with a rag or shop towel.
Is the repair complete? |
12 N.m (9 lb ft) |
System OK |
- |