Power Brake Units - BENDIX Single Diaphragm: Overhaul: Reassembly
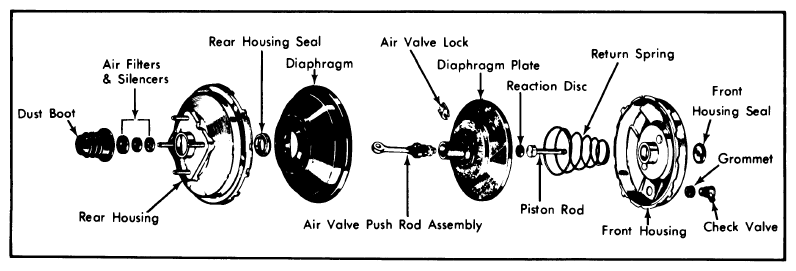
- Install vacuum check valve grommet (beveled edge on inside), dip check valve in clean, denatured alcohol and install. Install suitable holding fixture (J-22805) on front housing. Install new rear housing seal in center hole, using suitable tool (J-22677) to seat seal in recess (tool bottoms against housing when seal is in place).
- Assemble diaphragm plate assembly as follows: Lubricate outer diameter of diaphragm plate and extension, valve, and plunger bearing surfaces, and outer edge of valve poppet. Install valve and rod into diaphragm plate extension. Depress push rod slightly and install air valve lock (lock must index and retain air valve). Install rolling diaphragm in diaphragm plate hub groove. Lubricate reaction disc and install disc (use master cylinder push rod to seat disc in diaphragm plate bore). If disc is not fully seated, push rod height will be gauged incorrectly during adjustment procedure.
 Courtesy of NOT AVAILABLE
- Lubricate inside of bearing seal and diaphragm bead contact surface of rear shell. Install diaphragm plate assembly in rear housing. Place air filter element over push rod and into diaphragm plate extension. Install filter retainer.
- With holding fixture in place, position suitable wrench (J-9504) over studs on rear housing and position front and rear housings together. Press down on wrench and rotate rear housing counterclockwise to lock housings. Align scribe marks. Re-bend tabs on rear housings. If tabs are cracked or broken, housing must be replaced. Remove wrench.
- Install air silencers over push rod end. Install push rod boot and boot retainer. On clevis type push rods, install lock nut and push rod clevis. Lightly lubricate piston rod (except rounded end). Guide rod into center bore until fully seated against reaction disc. Press front housing seal into housing until seal is bottomed in recess of housing.