Crankshaft Rear Seal
Crankshaft Rear Seal
Removal
1. Remove the flexplate or flywheel. For additional information, refer to Flexplate Flexplate or Flywheel Removal and Replacement.
2. Remove the oil pan. For additional information, refer to Oil Pan Oil Pan.
3. Remove the 6 bolts and the crankshaft rear seal.
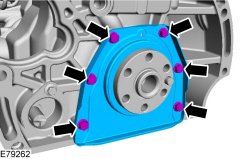
4. Clean the sealing surface of the crankshaft rear seal and crankshaft.
Installation
1. NOTE: New crankshaft rear seal is supplied with an alignment sleeve which must be removed after installation.
NOTE: Do not remove the alignment sleeve from the crankshaft rear seal prior to installation on the crankshaft.
NOTE: Do not lubricate the new crankshaft rear seal.
Align the crankshaft rear seal and alignment sleeve on the crankshaft and push the crankshaft rear seal off the alignment sleeve onto the crankshaft without stopping until the crankshaft rear seal meets the cylinder block.
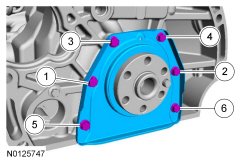
- Install the 6 bolts and tighten in sequence shown in 2 stages.
- Stage 1: Tighten bolts 1 through 6 to 4 Nm (35 lb-in).
- Stage 2: Tighten bolts 1 through 6 to 9 Nm (80 lb-in).
2. Remove the alignment sleeve taking care not to touch the sealing lip.
3. Install the oil pan. For additional information, refer to Oil Pan Oil Pan.
4. Install the flexplate or flywheel. For additional information, refer to Flexplate Flexplate or Flywheel Removal and Replacement.