Camshaft Phaser and Sprocket - LH
Camshaft Phaser and Sprocket - LH
Removal
1. Remove the timing drive components. For additional information, refer to Timing Drive Components Removal and Replacement.
2. NOTICE: Damage to the camshaft phaser and sprocket assembly will occur if mishandled or used as a lifting or leveraging device.
NOTICE: Only use hand tools to remove the camshaft phaser and sprocket assembly or damage may occur to the camshaft or camshaft phaser and sprocket.
Using a 26 mm (1.023 in) wrench on the flats of the camshaft to secure the camshaft, remove the 3 LH camshaft phaser and sprocket bolts and the camshaft phaser and sprocket.
- Discard the 3 camshaft phaser and sprocket bolts.
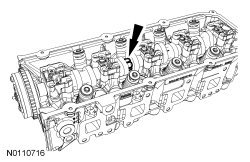
3. Remove and discard the Variable Camshaft Timing (VCT) system oil filter.
Installation
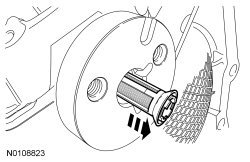
1. Install a new VCT (Variable Camshaft Timing) system oil filter with the open end facing the front of the engine.
2. NOTICE: Damage to the camshaft phaser and sprocket assembly will occur if mishandled or used as a lifting or leveraging device.
Position the camshaft phaser and sprocket with the alignment pin in the alignment slot of the camshaft and install 3 new camshaft phaser and sprocket bolts finger-tight.
3. NOTICE: Damage to the camshaft phaser and sprocket assembly will occur if mishandled or used as a lifting or leveraging device.
NOTICE: Only use hand tools to install the camshaft phaser and sprocket bolt or damage may occur to the camshaft or camshaft phaser and sprocket.
Using a 26 mm (1.023 in) wrench on the flats of the camshaft to secure the camshaft, tighten the 3 new LH camshaft phaser and sprocket bolts in 2 stages.
- Stage 1: Tighten to 9 Nm (80 lb-in).
- Stage 2: Tighten an additional 90 degrees.
4. Install the timing drive components. For additional information, refer to Timing Drive Components Removal and Replacement.