Test Q: Overdrive (O/D) Off Indicator Inoperative
- Road test vehicle to check overdrive operation. If overdrive operates properly, go to next step. If overdrive does not operate properly, repair transmission concern. See appropriate ELECTRONIC CONTROLS article in AUTOMATIC TRANSMISSIONS.
- Turn ignition switch to LOCK position. Disconnect Powertrain Control Module (PCM) 104-pin harness connector C202. PCM is mounted on cowl in right rear of engine compartment. Install EEC-V 104-Pin Breakout Box (014-00950), leaving PCM disconnected. Turn ignition switch to RUN position. Connect a fused (7.5-amp) jumper wire between breakout box test pins No. 24 and 79. Cycle headlight switch off, then on. If O/D OFF indicator illuminates, repair transmission external control circuit as necessary. See appropriate ELECTRONIC CONTROLS article in AUTOMATIC TRANSMISSIONS. If O/D OFF indicator is off with headlights on, go to next step. If O/D OFF indicator is off with headlights off, go to step 4
. If O/D OFF indicator is off with headlights off or on, go to step 5
.
- Turn ignition switch to LOCK position. Disconnect headlight switch 11-pin harness connector C216, located under left side of instrument panel. See Fig 1
. Turn ignition switch to RUN position. Rotate dimmer wheel to full bright position. Measure voltage between ground and headlight switch harness connector C216 terminal No. 9 (Red/Black wire). If more than 10 volts exist, replace headlight switch. Recheck system operation. If 10 volts or less exist, repair open in Red/Black wire between headlight switch and splice S264. Splice S264 is located at breakout in harness near instrument cluster.
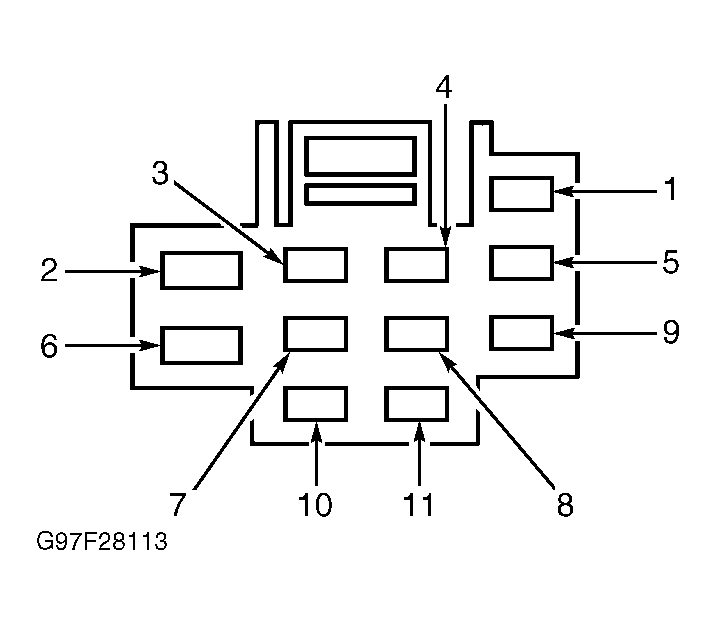 Courtesy of FORD MOTOR CO.
- Turn ignition switch to LOCK position. Disconnect headlight switch 11-pin harness connector C216, located under left side of instrument panel. See Fig 1
. Turn ignition switch to RUN position. Measure voltage between ground and headlight switch harness connector C216 terminal No. 4 (Brown/White wire). If more than 10 volts exist, replace headlight switch. Recheck system operation. If 10 volts or less exists, repair open circuit between headlight switch and fuse No. 11 located in Central Junction Box (CJB). Recheck system operation.
- Turn ignition switch to LOCK position. Disconnect headlight switch 11-pin harness connector C216, located under left side of instrument panel. See Fig 1
. Turn ignition switch to RUN position. Measure voltage between ground and headlight switch harness connector C216 terminal No. 4 (Brown/White wire). If more than 10 volts exist, reconnect headlight switch and go to next step. If 10 volts or less exist, repair open circuit between headlight switch and fuse No. 11 located in Central Junction Box (CJB). Recheck system operation.
- Turn ignition switch to LOCK position. Remove instrument cluster. See INSTRUMENT CLUSTER
under REMOVAL & INSTALLATION. Turn ignition switch to RUN position. Measure voltage between ground and instrument cluster White 16-pin harness connector C288 terminal No. 5 (Orange/Black wire). See Figure
. If more than 10 volts exist, go to step 8
. If 10 volts or less exist, go to next step.
- Turn ignition switch to LOCK position. Disconnect headlight switch 11-pin harness connector C216. Measure resistance of Orange/Black wire between instrument cluster White 16-pin harness connector C286 terminal No. 5 and headlight switch harness connector C216 terminal No. 8. See Figure
and Fig 1
. If resistance is less than 5 ohms, replace headlight switch. Recheck system operation. If resistance is 5 ohms or more, repair open in Orange/Black wire between instrument cluster and headlight switch. Recheck system operation.
- Ensure ignition is off. Disconnect Powertrain Control Module (PCM) 104-pin harness connector C202. PCM is mounted on cowl in right rear of engine compartment. Install EEC-V 104-Pin Breakout Box (014-00950), leaving PCM disconnected. Measure resistance between instrument cluster White 16-pin harness connector C286 terminal No. 1 (White/Light Green wire) and breakout box test pin No. 79. If resistance is less than 5 ohms, go to next step. If resistance is 5 ohms or more, repair open in White/Light Green wire between instrument cluster and PCM. Recheck system operation.
- Remove O/D OFF indicator bulb and check continuity between bulb terminals. If continuity exists, replace instrument cluster printed circuit. See PRINTED CIRCUIT
under REMOVAL & INSTALLATION. Recheck system operation. If continuity does not exist, replace bulb. Recheck system operation.