Test C: Fuel Gauge Inaccurate (With Flex Fuel)
- Turn ignition switch to LOCK position. Disconnect fuel pump/fuel gauge sender harness connector C434. Connect Instrument Gauge System Tester (014-R1063) to terminal No. 2 (Yellow/White wire) at fuel pump module harness connector C434. Connect other lead to ground. Set tester to 115 ohms. Turn ignition switch to RUN position. Turn tester POWER switch to ON position. Wait 1 minute. Fuel gauge should read FULL or above. Turn ignition switch to LOCK position. Set tester to 11 ohms. Turn ignition switch to RUN position. Wait 1 minute. Fuel gauge should read EMPTY or below. If fuel gauge operates correctly, go to next step. If fuel gauge does not operate correctly, go to step 4
.
- Inspect fuel tank for any damage or deformation. If fuel tank is okay, go to next step. If fuel tank is not okay, replace fuel tank.
- Inspect fuel pump assembly for damage to wiring or connectors. Inspect float and float rod for damage or obstruction. If fuel pump and wiring is okay, replace fuel level sensor. If fuel pump or wiring is not okay, repair as necessary.
- Disconnect flex fuel sensor module connector C2005. See Fig 1
. Measure resistance between terminal No. 3 (Black/Yellow wire) at fuel pump module harness connector C434 and terminal No. 3 (Black/Yellow wire) at flex fuel sensor module harness connector C2005. Measure resistance between ground and terminal No. 3 (Black/Yellow wire) at flex fuel sensor module harness connector C2005. If resistances are less than 5 ohms, go to next step. If resistances are 5 ohms or more, repair open in (Black/Yellow wire) and retest.
- Turn ignition switch to LOCK position. Measure resistance between terminal No. 2 (Yellow/White wire) at fuel pump module harness connector C434 and terminal No. 4 (Yellow/White wire) at flex fuel sensor module harness connector C2005. Measure resistance between ground and terminal No. 2 (Yellow/White wire) at fuel pump module harness connector C434. If resistance is less than 5 ohms between fuel sending unit and flex fuel sensor module and more than 10 k/ohms between flex fuel sensor module and ground, go to next step. If resistance is more than 5 ohms between fuel sending unit and flex fuel sensor module and less than 10 k/ohms between flex fuel sensor module and ground, repair circuit and retest.
- Turn ignition switch to LOCK position. Disconnect flex fuel sensor module connector C2005. Connect Instrument Gauge System Tester (014-R1063) to terminal No. 6 (Orange/Light Green wire) at flex fuel sensor harness connector C2005. Connect other lead to ground. Set tester to 145 ohms. Turn ignition switch to RUN position. Turn tester POWER switch to ON position. Wait 1 minute. Fuel gauge should read FULL or above. Turn ignition switch to LOCK position. Set tester to 22 ohms. Turn ignition switch to RUN position. Wait 1 minute. Fuel gauge should read EMPTY or below. If fuel gauge operates correctly, go to step 9
. If fuel gauge does not operate correctly, go to next step.
- Turn ignition switch to LOCK position. Disconnect instrument cluster connector C220a. Measure resistance between terminal No. 7 (Orange/Light Green wire) at instrument cluster harness connector C220a and terminal No. 6 (Orange/Light Green wire) at flex fuel sensor module harness connector C2005. See Fig 1
. Measure between ground and terminal No. 7 (Orange/Light Green wire) at instrument cluster harness connector C220a. If resistances are less than 5 ohms, go to next step. If resistances are more than 5 ohms, repair open in Orange/Light Green wire and retest.
- Inspect instrument cluster printed circuit for damage. If instrument cluster printed circuit is okay, replace fuel gauge and indicator module. See FUEL GAUGE/TEMPERATURE GAUGE
under REMOVAL & INSTALLATION. If instrument cluster printed circuit is not okay, replace instrument cluster printed circuit. See PRINTED CIRCUIT
under REMOVAL & INSTALLATION.
- Check for the following conditions, corrosion, pushed-out pins and see if connector is seated correctly. Correct any problems found. Operate system and verify if concern is still present. If problems still exist, replace flex fuel sensor module and retest. If system is now operating correctly, problem may have been caused by a loose or corroded connector.
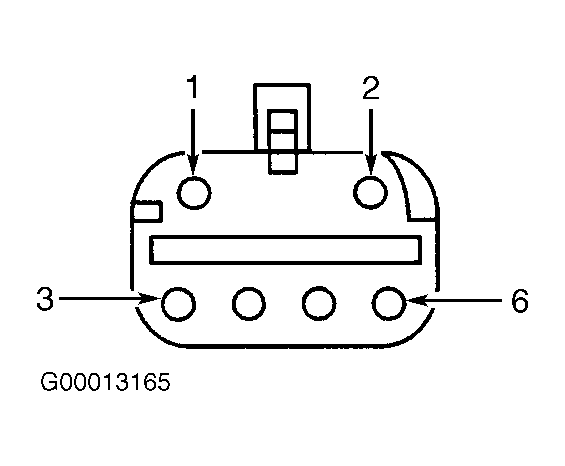 Courtesy of FORD MOTOR CO.