Temperature Gauge & Sensor Test
- Ensure 10-Amp "Meter" fuse in fuse panel is okay. Ensure Black/Yellow wire from fuse panel to instrument cluster supplies 12-volts with ignition on (gauge voltage is regulated to 7 volts). If fuse blows check for short to ground in Black/Yellow wire circuit. If temperature gauge always reads "COLD", ground Yellow/White wire at instrument cluster connector. If temperature gauge reads "COLD", replace gauge. If gauge does not read "COLD", proceed to step 2).
- Ground Yellow/White wire at coolant temperature sending unit. If gauge reads "COLD", replace Yellow/White wire between gauge and sending unit. If gauge does not read "COLD", replace sending unit.
- If temperature gauge always reads "HOT", disconnect Yellow/White wire from sending unit. If gauge does not read "HOT", check or replace sending unit. With sensor disconnected, use an ohmmeter to measure the resistance between the connector terminal and case of the sending unit at 176°F (80°C). Resistance should be 49.3-57.7 ohms. If gauge does read "HOT", proceed to step 4).
- Reconnect Yellow/White wire to sending unit. Disconnect instrument meter connector. If gauge does not read "HOT", repair shorted Yellow/White wire between sending unit and gauge. If gauge does read "HOT", replace gauge.
- If temperature gauge is not accurate, disconnect coolant temperature sending unit connector. Connect leads of Rotunda Gauge Tester (021-00038) to the White wire of sending unit connector and the other lead to ground.
- Turn ignition on, check that temperature gauge needle indicator displays correct resistance values. See Fig 1
.
- Inspection should continue for 2 minutes. If gauge readings are incorrect, replace gauge. If gauge readings are correct, replace coolant sending unit.
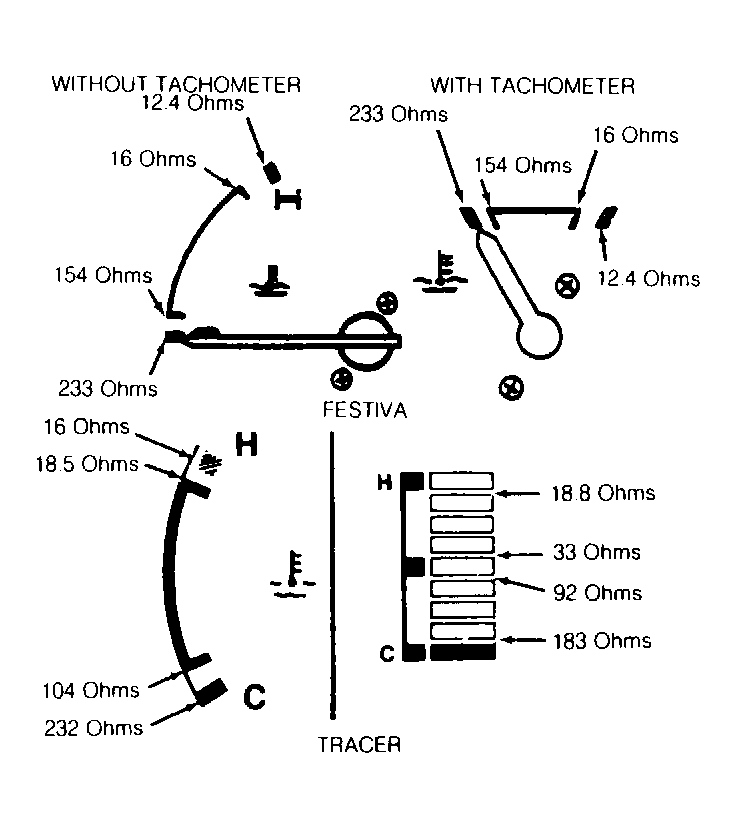 Courtesy of FORD MOTOR CO.