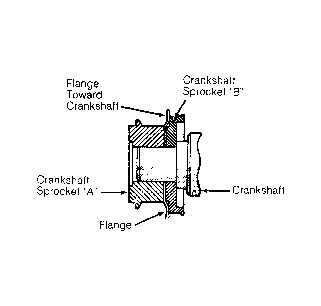
- Install rear timing belt covers, engine support bracket and crankshaft key. Install crankshaft sprocket "B" with hollow side toward crankshaft. See Fig 1.
CAUTION:
Install right silent shaft spacer with chamfered side toward oil seal or damage to oil seal will result.
- Coat outer diameter of spacer for right silent shaft with engine oil. Install spacer with chamfered edge toward silent shaft or oil seal.
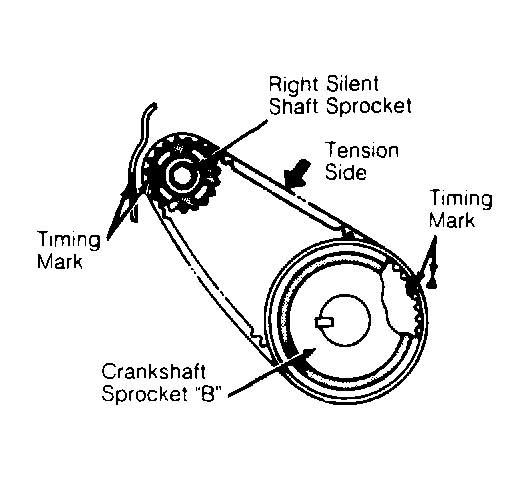
- Install right silent shaft sprocket. Align timing marks on crankshaft sprocket "B" and right silent shaft sprocket with respective timing marks on case. See Fig 2. Install timing belt "B" on sprockets. Install belt in original direction of rotation; ensure slack does not exist in belt.
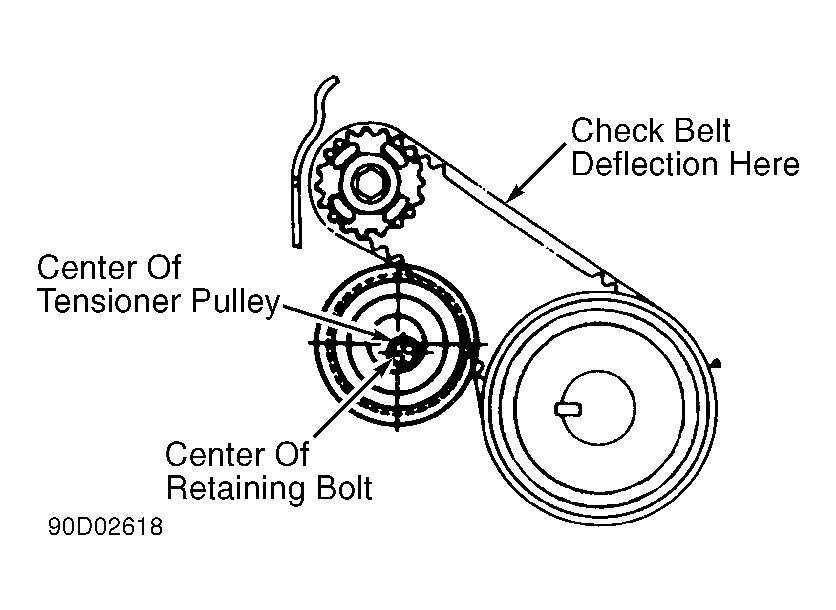
- Install timing belt "B" tensioner so center of tensioner pulley is left of retaining bolt center. See Fig 3.
 Courtesy of CHRYSLER CORP.
 Courtesy of CHRYSLER CORP.
 Courtesy of CHRYSLER CORP.
CAUTION:
Ensure tensioner does not rotate when bolt is tightened or excessive pressure will be applied to timing belt.
- Rotate tensioner inward toward timing belt until belt is tight. Tighten tensioner retaining bolt.
- Check belt deflection at designated area. See Fig 3. Belt deflection should be .20-.28" (5.0-7.0 mm). Readjust timing belt if belt deflection is not within specification.
CAUTION:
Install flange and crankshaft sprockets in correct positions or timing belt may be damaged.
- Install flange in front of crankshaft sprocket "B", with offset in proper direction. Install crankshaft sprocket "A". See Fig 1.
- Install camshaft and oil pump sprockets. Tighten bolts to specification. See TORQUE SPECIFICATIONS table at the end of this article. Install idler pulley.
CAUTION:
Check plug at bottom of auto tensioner. If plug protrudes past tensioner housing, place washer over end of plug before installing tensioner in vise.
- Retract auto tensioner rod into tensioner housing by placing tensioner assembly in soft-jawed vise. Push rod back into housing until rod hole and housing hole align. See Figure. Install .055" (1.40 mm) diameter wire into holes.
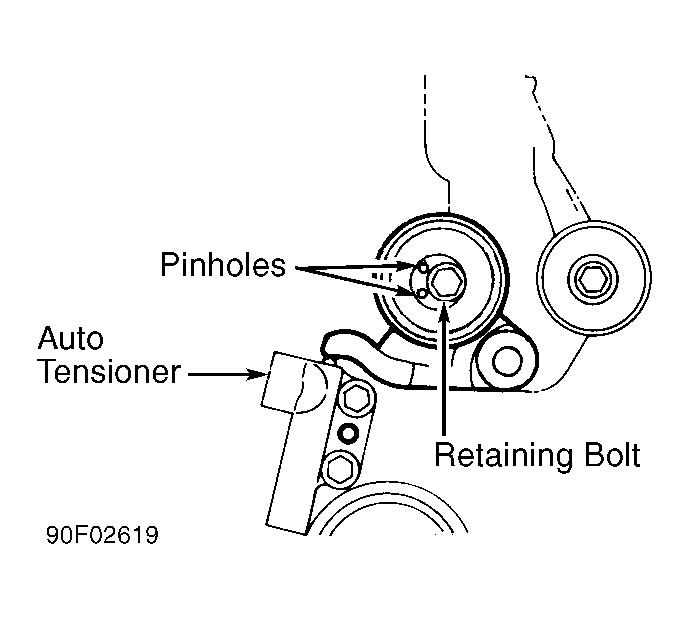
- Remove auto tensioner from vise with wire installed. Install tensioner arm. Install tensioner pulley on tensioner arm. Position pinhole in tensioner pulley to left of retaining bolt, and slightly tighten retaining bolt. See Fig 4.
 Courtesy of CHRYSLER CORP.
NOTE:
Exhaust camshaft will rotate one tooth counterclockwise. This is taken into account during timing belt installation. Same camshaft sprockets are used for both camshafts. Use timing mark toward inside of camshaft sprocket when dowel pin is facing upward and away from cylinder head. See Figure.
- Rotate camshaft sprocket so dowel pins are upward and away from cylinder head and timing marks are aligned with cylinder head surface. Timing marks should face each other. See Figure.
- Rotate crankshaft and oil pump so timing marks align. When aligning oil pump sprocket timing marks, remove plug from cylinder block. See Figure. Insert a .31" (8.0 mm) diameter Phillips screwdriver into plug hole. Ensure screwdriver can be inserted at least 2.4" (60 mm). DO NOT
remove screwdriver until timing belt is installed.
- If screwdriver can be inserted only about 0.8-1.0" (20-25 mm), remove screwdriver. Rotate oil pump sprocket one revolution and realign timing mark. Reinstall screwdriver, and ensure screwdriver can be inserted at least 2.4" (60 mm). DO NOT
remove screwdriver until timing belt is installed.
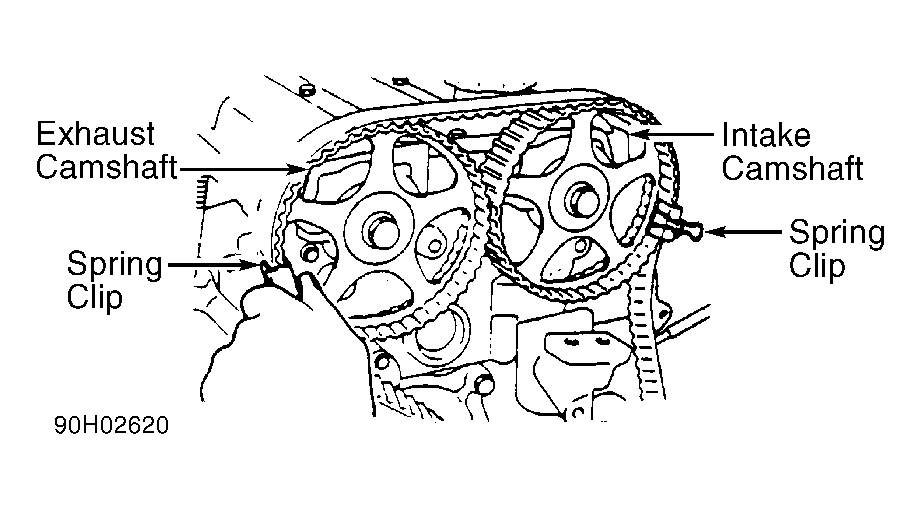
- Install timing belt "A" on intake camshaft sprocket. Install spring clip to retain timing belt on sprocket. See Fig 5. Place a wrench on each camshaft sprocket retaining bolt. Rotate camshafts so timing marks align with each other. Install timing belt over exhaust camshaft. Install spring clip to retain timing belt.
 Courtesy of CHRYSLER CORP.
- Install timing belt "A" over idler pulley, oil pump sprocket, crankshaft sprocket and tensioner pulley. Remove spring clips from camshaft sprockets.
- Lift tensioner pulley upward to apply tension on timing belt. Tighten retaining bolt. Ensure all timing marks are aligned. See Figure. Remove screwdriver from cylinder block, and install plug.
NOTE:
If necessary, raise engine slightly so torque wrench will not contact body.
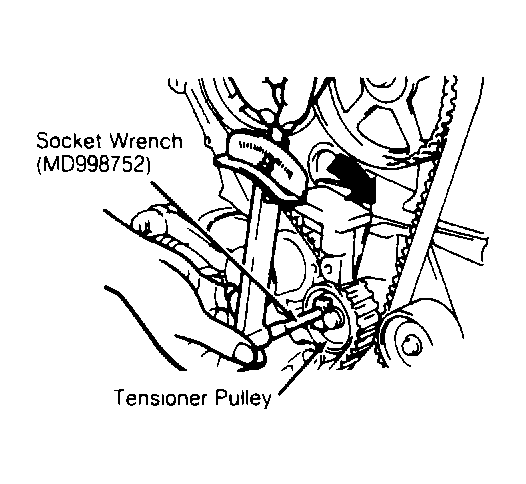
- Rotate crankshaft 1/4 turn counterclockwise and then clockwise until all timing marks align. Loosen tensioner pulley bolt. Install Socket Wrench (MD998752) and INCH-lb. torque wrench on tensioner pulley. See Fig 6. Apply 23-25 INCH lbs. (2.6-2.8 N.m) torque on tensioner pulley.
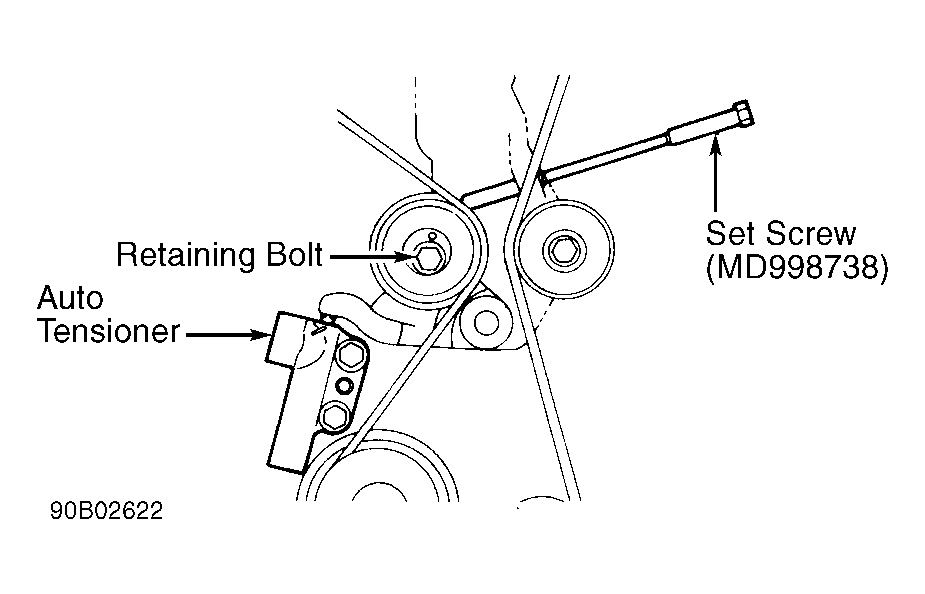
- Hold tensioner pulley at specified torque, and tighten bolt to specification. See TORQUE SPECIFICATIONS table at the end of this article. Install Set Screw (MD998738) in engine support bracket until it contacts tensioner arm. See Fig 7. Tighten set screw until wire can be removed from auto tensioner. Remove set screw.
 Courtesy of CHRYSLER CORP.
 Courtesy of CHRYSLER CORP.
- Rotate crankshaft 2 full revolutions and then allow engine to stand for 15 minutes without turning crankshaft. Distance between auto tensioner housing and tensioner arm should be .15-.18" (3.8-4.5 mm). If distance is incorrect, repeat steps 17-19) until distance is correct.
- If distance cannot be measured due to lack of clearance, use alternate method to set belt tension. Install Set Screw (MD998738) in engine support bracket until it contacts tensioner arm. See Fig 7.
- Rotate set screw inward while noting number of turns until tensioner arm contacts auto tensioner housing. Set screw should rotate inward 2 1/2-3 turns if belt tension is correct. Remove set screw, and install rubber plug.
- To install remaining components, reverse removal procedure. Apply sealant to inside of semi-circular packing and cylinder head before installing.
- Apply sealant at valve cover gasket-to-camshaft bearing cap contact areas before installing. Ensure proper length bolts are installed in timing belt covers. See Fig 8.