Vacuum Brake Booster: Testing and Inspection
MASTER CYLINDER/POWER BOOSTER
There are separate tests for HEV vehicles and non-HEV vehicles. The steps of the tests are different and in different sequence due to the need to disconnect sensors on the HEV which will set DTCs.
MASTER CYLINDER/POWER BOOSTER - WITHOUT HEV
1. Start engine and check booster vacuum hose connections. A hissing noise indicates vacuum leak. Correct any vacuum leak before proceeding.
2. Stop engine and pump brake pedal until all vacuum reserve in booster is depleted.
3. Press and hold brake pedal under light foot pressure. The pedal should hold firm, if the pedal falls away master cylinder is faulty (internal leakage).
4. Start engine and note pedal action. It should fall away slightly under light foot pressure then hold firm. If no pedal action is discernible, power booster, vacuum supply, or vacuum check valve is faulty. Proceed to the POWER BOOSTER VACUUM TEST.
5. If the POWER BOOSTER VACUUM TEST passes, rebuild booster vacuum reserve as follows: Release brake pedal. Increase engine speed to 1500 rpm, close the throttle and immediately turn off ignition to stop engine.
6. Wait a minimum of 90 seconds and try brake action again. Booster should provide two or more vacuum assisted pedal applications. If vacuum assist is not provided, booster is faulty.
POWER BOOSTER VACUUM TEST - WITHOUT HEV
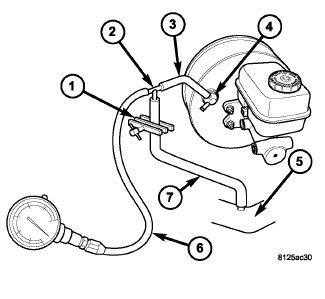
1. Connect vacuum gauge (6) to booster check valve (4) with short length of hose (3) and T-fitting (2).
2. Start and run engine at curb idle speed for one minute.
3. Observe the vacuum gauge. If vacuum supply is not above 12 inches HG (406 millibars), repair vacuum supply.
4. Clamp (1) hose (7) shut between intake vacuum source (5) and check valve (4).
5. Stop engine and observe vacuum gauge (6).
6. If vacuum drops more than one inch HG (33 millibars) within fifteen seconds, booster diaphragm or check valve is faulty.
POWER BOOSTER CHECK VALVE TEST - WITHOUT HEV
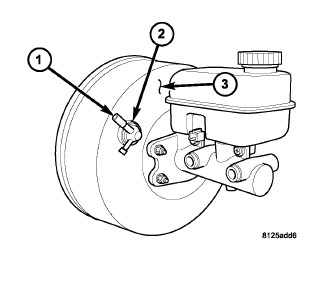
1. Disconnect vacuum hose from check valve (1).
2. Remove check valve (1) from booster (3).
3. Use a hand operated vacuum pump for test.
4. Apply 15-20 inches HG (508-677 millibars) vacuum at power booster end of check valve.
5. Plug off the small end (if present) to prevent vacuum leakage.
6. Vacuum should hold steady. If vacuum gauge indicates a vacuum loss, check valve is faulty and should be replaced.
POWER BOOSTER VACUUM TEST - HEV
1. Disconnect brake vacuum hose between booster and T-fitting and connect another T-fitting in-line.
2. Connect a vacuum gauge to the T-fitting installed in the previous step.
3. With the hood open, start and run engine at curb idle speed for one minute.
4. Observe the vacuum gauge. If vacuum supply is not above 12 inches HG (406 millibars), repair vacuum supply.
5. Clamp hose shut between T-fitting and engine manifold vacuum source.
6. Stop engine and observe vacuum gauge.
7. If vacuum drops more than one inch HG (33 millibars) within fifteen seconds, booster diaphragm, check valve or original T-fitting is faulty.
POWER BOOSTER CHECK VALVE TEST- HEV
NOTE: The vacuum line for the booster has a T-fitting with two integrated check valves, one on the engine manifold side, and one on the Electric Vacuum Pump (EVP) side. If this T-fitting/check valves fail, replace only with proper T-fitting.
1. Disconnect the vacuum hose from the T-fitting on the booster side of T-fitting (side without check valve).
2. Connect a hand operated vacuum pump to the T-fitting.
3. Apply 15-20 inches HG (508-677 millibars) of vacuum. Vacuum should hold steady. If gauge on pump indicates vacuum loss, check valve in T-fitting is faulty and T-fitting should be replaced
4. Remove check valve from booster.
5. Connect a hand operated vacuum pump at the power booster end of check valve.
6. Apply 15-20 inches HG (508-677 millibars) of vacuum.
7. Vacuum should hold steady. If gauge on pump indicates vacuum loss, booster check valve is faulty and should be replaced.
MASTER CYLINDER/POWER BOOSTER - HEV
NOTE: Perform the POWER BOOSTER VACUUM TEST - HEV and the POWER BOOSTER CHECK VALVE TEST- HEV before this test. DTCs will set when performing this test.
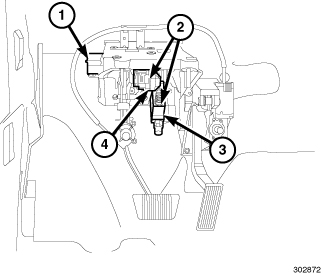
1. With ignition key off, and door open, press on the brake pedal. The electric vacuum pump (EVP) should come on for approximately 2-5 seconds. If not, EVP or circuits may be faulty, refer to DTC diagnostics.
2. Start engine and check booster vacuum hose connections. A hissing noise indicates vacuum leak. Correct any vacuum leak before proceeding.
3. Turn off engine.
4. Remove the Vacuum Pump Circuit Breaker located in the Power Distribution Center-HEV.
5. Disconnect the harness connector of the Brake Pedal Simulator Cut Off (3).
6. Pump brake pedal until all vacuum reserve in booster is depleted.
7. Press and hold brake pedal under light foot pressure. The pedal should hold firm, if the pedal falls away master cylinder is faulty (internal leakage).
NOTE: Several system warning lamps will illuminate on the instrument panel after starting the engine due to the circuit breaker and harness connector disconnect in the previous steps. The last step will clear DTCs and reset these warning lamps.
8. Start engine and note pedal action. It should fall away slightly under light foot pressure then hold firm. If no pedal action is discernible and the Power Booster Vacuum Test - HEV and Power Booster Check Valve Test - HEV have both passed, the power booster is faulty.
9. Increase engine speed to 1500 rpm, close the throttle and immediately turn off ignition to stop engine. Wait a minimum of 90 seconds and try brake action again. Booster should provide two or more vacuum assisted pedal applications. If vacuum assist is not provided, booster is faulty.
10. Stop engine, connect the harness connector of the Brake Pedal Simulator Cut Off (3) and install the Vacuum Pump Circuit Breaker.
NOTE: This step must be performed. The warning lamps may not be illuminated after reconnecting all connectors, however the DTCs will need to be cleared
11. Perform the ABS VERIFICATION TEST-HEV ABS Verification Test.