Master Cylinder: Reassembly
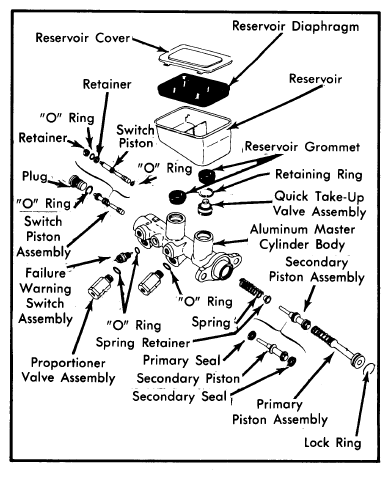
- Put check valve spring in drum brake outlet.
CAUTION:
Check valve in disc brake outlet will cause disc brakes to lock up.
Put check valve on top of spring and insert tube seat in outlet against valve. Use a spare tube nut, and screw nut into outlet to bottom tube seat. Remove nut and inspect for burrs or shavings caused by installing seat.
NOTE:
Before assembly, dip all component parts in clean brake fluid. Assembling seals dry can damage them.
CAUTION:
On aluminum master cylinders, DO NOT polish cylinder bore with anything abrasive.
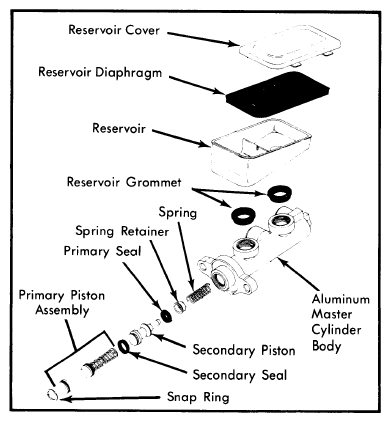
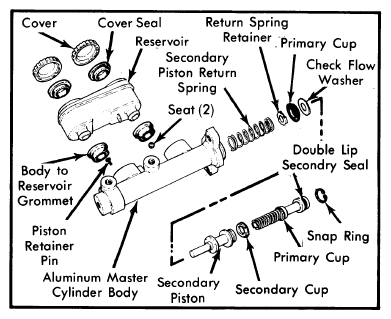
- Install new secondary cups on rear of front (secondary) piston. Place cup lips facing away from each other. Some front pistons use a cup in rear grooves and an "O" ring in second groove from rear. Place cup so lip faces forward and back of cup is against protector washer.
NOTE:
Protector washer may be permanently attached to cup.
- If it is necessary to disassemble rear (primary) piston for replacement of parts see "Primary Piston Assembly" illustration.
 Courtesy of NOT AVAILABLE
 Courtesy of NOT AVAILABLE
 Courtesy of NOT AVAILABLE
- Coat bore of cylinder and all cups with brake fluid. Place spring retainer on end of front spring. Place spring on end of front piston so that retainer is seated inside cup. Hold open end of master cylinder down. Push front spring and piston up into bore until spring seats against end of cylinder.
- Hold master cylinder with open end up. Insert rear piston assembly with spring end going in first. Install lock ring in groove, or screw and retainer if used. Push rear piston into bore. Install stop screw and "O" ring if used.
NOTE:
Stop screw is a special screw. DO NOT use any other type as a substitute.
CAUTION:
Cadillac models DO NOT use a stop screw even though a drilled and tapped hole is provided. If stop screw is installed, damage to master cylinder piston or seal will result.
- Install housing-to-reservoir grommets. Install reservoirs to housing, seating against grommets with a rocking motion. Install master cylinder cover and gasket. Place beaded side of gasket against master cylinder.
- On manual brake systems, assemble pushrod through retainer if used. Push retainer over end of master cylinder. Install a new boot over pushrod and press boot down over pushrod retainer.
NOTE:
See Delco-Moraine Automatic Adjusters article in this section for master cylinder specifications.
TIGHTENING SPECIFICATIONS
| Application |
Ft. Lbs. (N.m) |
| American Motors |
| |
Master Cylinder-to-Firewall |
30 (41) |
| |
Master Cylinder-to-Power Unit |
30 (41) |
| |
Brake Line-to-Master Cylinder |
15 (20) |
| Chrysler Corp. |
| |
Master Cylinder-to-Firewall |
17 (23) |
| |
Master Cylinder-to-Power Unit |
17 (23) |
| |
Brake Line-to-Master Cylinder |
15 (20) |
| Ford Motor Co. |
| |
Master Cylinder-to-Firewall |
13-25 (18-34) |
| |
Master Cylinder-to-Power Unit |
13-25 (18-34) |
| |
Brake Line-to-Master Cylinder |
10-18 (14-24) |
| General Motors |
| |
Master Cylinder-to-Firewall |
25 (34) |
| |
Master Cylinder-to-Power Unit |
25 (34) |
| |
Brake Line-to-Master Cylinder |
13 (18) |
| |
Pro. Valve-to-Master Cylinder |
25 (34) |