Hinge, Primary Convertible Top: Removal: Removal
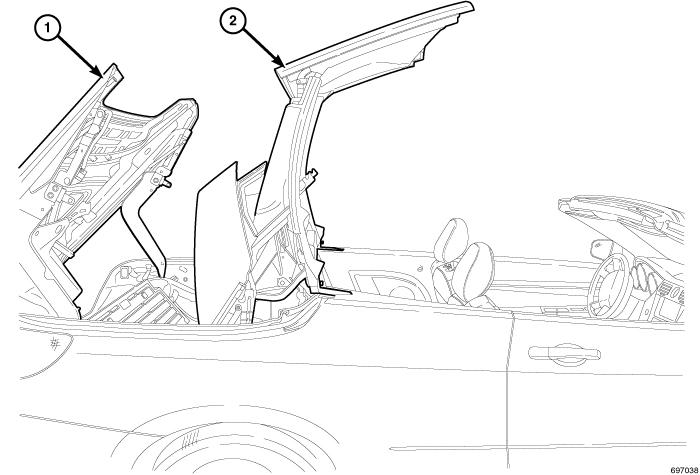 Courtesy of CHRYSLER GROUP, LLC
- Remove the appropriate quarter trim panel. Refer to PANEL, QUARTER TRIM, REMOVAL .
- Remove the rear and side trunk trim panels. Refer to PANEL, TRUNK TRIM, REMOVAL .
- Place the convertible top (2) in the vertical position.
- Disconnect and isolate the battery negative cable.
 Courtesy of CHRYSLER GROUP, LLC
- Remove the center rail trim panels. Refer to TRIM, HEADER, REMOVAL .
- Remove the front headliner. Refer to HEADLINER, REMOVAL - CONVERTIBLE TOP, CONVERTIBLE SOFT TOP UNIQUE COMPONENTS or HEADLINER, REMOVAL - CONVERTIBLE TOP, RETRACTABLE HARD TOP UNIQUE COMPONENTS.
- Remove the hinge covers.
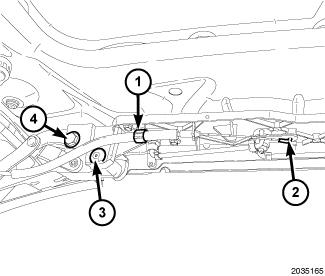
- Disengage the cable retainer (1) from the top panel.
- Disconnect the cable (2) from the top panel linkage.
- Lower the top to the header, do not latch.
- Remove the forward mounting fastener (3) on each side.
- Remove the rearward mounting fastener (4) on each side.
- With help from an assistant, carefully remove the front panel from the vehicle.
 Courtesy of CHRYSLER GROUP, LLC
- Remove the mid/rear headliner. Refer to HEADLINER, REMOVAL - CONVERTIBLE TOP, CONVERTIBLE SOFT TOP UNIQUE COMPONENTS or HEADLINER, REMOVAL - CONVERTIBLE TOP, RETRACTABLE HARD TOP UNIQUE COMPONENTS.
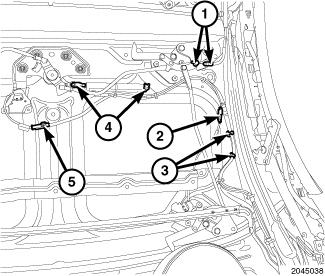
- Disconnect the micro-switch connectors (2 and 5).
- Remove the push-pins (3) securing the harness to the middle panel.
- Remove both clips (4) from the panel to panel cylinder.
- Disengage the latch cable (1) from the support and remove from the panel to panel latch.
 Courtesy of CHRYSLER GROUP, LLC
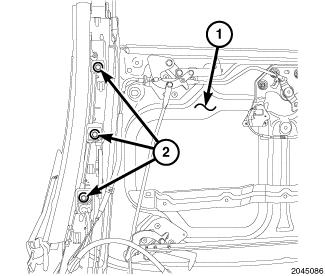
- Disconnect the drain tube to gain access to the mounting fasteners (2).
- Make note of the location, quantity and size of the shims located between the side rail and middle panel to aid in installation at each fastener.
- Remove the lower two fasteners on each side.
- With the help of an assistant, remove the top fastener on each side and remove the mid panel (1) from the vehicle.
 Courtesy of CHRYSLER GROUP, LLC
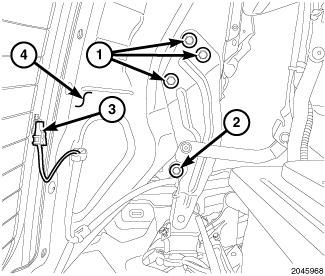
- Mark the location of the hinge bracket to rear panel (4) to aid in installation.
- Disconnect the heated glass connectors (3) and remove the harness from the rear panel.
- Remove the lower fastener (2).
- Remove the two lower fasteners (1), leaving the top one on each side, that secure the rear panel to the hinge assemblies.
- With the help of assistant, remove remaining fasteners and remove rear panel.
 Courtesy of CHRYSLER GROUP, LLC
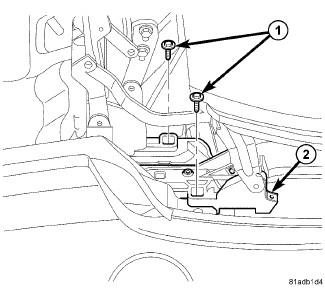
- Remove the center rail weatherstrips and retainers.
- Make marks with a scribe or grease pencil to align the primary hinge (2) upon installation.
- Remove the bolts (1) to the hinge and remove from vehicle.