Body - Interior & Exterior: DECKLID/Hatch/Liftgate/Tailgate: Liftgate: Removal: Removal
 Courtesy of CHRYSLER LLC
- Open the liftgate (7).
- Disconnect and isolate the battery negative cable.
- Remove the upper and lower trim panels from the inside of the liftgate. See Body/Decklid/Hatch/Liftgate/Tailgate/PANEL, Trim - Removal .
- Disconnect the washer supply hose (2) in the right body wire harness (3) from the liftgate spoiler washer nozzle hose on the underside of the liftgate.
- Disconnect the take out and connector (1) of the right body wire harness from the antenna amplifier module on the inside of the liftgate near the right upper corner of the glass opening.
- Disconnect the two connectors (6) of the liftgate wire harness from the two take outs and connectors of the left body wire harness (5).
- Disengage the retainers that secure the liftgate take outs of the right and left body wire harnesses to the underside of the liftgate.
- Disengage the wire grommets (4) of the right and left body wire harnesses inboard of the liftgate hinges from the underside of the liftgate.
- Carefully remove the liftgate take outs of the right and left body wire harnesses from between the inner and outer liftgate panels.
 Courtesy of CHRYSLER LLC
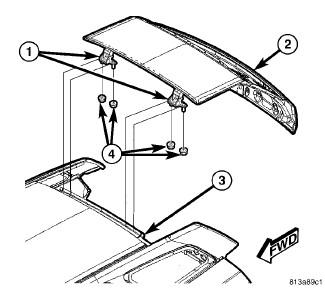
- Disconnect the gas props from the ball studs on each side of the liftgate (2). See Body/Decklid/Hatch/Liftgate/Tailgate/PROP, Gas - Removal .
- Remove the trim plate from the underside of the upper liftgate opening header (3). See Body/Interior/PANEL, Liftgate Trim - Removal .
- Mark the liftgate hinge body bracket (1) locations on the upper liftgate opening header to aid reinstallation.
- Carefully pull the rear edge of the headliner downward from the header far enough to access and remove the four nuts (4) that secure the two studs of each hinge to the underside of the header.
- With the aid of an assistant, lift the liftgate far enough to disengage the hinge studs from the header and remove the liftgate from the vehicle.