Installation (All Models)
- Install tension side chain guide and sprocket holder. Ensure side chain guide remains loose. Install tension spring, rubber washer, and tension sleeve to oil pump.
- Install crankshaft sprocket. Ensure crankshaft in positioned with No. 1 piston at TDC of compression stroke. Align plated links of timing chain and timing marks on sprockets as chain and sprockets are assembled. See Fig 1.
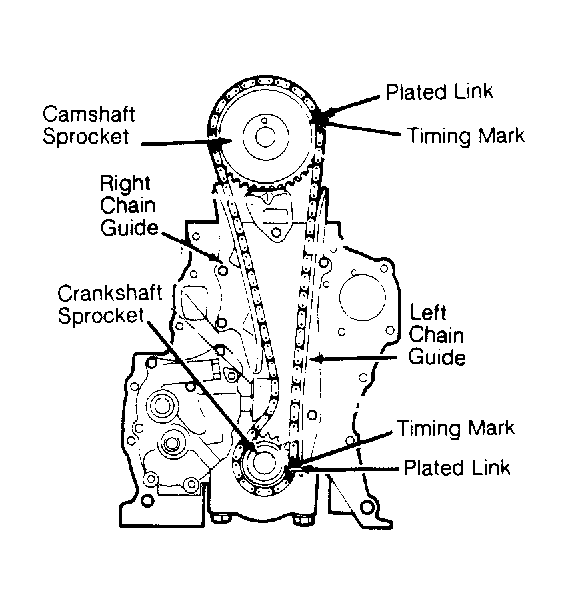 Courtesy of MITSUBISHI MOTOR SALES OF AMERICA, INC.
- While sliding crankshaft sprocket onto crankshaft, install chain and sprocket. Place camshaft sprocket on sprocket holder. Install camshaft sprocket, pin and distributor gear on camshaft.
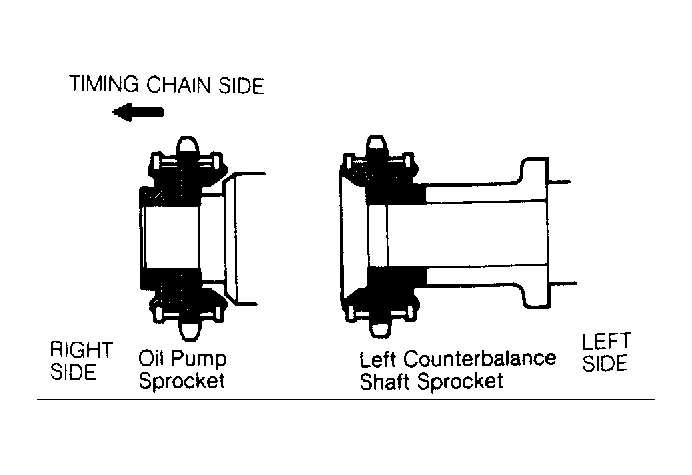
- Assemble counterbalance shaft sprockets to chain "B". Ensure timing marks are in alignment with plated links on timing chain. DO NOT
install counterbalance shaft sprockets in wrong direction; sprockets are installed in opposite directions and should not be installed incorrectly. See Fig 2.
 Courtesy of MITSUBISHI MOTOR SALES OF AMERICA, INC.
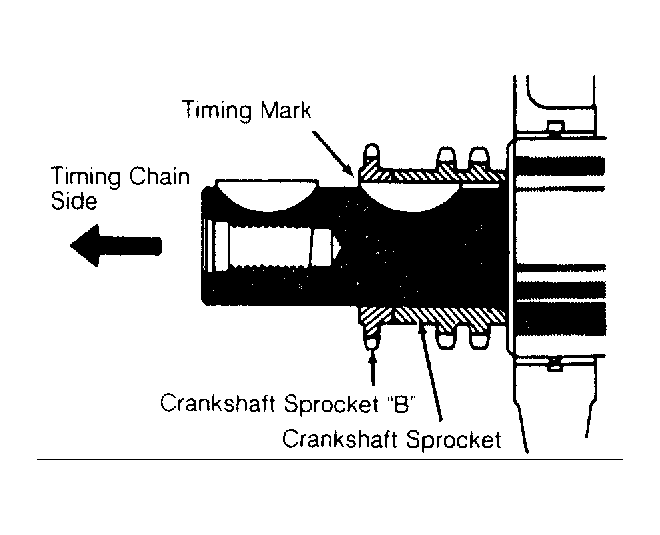
- Install oil pump sprocket. Install crankshaft sprocket "B" (sprocket that drives counterbalance shafts) on crankshaft. See Fig 3. Holding assembled sprockets and chain "B", align timing mark on crankshaft sprocket "B" with timing mark on chain "B". Install sprockets to oil pump drive gear and left counterbalance shaft. Temporarily tighten bolt.
- Rotate both counterbalance shaft sprockets slightly to position chain slack at point "P". Adjust position of chain guide "B" so that when chain is pulled in direction of arrow (with fingers), clearance between chain guide "B" and links of chain "B" is .008-.031" (.20-.79 mm). Tighten bolt to specification. See Figure.
 Courtesy of MITSUBISHI MOTOR SALES OF AMERICA, INC.
- Install chain guides "C", "A", and "B". Replace front cover oil seal at this time. Replace chain guide access hole gasket and install cover. Install timing chain cover using new gaskets and tighten bolts to specification. Install crankshaft pulley, washer and bolt.
- To complete installation, reverse removal procedure. Replace all gaskets, seals and "O" rings. Adjust all drive belts. Fill cooling system and engine crankcase to specified capacity.