Crankshaft Balancer Installation
WARNING: This page is about a different car, the 2019 GMC Savana 3500, 2019 GMC Savana 2500, 2019 Chevrolet Express 3500, and 2019 Chevrolet Express 2500. However, it is still accessible from the selected car via links, so may be relevant.
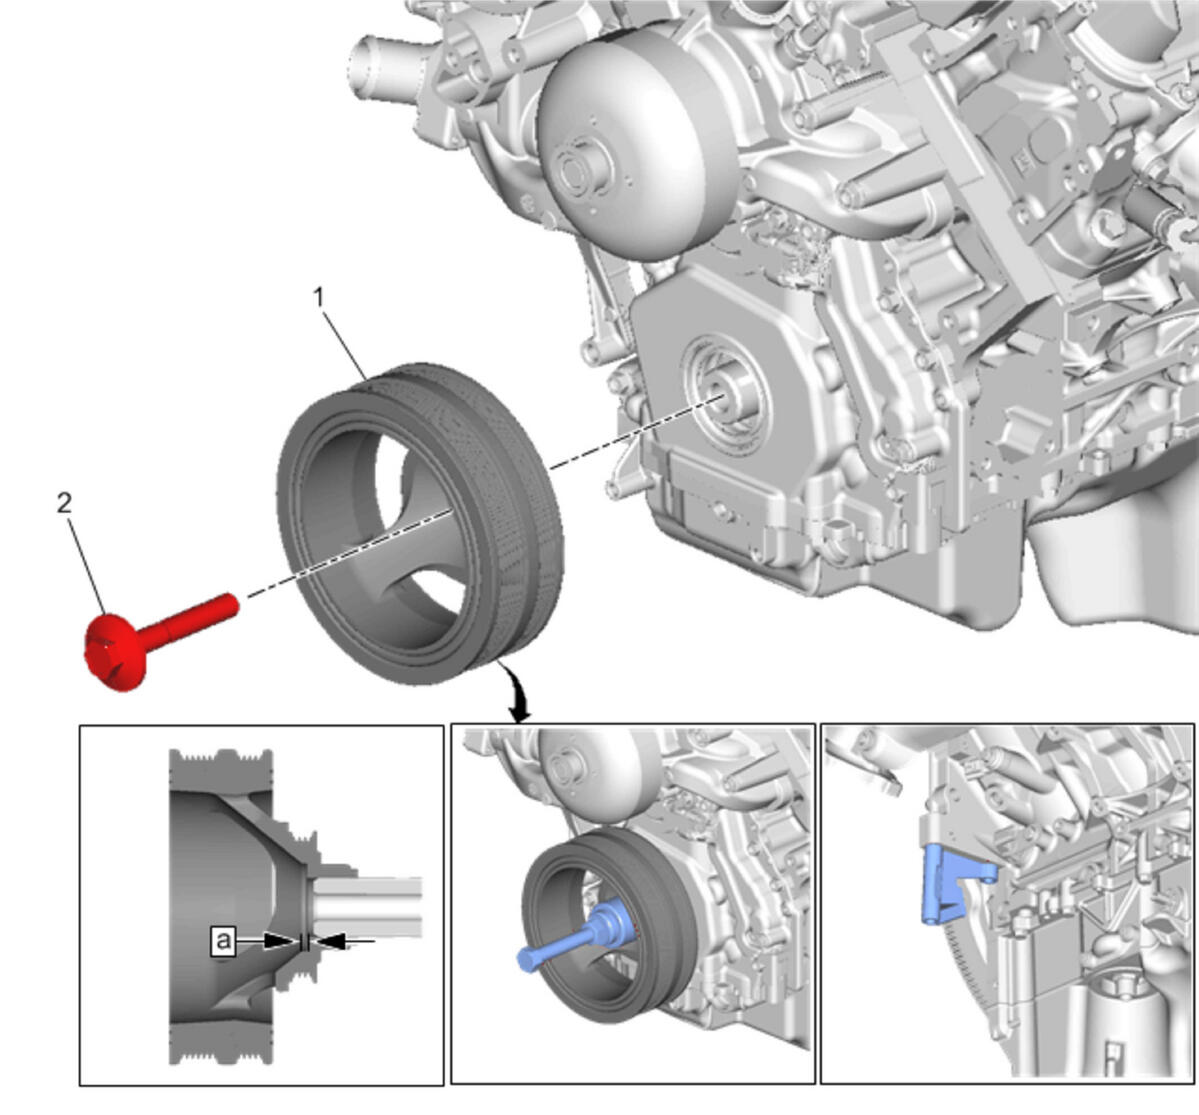 Courtesy of GENERAL MOTORS COMPANY Courtesy of GENERAL MOTORS COMPANY
|
| Callout |
Component Name |
| 1 |
Crankshaft Balancer
NOTE:
- Ensure the teeth of the tool engage the engine flywheel teeth.
- The used crankshaft balancer bolt is used only during the installation procedure. Install a NEW crankshaft balancer bolt during final assembly.
Procedure
- Install the EN-42386-A
flywheel holding tool. Use 1 M10 - 1.5 x 120 mm and 1 M10 - 1.5 x 45 mm bolt for proper tool operation and tighten bolts to 50 N.m (37 lb ft).
- Assemble the EN-41478
installer threaded rod, nut, washer and the EN-41665
installer.
- Insert the smaller end of the installer into the front of the balancer. Use a wrench and hold the hex end of the threaded rod. Use a second wrench and rotate the installation tool nut clockwise until the balancer is started onto the crankshaft.
- Remove the tool and reverse the installation tool. Position the larger end of the installer against the front of the balancer. Use wrench and hold the hex end of the threaded rod. Use a second wrench and rotate the nut clockwise until the balancer is installed onto the crankshaft.
- Remove the balancer installation tools.
Special Tools
- EN-41478
Crankshaft Front Oil Seal Installer
- EN-41665
Crankshaft Balancer and Sprocket Installer
- EN-42386-A
Flywheel Holding Tool
For equivalent regional tools, refer to Special Tools . |
| 2 |
Crankshaft Balancer Bolt
CAUTION:
This vehicle is equipped with torque-to-yield or single use fasteners. Install a NEW torque-to-yield or single use fastener when installing this component. Failure to replace the torque-to-yield or single use fastener could cause damage to the vehicle or component.
NOTE:
The nose of the crankshaft (a) should be recessed 2.40 - 4.48 mm (0.094 - 0.176 in) into the balancer bore.
Procedure
- Install the used crankshaft balancer bolt and tighten to 330 N.m (240 lb ft) to fully seat the balancer.
- Remove the used crankshaft balancer bolt.
- Measure for correctly installed balancer. If the balancer is not installed to proper dimensions, install the EN-41665
installer and repeat the installation procedure.
- Install the NEW crankshaft balancer bolt:
- Tighten the crankshaft balancer bolt to 150 N.m (110 lb ft).
- Loosen the crankshaft balancer bolt 360 degrees.
- Tighten the crankshaft balance bolt to 80 N.m (59 lb ft).
- Tighten the crankshaft balancer bolt a final pass to:
- Balancer bolt with flanged head tighten to 125 degrees using the EN-45059
angle meter.
- Balancer bolt with retained rotating washer tighten to 200 degrees using the EN-45059
angle meter.
- Remove the EN-42386-A
flywheel holding tool.
Special Tools
- EN-41665
Crankshaft Balancer and Sprocket Installer
- EN-42386-A
Flywheel Holding Tool
- EN-45059
Angle Meter
For equivalent regional tools, refer to Special Tools . |