Oil Pan Installation (LV7)
WARNING: This page is about a different car, the 2017 Chevrolet Spark. However, it is still accessible from the selected car via links, so may be relevant.
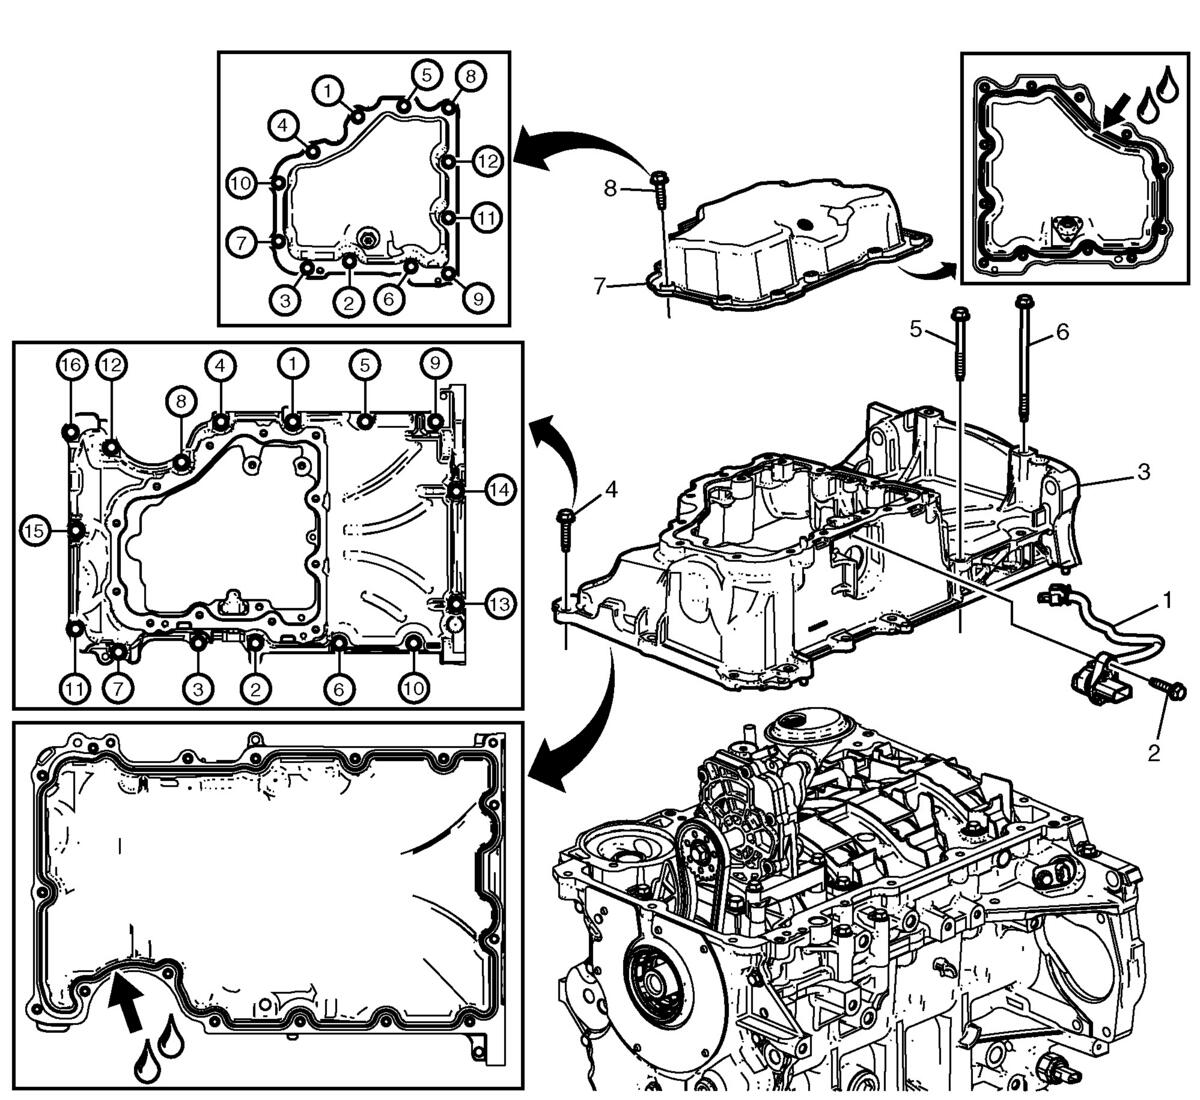 Courtesy of GENERAL MOTORS COMPANY
| Callout |
Component Name |
| 1 |
Engine Oil Level Indicator Control Wiring Harness |
| 2 |
Wiring Harness Connector Bolt
Tighten
10 N.m (89 lb in) |
| 3 |
Upper Oil Pan Assembly Procedure
- Ensure proper use of room temperature vulcanizing (RTV) sealant. Refer to Use of Room Temperature Vulcanizing (RTV) and Anaerobic Sealant
NOTE:
- The lower crankcase and oil pan mating surfaces must be free of contamination prior to applying the sealer.
- Install and align the oil pan to block within 20 minutes of applying the sealer.
- The oil pan must be fastened to final torque specification within 60 minutes of applying the sealer.
- Additional sealant is necessary to reduce the possibility of leakage where the cylinder head to engine block interface along the bead path flange on the front cover.
- Apply a 3 mm bead of sealer around the perimeter of the oil pan. Refer to Adhesives, Fluids, Lubricants, and Sealers (Europe LV7)Adhesives, Fluids, Lubricants, and Sealers (North America LV7)
.
- Install the oil pan on the lower crankcase, ensure the oil pan locating pins align with the lower crankcase.
|
| 4 |
Oil Pan Bolt (Qty: 12) Procedure
- Apply sealant to the oil pan bolts. Refer to Adhesives, Fluids, Lubricants, and Sealers (Europe LV7)Adhesives, Fluids, Lubricants, and Sealers (North America LV7)
.
- Hand start the oil pan bolts. Torque to specification when all oil pan bolts are installed hand-tight.
Tighten
10 N.m (89 lb in) |
| 5 |
Oil Pan Bolt (Qty: 2) Procedure
- Apply sealant to the oil pan bolts. Refer to Adhesives, Fluids, Lubricants, and Sealers (Europe LV7)Adhesives, Fluids, Lubricants, and Sealers (North America LV7)
.
- Hand start the oil pan bolts. Torque to specification when all oil pan bolts are installed hand-tight.
Tighten
10 N.m (89 lb in) |
| 6 |
Oil Pan Bolt (Qty: 2) Procedure
- Apply sealant to the oil pan bolts. Refer to Adhesives, Fluids, Lubricants, and Sealers (Europe LV7)Adhesives, Fluids, Lubricants, and Sealers (North America LV7)
.
- Tighten all the oil pan bolts in sequence.
- Inspect for excessive sealer around the oil filter mounting area when final torque is achieved. If extra sealer is present, remove and clean accordingly.
Tighten
10 N.m (89 lb in) |
| 7 |
Lower Oil Pan Procedure
- Connect the oil pump control valve wiring harness connector.
- Use a NEW lower oil pan.
- Ensure proper use of room temperature vulcanizing (RTV) sealant. Refer to Use of Room Temperature Vulcanizing (RTV) and Anaerobic Sealant
- Apply a 5 mm bead of sealer around the perimeter of the lower oil pan. Refer to Adhesives, Fluids, Lubricants, and Sealers (Europe LV7)Adhesives, Fluids, Lubricants, and Sealers (North America LV7)
.
- Install the lower oil pan on the upper oil pan, ensure the oil pan locating pins align with the lower oil pan.
|
| 8 |
Lower Oil Pan Bolt (Qty: 12)
Procedure
Tighten the oil pan bolts in sequence.
Tighten
10 N.m (89 lb in) |