Lower Crankcase Installation (LV7)
WARNING: This page is about a different car, the 2017 Chevrolet Spark. However, it is still accessible from the selected car via links, so may be relevant.
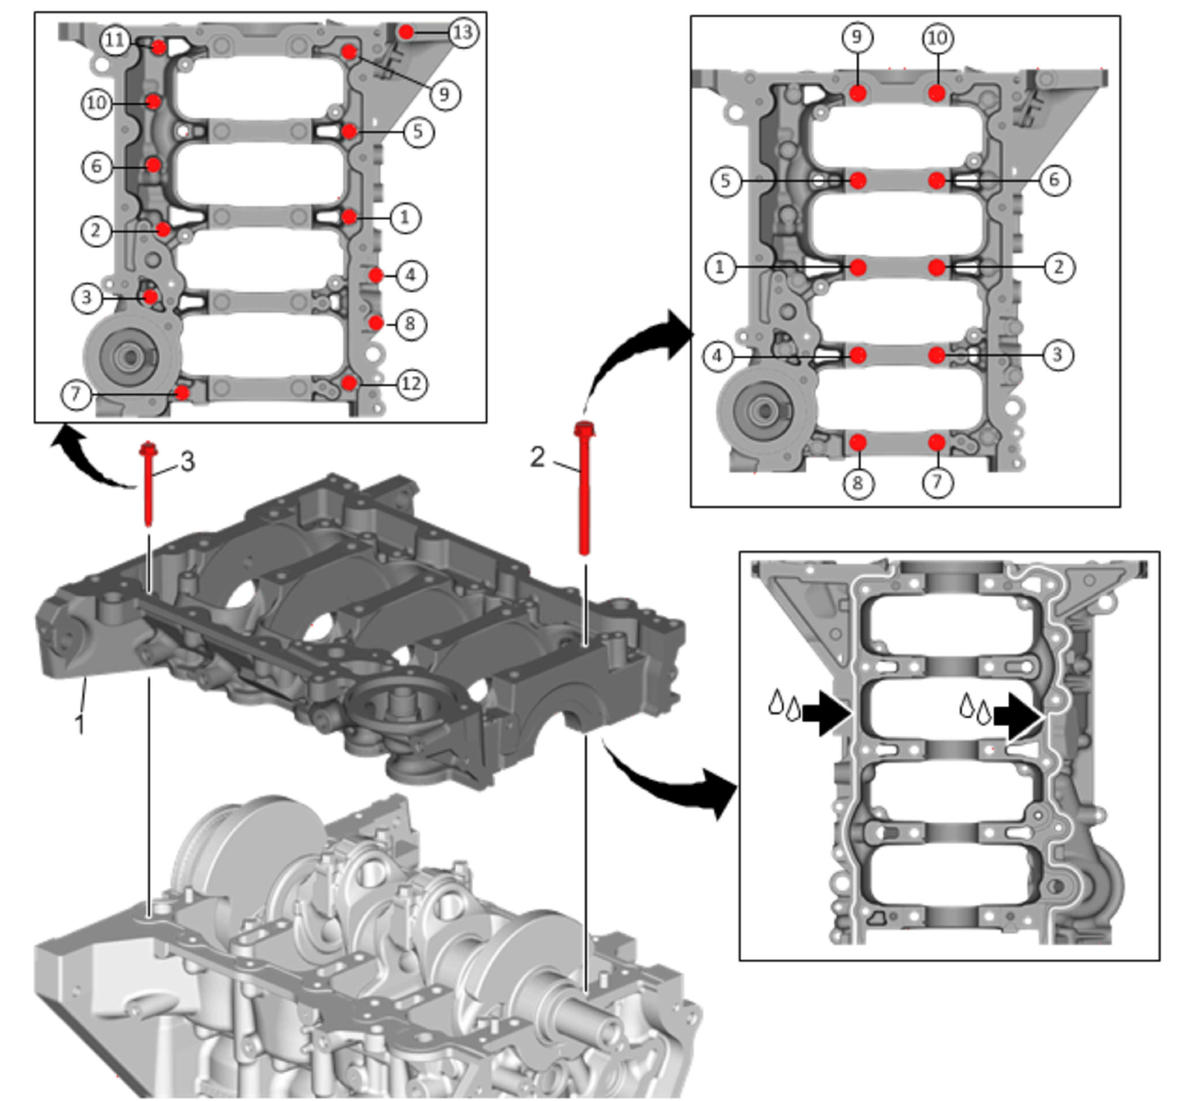 Courtesy of GENERAL MOTORS COMPANY
| Callout |
Component Name |
| 1 |
Lower Crankcase Procedure
- Ensure proper use of room temperature vulcanizing (RTV) sealant. Refer to Use of Room Temperature Vulcanizing (RTV) and Anaerobic Sealant
NOTE:
- The block assembly surface must be free of contamination prior to applying the sealer.
- Install and align the bedplate to block within 20 minutes of applying the sealer.
- The bedplate must be fastened to final torque specification within 60 minutes of applying the sealer.
- Apply a 3 mm bead of sealer directly in the groove of the block to bedplate mating surfaces. Refer to Adhesives, Fluids, Lubricants, and Sealers (Europe LV7)Adhesives, Fluids, Lubricants, and Sealers (North America LV7)
.
- Install the lower crankcase, ensure the lower crankcase is aligned properly on the dowels. Tap gently into place with a suitable tool, if necessary.
|
| 2 |
Lower Crankcase Bolt (Qty: 10)
Procedure
Tighten the NEW lower crankcase bolts in the sequence shown.
- Tighten the bolts in sequence a first pass to 15 N.m (11 lb ft).
- Using the EN 45059
angle meter, tighten the bolts in sequence a final pass to 180 degrees.
Special Tools
EN-45059
Angle Meter
For equivalent regional tools, refer to Special Tools
. |
| 3 |
Lower Crankcase Bolt (Qty: 13)
Procedure
- Apply sealant to the lower crankcase perimeter bolts. Refer to Adhesives, Fluids, Lubricants, and Sealers (Europe LV7)Adhesives, Fluids, Lubricants, and Sealers (North America LV7)
.
- Tighten the lower crankcase bolts in the sequence shown.
- Tighten the bolts in sequence a first pass to 5 N.m (44 lb in).
- Tighten the bolts in sequence a final pass to 10 N.m (89 lb in).
|