Headlamp Replacement (Tahoe, Avalanche)
WARNING: This page does not describe the selected car, but rather 8 other vehicles, including the 2011 GMC Yukon XL, 2011 GMC Yukon, 2011 Chevrolet Tahoe, 2011 Chevrolet Suburban, and 2011 Chevrolet Avalanche. However, it is still accessible from the selected car via links, so may be relevant.
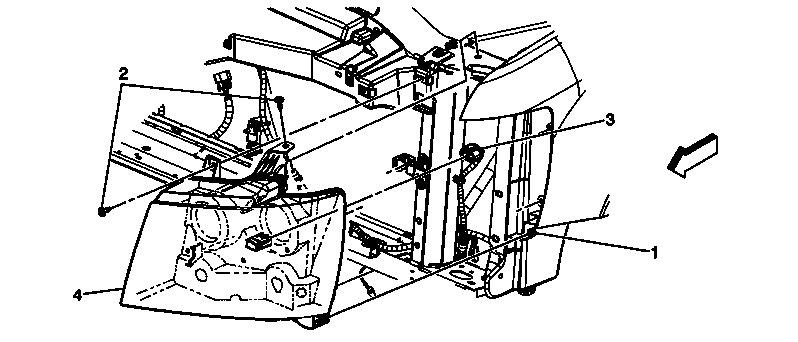 Courtesy of GENERAL MOTORS CORP.
 Headlamp Replacement (Tahoe, Avalanche)
| Callout |
Component Name |
|
Preliminary Procedures
- Remove the 2 forward wheelhouse liner screws in order to access the hidden lower headlamp bolt. Refer to Front Wheelhouse Liner Replacement - Left Side
, or Front Wheelhouse Liner Replacement - Right Side
.
- Open the hood.
- Remove the upper fascia bolts.
- Remove the lower rear fascia bolt from the support bracket.
- Loosen the 2 fascia to fender bolts from behind the wheelhouse liner.
- Pull the outboard end of the front fascia straight outboard until it disengages from the fender attachment bracket.
- Pull the fascia forward and downward to allow enough clearance to remove the headlamp assembly.
- Remove the 2 upper headlamp bolts.
- Grasp the headlamp at the upper inboard and lower outboard side and pull the headlamp forward to disengage the locating pins from the fender panel.
- Pull the outboard side of the headlamp forward until the locating pin is disengaged from the radiator support.
- Disconnect the electrical harness connector.
|
| 1 |
Headlamp Bolt
Tighten
6 N.m (53 lb in) |
| 2 |
Headlamp Bolt
Tighten
6 N.m (53 lb in) |
| 3 |
Forward Lamp Harness Electrical Connector |
| 4 |
Headlamp Assembly
TIP:
Upon re-assembly, align the locating tab along with the outer locating pins prior to applying inward pressure to the headlamp assembly. |