Air Conditioning Compressor Malfunction
Air Conditioning Compressor Malfunction
Diagnostic Instructions
* Perform the Diagnostic System Check - Vehicle (Initial Inspection and Diagnostic Overview) prior to using this diagnostic procedure.
* Review Strategy Based Diagnosis (Initial Inspection and Diagnostic Overview) for an overview of the diagnostic approach.
* Diagnostic Procedure Instructions (Initial Inspection and Diagnostic Overview) provides an overview of each diagnostic category.
Diagnostic Fault Information
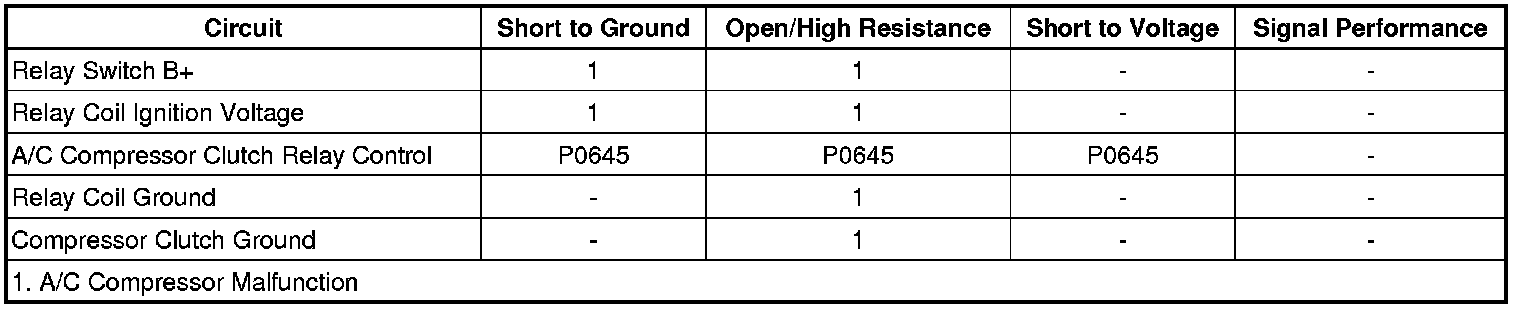
Circuit/System Description
When the A/C switch is pressed, the HVAC control module grounds the A/C request signal circuit. This input will request the engine control module (ECM) to ground the A/C compressor clutch relay control circuit, which will switch the A/C CMPRSR CLUTCH relay on. With the relay contacts closed, battery voltage is supplied to the A/C compressor clutch assembly.
Diagnostic Aids
The following conditions must be met in order for the ECM to turn on the compressor clutch:
* Battery voltage is between 9-18 volts
* Engine coolant temperature (ECT) is less than 123°C (253°F)
* Engine speed is greater than 600 RPM
* Engine speed is less than 4,760 RPM
* A/C high side pressure is between 2929-269 kPa (39-425 psi)
* Throttle position is less than 100 percent
* Evaporator temperature is greater than 0°C (32°F)
* ECM does not detect excessive torque load
* ECM does not detect insufficient idle quality
* The ambient temperature is above 1°C (34°F)
Reference Information
Schematic Reference
HVAC Schematics (HVAC - Manual)
Connector End View Reference
Component Connector End Views (Connector Views)
Description and Operation
* Air Temperature Description and Operation (Air Temperature Description and Operation)
* Air Delivery Description and Operation (Air Delivery Description and Operation)
Electrical Information Reference
* Circuit Testing (Component Tests and General Diagnostics)
* Connector Repairs (Component Tests and General Diagnostics)
* Testing for Intermittent Conditions and Poor Connections (Component Tests and General Diagnostics)
* Wiring Repairs (Component Tests and General Diagnostics)
Scan Tool Reference
Control Module References (Programming and Relearning) for scan tool information
Circuit/System Verification
1. Engine running
2. Press the A/C request switch. The A/C compressor clutch should engage.
3. Place the mode switch in the defrost position. The A/C compressor clutch should engage.
• If the clutch does not engage refer to Air Conditioning (A/C) System Performance Test (Initial Inspection and Diagnostic Overview)
Circuit/System Testing
1. Ignition OFF, disconnect the X2 harness connector at the HVAC control module.
2. Test for less than 1.0 ohm between the ground circuit terminal and ground.
• If greater than the specified range, test the ground circuit for an open/high resistance.
3. Remove the A/C compressor clutch relay.
4. Verify that a test lamp illuminates between the ignition circuit terminal 85 and ground.
• If the test lamp does not illuminate, test the ignition circuit for a short to ground or an open/high resistance.
5. Verify that a test lamp illuminates between the B+ circuit terminal 30 and ground.
• If the test lamp does not illuminate, test the B+ circuit for an open/high resistance. If the A/C clutch fuse is open, test the relay switch control circuit for a short to ground. If all circuits test normal, test or replace the A/C compressor clutch.
6. Disconnect the harness connector at the A/C compressor clutch.
7. Ignition OFF test for less than 1.0 ohm between the A/C compressor ground circuit terminal 2 and ground.
• If greater than the specified range, test the ground circuit for an open/high resistance.
8. Connect the harness connector at the A/C compressor clutch.
9. Connect a 10-amp fused jumper wire between the B+ circuit terminal 30 and the control circuit terminal 87. Verify the A/C compressor clutch engages.
• If the A/C compressor clutch does not activate, test the control circuit for an open/high resistance. If the circuit tests normal, test or replace the A/C compressor.
10. Connect a test lamp between the control circuit terminal 86 and the B+ circuit terminal 85.
11. Using a scan tool, command the A/C relay output ON and OFF. The test lamp should turn ON and OFF when changing between the commanded states.
• If the test lamp remains ON all the time, test the control circuit for a short to ground. If the circuit tests normal, replace the ECM.
• If the test lamp remains OFF all the time, test the control circuit for a short to voltage or an open/high resistance. If the circuit tests normal, replace the ECM.
12. If all circuits test normal, test or replace the A/C compressor.
Repair Instructions
Perform the Diagnostic Repair Verification (Verification Tests) after completing the diagnostic procedure.
* Air Conditioning Compressor Replacement (LL8) (Service and Repair)Air Conditioning Compressor Replacement (LH6, LS2) (Service and Repair)
* Control Module References (Programming and Relearning) for HVAC control module and ECM replacement, setup, and programming