Coolant Recovery Reservoir Replacement
Coolant Recovery Reservoir Replacement
Removal Procedure
1. Remove the air cleaner assembly. Refer to Air Cleaner Assembly Replacement (Service and Repair) for the 4.2L engine or Air Cleaner Assembly Replacement (Service and Repair) for the 4.8L, 5.3L, 6.0L, 6.2L, or 7.0L engine.
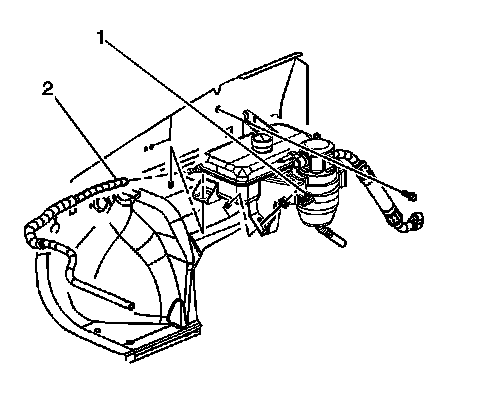
2. Remove the bracket bolt securing the accumulator to the coolant recovery reservoir (1).
3. Disconnect the electrical connector from the A/C pressure switch and reposition accumulator.
4. Remove the coolant hoses from the coolant recovery reservoir and plug the hoses and the coolant recovery reservoir outlets with suitable plugs (2).
5. Remove the nut and bolt securing the coolant recovery reservoir.
6. Remove the coolant recovery reservoir.
Installation Procedure
1. Install the coolant recovery reservoir.
Caution: Refer to Fastener Caution (Fastener Caution).
2. Install the coolant recovery reservoir bolt.
Tighten the bolt to 12 Nm (106 lb in).
3. Install the coolant recovery reservoir nut.
Tighten the nut to 10 Nm (89 lb in).
4. Install the coolant hose to the coolant recovery reservoir (2).
5. Install the accumulator to the coolant recovery reservoir and connect the electrical connector to the A/C low pressure switch.
6. Secure the accumulator with the bracket and the bolt (1).
Tighten the nut to 10 Nm (89 lb in).
7. Install the air cleaner assembly. Refer to Air Cleaner Assembly Replacement (Service and Repair) for the 4.2L engine or Air Cleaner Assembly Replacement (Service and Repair) for the 4.8L, 5.3L, 6.0L, 6.2L, or 7.0L engine.